Rapid7 has successfully completed an Information Security Registered Assessors Program (IRAP) assessment to PROTECTED Level for several of our Insight Platform solutions.
What is IRAP?
An IRAP assessment is an independent assessment of the implementation, appropriateness, and effectiveness of a system’s security controls. Achieving IRAP PROTECTED status means Australian Government agencies requiring PROTECTED level controls can access our industry-leading, practitioner-first security solutions. Meeting this status further strengthens our position as a trusted partner for Australian government organizations seeking to enhance their cybersecurity posture.
Rapid7 is one of the only vendors to be IRAP-assessed across what we consider a consolidated cybersecurity operation. This places us in a unique position to supply services across federal, state, and local government in Australia. It provides our government customers with the confidence that we have the right governance and controls in place for our own business in order to deliver that service effectively for our customers, specifically covering:
Vulnerability management on traditional infrastructure
Endpoints
The secure implementation of web applications
Detection and response to alerts or threats
The ability to securely automate workflows
Why is being IRAP PROTECTED important?
Being IRAP-assessed demonstrates our commitment to providing secure and reliable information security services for Government Systems, Cloud Service Providers, Cloud Services, and Information and Communications Technology (ICT) Systems, and more widely to our Australian customers.
Importantly, it highlights how we take the shared responsibility model extremely seriously. It also shows we’re protecting our customers’ information and data across their traditional infrastructure and in the cloud.
Which solutions are approved?
Solutions assessed and approved for PROTECTED Level include InsightIDR (detection and response), InsightVM (vulnerability management), InsightAppSec (application security), and InsightConnect (orchestration and automation). These solutions provide a comprehensive security platform to help government agencies tackle the challenges of today's evolving cybersecurity landscape.
The successful completion of the IRAP assessment at the PROTECTED level demonstrates our commitment to supporting Australian government customers. It means they have access to a comprehensive security platform necessary to tackle the ever-evolving challenges of today's cybersecurity landscape.
As more government agencies migrate to hybrid cloud environments, we can help them better manage the growing complexity of identifying and securing the attack surface.
As attackers become increasingly sophisticated, better armed, and faster, the IRAP assessment is yet another string in our cybersecurity bow, showcasing our potential to support Australian Government agencies and more widely, our customers.
The PCI Security Standards Council (PCI SSC) is a global forum that connects stakeholders from the payments and payment processing industries to craft and facilitate adoption of data security standards and relevant resources that enable safe payments worldwide.
According to the PCI SSC website, “PCI Security Standards are developed specifically to protect payment account data throughout the payment lifecycle and to enable technology solutions that devalue this data and remove the incentive for criminals to steal it. They include standards for merchants, service providers, and financial institutions on security practices, technologies and processes, and standards for developers and vendors for creating secure payment products and solutions.”
Perhaps the most recognizable standard from PCI, their Data Security Standard (PCI DSS), is a global standard that provides a baseline of technical and operational requirements designed to protect account data. In March 2022, PCI SSC published version v4.0 of the standard, which replaces version v3.2.1. The updated version addresses emerging threats and technologies and enables innovative methods to combat new threats. This post will cover the changes to the standard that came with version 4.0 along with a high-level overview of how Rapid7 helps teams ensure their cloud-based applications can effectively implement and enforce compliance.
What’s New With Version 4.0, and Why Is It Important Now?
So, why are we talking about the new standard nearly two years after it was published? That’s because when the standard was published there was a two year transition period for organizations to adopt the new version and implement required changes that came with v4.0. During this transition period, organizations were given the option to assess against either PCI DSS v4.0 or PCI DSS v3.2.1.
For those that haven’t yet made the jump, the time is now This is because the transition period concluded on March 31, 2024, at which time version 3.2.1 was retired and organizations seeking PCI DSS certification will need to adhere to the new requirements and best practices. Important to note, there are some requirements that have been “future-dated.” For those requirements, organizations have been granted another full year, with those updates being required by March 31, 2025.
The changes were driven by direct feedback from organizations across the global payments industry. According to PCI, more than 200 organizations provided feedback to ensure the standard continues to meet the complex, ever-changing landscape of payment security.
Key changes for this version update include:
Flexibility in How Teams Achieve Compliance / Customized Approach
A primary goal for PCI DSS v4.0 was to provide greater flexibility for organizations in how they can achieve their security objectives. PCI DSS v4.0 introduces a new method – known as the Customized Approach – by which organizations can implement and validate PCI DSS controls Previously, organizations had the option of implementing Compensating controls, however these are only applicable when a situation arises whereby there is a constraint – such as legacy systems or processes – impacting the ability to meet a requirement.
PCI DSS v4.0 now provides organizations the means to choose to meet a requirement leveraging other means than the stated requirement. Requirement 12.3.2 and Appendices D and E outline the customized approach and how to apply it. To support customers, Rapid7’s new PCI DSS v4.0 compliance pack provides a greater number of insights than in previous iterations. This should lead to increased visibility and refinement in the process of choosing to mitigate and manage requirements.
A Targeted Approach to Risk Management
Alongside the customized approach concept, one of the most significant updates is the introduction of targeted risk analysis (TRA). TRAallows organizations to assess and respond to risks in the context of an organization's specific operational environment. The PCI council has published guidance “PCI DSS v4 x: Targeted Risk Analysis Guidance” that outlines the two types of TRAs that an entity can employ regarding frequency of performing a given control and the second addressing any PCI DSS requirement for when an entity utilizes a customized approach.
To assist in understanding and having a consolidated view of security risks in their cloud environments, Rapid7 customers can leverage InsightCloudSec Layered Context and the recently introduced Risk Score feature. This feature combines a variety of risk signals, assigning a higher risk score to resources that suffer from toxic combinations or multiple risk vectors.Risk score holistically analyzes the risks that compound and increase the likelihood or impact of compromise.
Enhanced Validation Methods & Procedures
PCI DSS v4.0 has provided improvements to the self-assessment (SAQ) document and to the Report on Compliance (RoC) template, increasing alignment between them and the information summarized in an Attestation of Compliance to support organizations in their efforts when self-attesting or working with assessors to increase transparency and granularity.
New Requirements
PCI DSS v4.0 has brought with it a range of new requirements to address emerging threats. With modernization of network security controls, explicit guidance on cardholder data protections, and process maturity, the standard focuses on establishing sustainable controls and governance. While there are quite a few updates - which you can find detailed here on the summary of changes - let’s highlight a few of particular importance:
Multifactor authentication is now required for all access into the Cardholder Data Environment (CDE) - req. 8.5.1
Encryption of sensitive authentication data (SAD) - req. 3.3.3
New password requirements and updated specific password strength requirements: Passwords must now consist of 12 characters with special characters, uppercase and lowercase - reqs. 8.3.6 and 8.6.3
Access roles and privileges are based on least privilege access (LPA), and system components operate using deny by default - req. 7.2.5
Audit log reviews are performed using automated mechanisms - req. 10.4.1.1
These controls place role-based access control, configuration management, risk analysis and continuous monitoring as foundations, assisting organizations to mature and achieve their security objectives. Rapid7 can help with implementing and enforcing these new controls, with a host of solutions that offer PCI-related support – all of which have been updated to align with these new requirements.
How Rapid7 Supports Customers to Attain PCI DSS v4.0 Compliance
InsightCloudSec allows security teams to establish, continuously measure, and illustrate compliance against organizational policies. This is accomplished via compliance packs, which are sets of checks that can be used to continuously assess your entire cloud environment - whether single or multi-cloud. The platform comes out of the box with dozens of compliance packs, including a dedicated pack for the PCI DSS v4.0.
InsightCloudSec assesses your cloud environments in real-time for compliance with the requirements and best practices outlined by PCI It also enables teams to identify, assess, and act on noncompliant resources when misconfigurations are detected. If you so choose, you can make use of the platform’s native, no-code automation to remediate the issue the moment it's detected, whether that means alerting relevant resource owners, adjusting the configuration or permissions directly or even deleting the non-compliant resource altogether without any human intervention. Check out the demo to learn more about how InsightCloudSec helps continuously and automatically enforce cloud security standards.
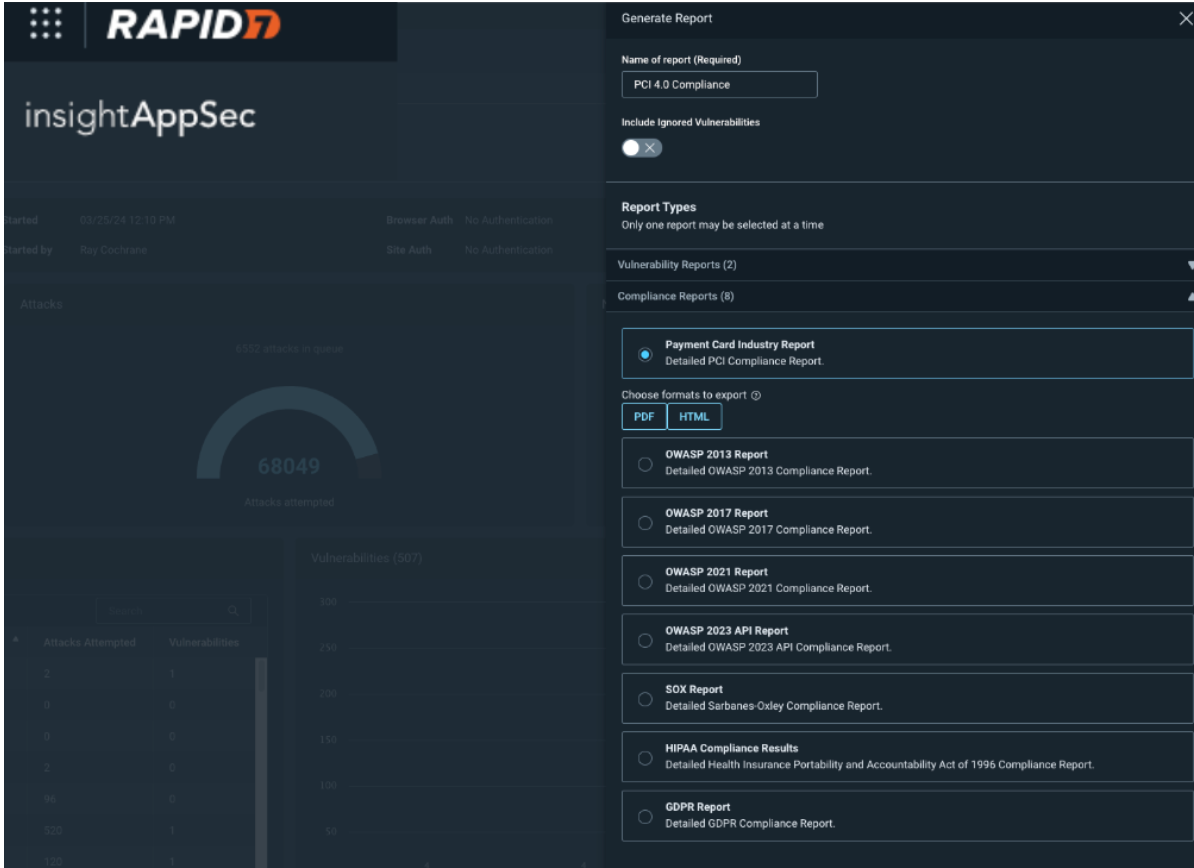
InsightAppSec also enables measurement against PCI v4.0 requirements to help you obtain PCI compliance. It allows users to create a PCI v4.0 report to help prepare for an audit, assessment or a questionnaire around PCI compliance. The PCI report gives you the ability to uncover potential issues that will affect the outcome or any of these exercises. Crucially, the report allows you to take action and secure critical vulnerabilities on any assets that deal with payment card data. PCI compliance auditing comes out of the box and is simple to generate once you have completed a scan against which to run the report.
InsightAppSec achieves this coverage by cross referencing and then mapping our suite of 100+ attack modules against PCI requirements, identifying which attacks are relevant to particular requirements and then attempting to exploit your application with those attacks to obtain areas where your application may be vulnerable. Those vulnerabilities are then packaged up in the PCI 4.0 report where you can see vulnerabilities listed by PCI requirements This provides you with crucial insights into any vulnerabilities you may have as well as enabling management of those vulnerabilities in a simplistic format.
For InsightVM customers, an important change in the revision is the need to perform authenticated internal vulnerability scans for requirement 11.3.1.2. Previous versions of the standard allowed for internal scanning without the use of credentials, which is no longer sufficient. For more details see this blog post.
Rapid7 provides a wide array of solutions to assist you in your compliance and governance efforts. Contact a member of our team to learn more about any of these capabilities or sign up for a free trial.
When scanning a web application in InsightAppSec, you might see it take several hours, if not several days, to run. This can be due to the size of your web app, but plenty of settings in your scan configuration can be modified to help scans complete faster.
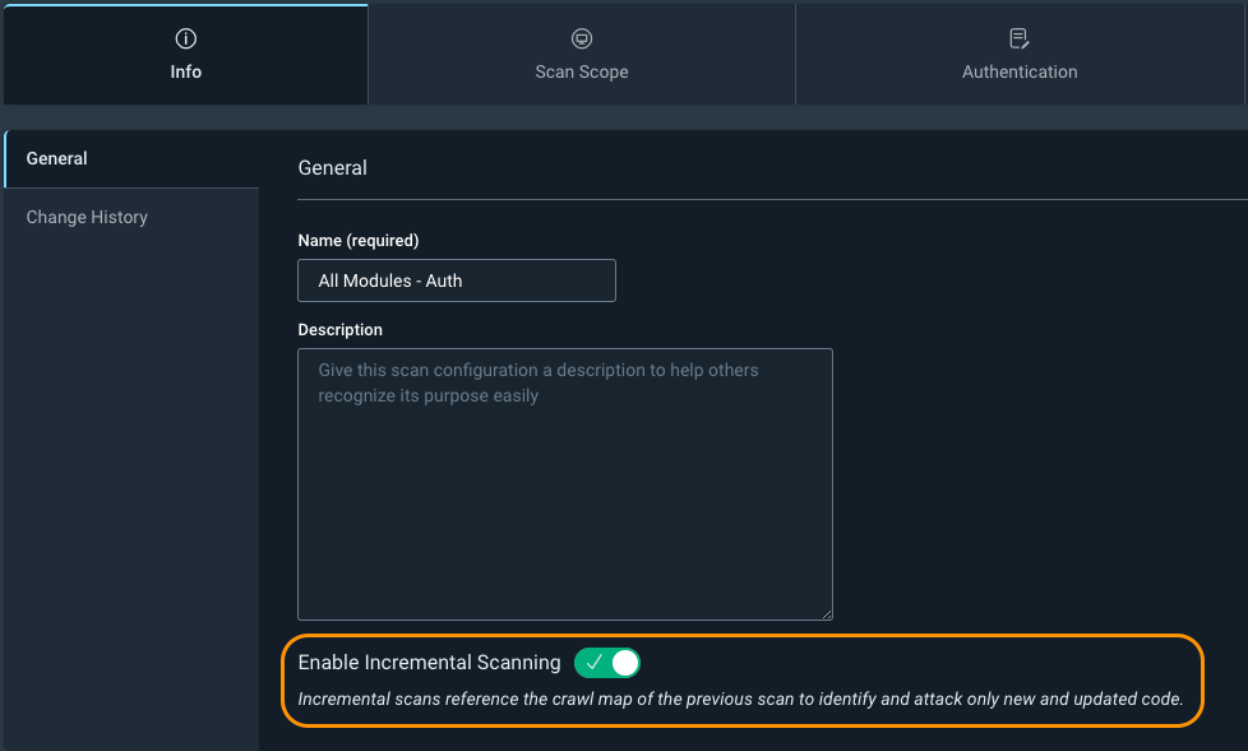
The first setting is Info -> Enable Incremental Scanning. Incremental scanning will take the crawl map of the previous scan and only hit new or updated web pages. It uses the crawl signature of a page, and if it doesn’t exist in the previous scan, or is different, then the scanner will attack it. This is especially useful if you have InsightAppsec as part of your CI/CD pipeline process, and you don't need to run a full scan every time a new build gets created. Just be aware that you will see fewer vulnerabilities on your web app because we are scanning fewer pages. It is still recommended you run periodic full scans of your web app without incremental scanning enabled to ensure maximum visibility into the vulnerability findings.
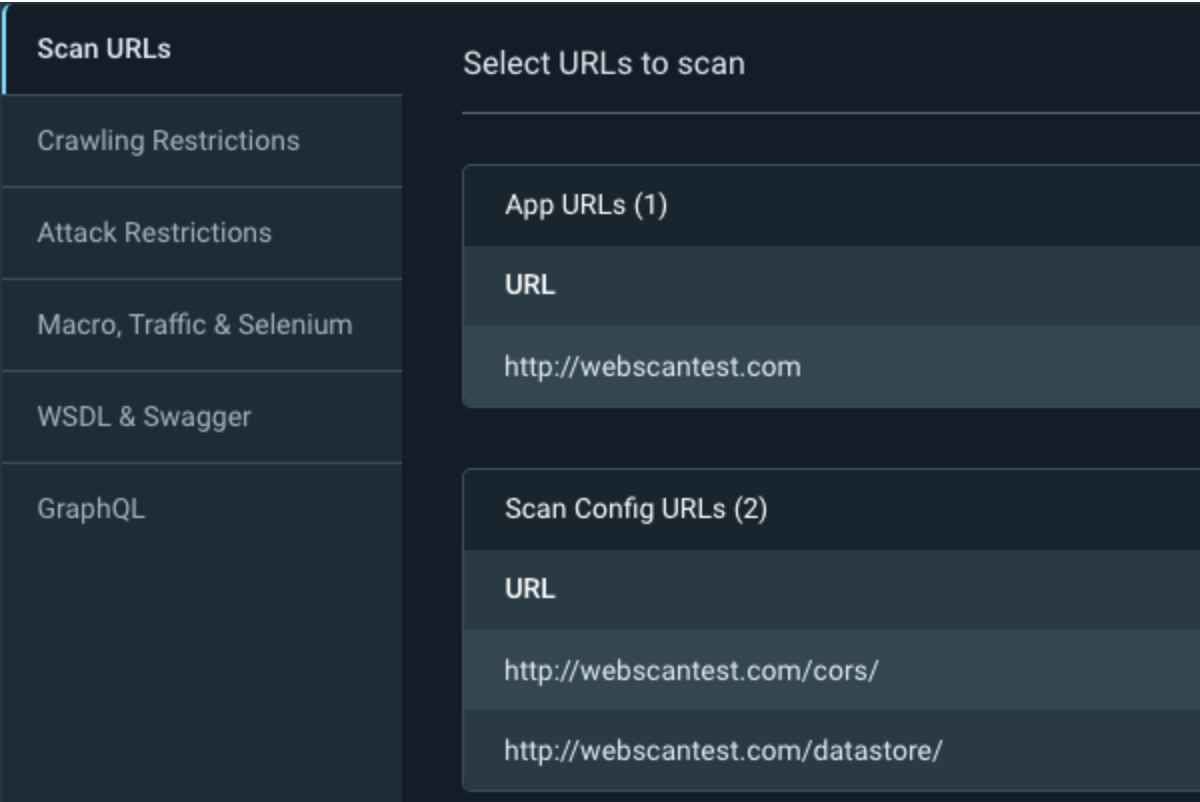
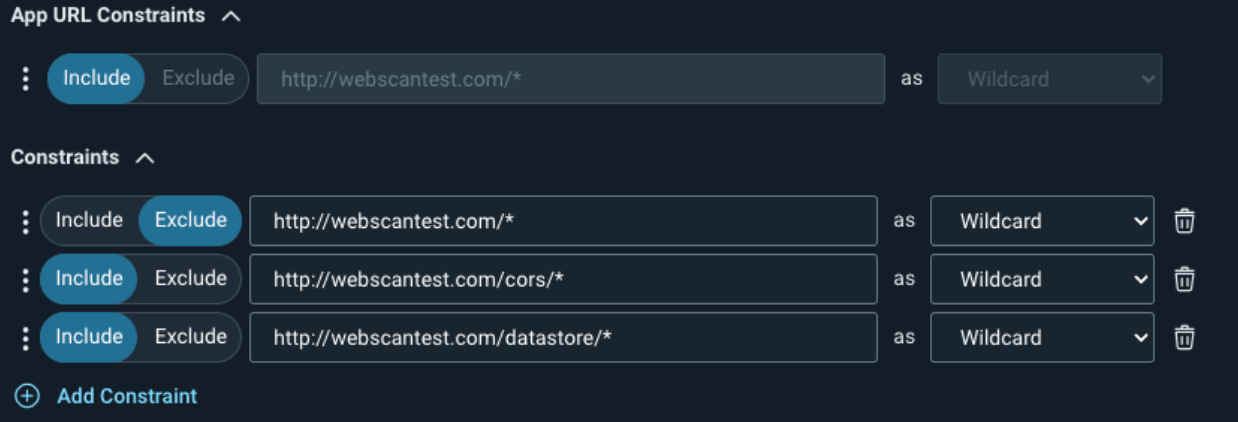
Your second option is Scan Scope -> Crawling Restrictions. This allows you to explicitly limit certain pages or directories from being crawled. For example, if you have product manuals in multiple languages, we don’t necessarily want to attack the same pages several times. We can explicitly allow one directory to be attacked while excluding another. In the example in the screenshot below, we are allowing the scan to hit the /manuals/EN/ directory while excluding all other directories under /manuals/.
Another trick with the crawl restrictions is the ability to tell InsightAppSec to only scan specific pages or directories. First, add the directories to the Scan Config URLs under your scan scope, and then specify the target directory under the Crawling Restrictions.
You can optionally add the constraints to the Attack Restrictions so the scan still crawls the target pages, but doesn’t attack them.
If you have a very large web app, an advanced use case would be to create several scan configurations, specify different directories in each one, and kick off multiple scans against your application at the same time. Be careful because this will multiply the traffic being sent to your web server for each scan configuration you create.
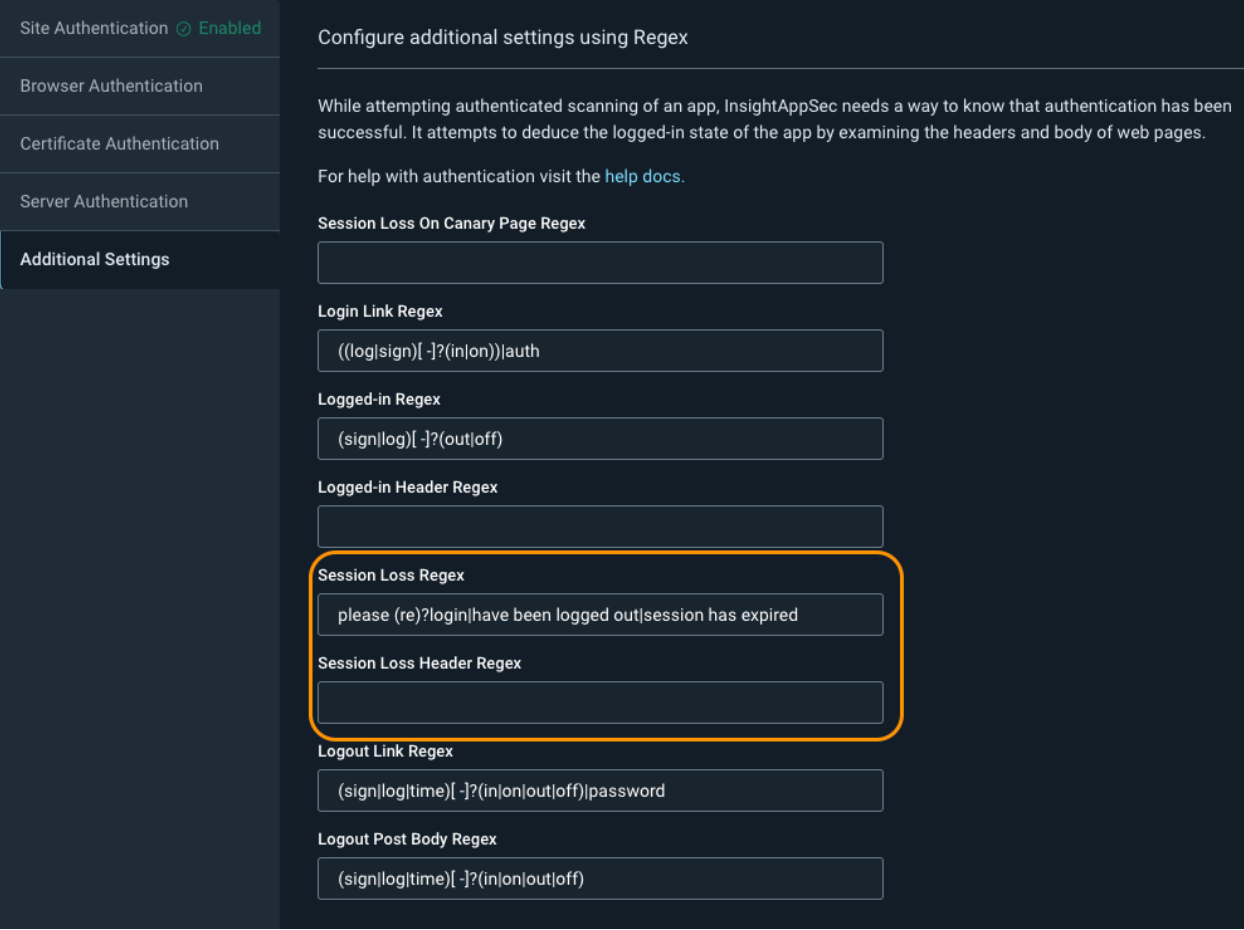
Next, we have Authentication -> Additional Settings. While you might not encounter this for all of your web applications, sometimes InsightAppSec will show that it was constantly detecting logouts in the scan logs. When this happens, the scan will attempt to log back in again, and if it keeps detecting these false session losses over and over, it can cause the scan to take a very long time to complete.
To fix this, we can adjust the Session Loss Regex or the Session Loss Header Regex depending on where the logs say the logout match was found, either in the response header or response body.
If the issue is in the header, it is recommended to delete the Session Loss Header Regex value and keep it blank. You can then change the Session Loss Regex to something that only exists on your login form. Some examples include: Remember my email|Forgot password?|Remember me|Keep me signed in|Stay signed in.
If the issue is in the body, you can remove the string that is causing the problem from the Session Loss Regex and add in additional strings from the example above for more accurate detection.
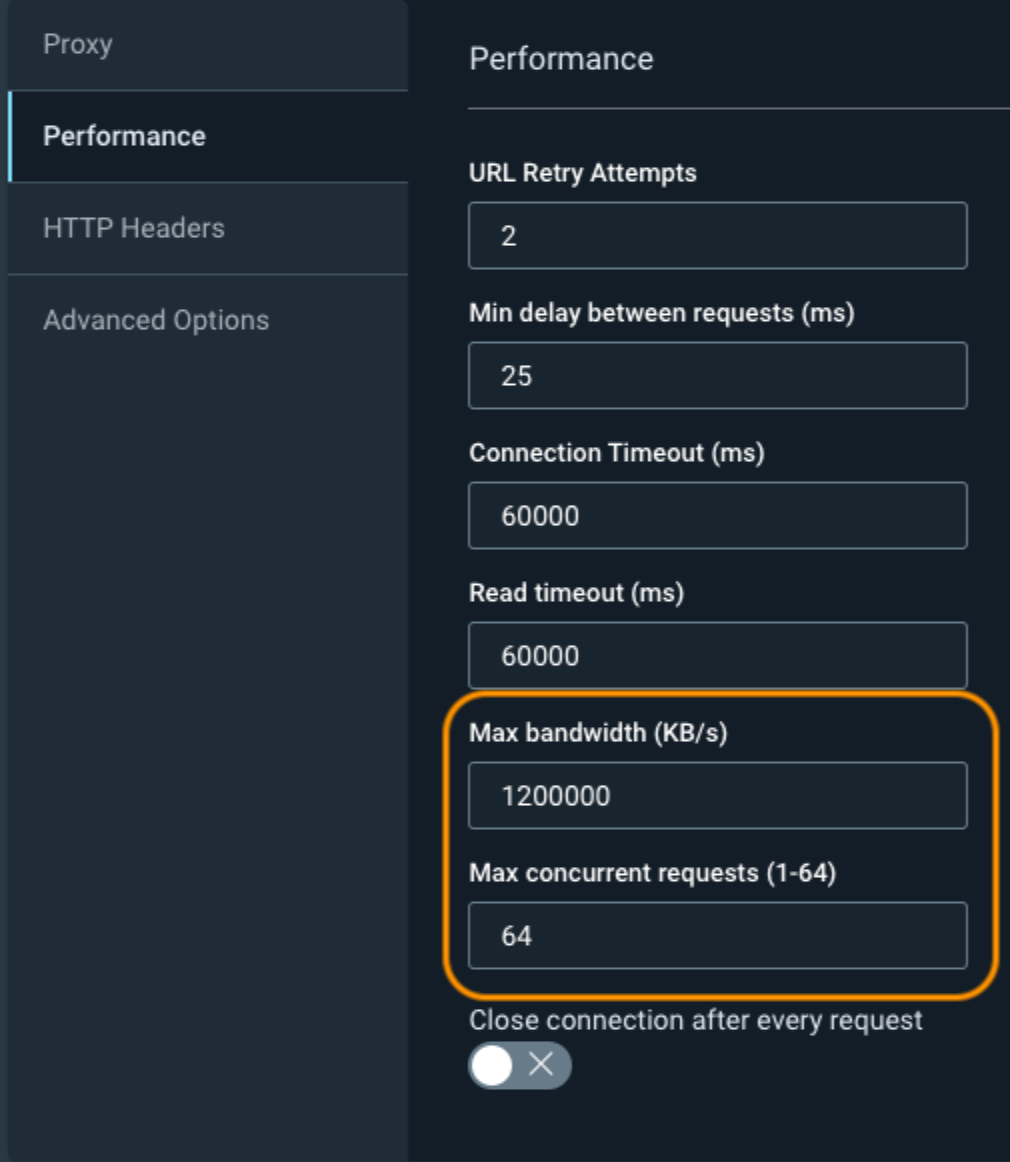
We now have Custom Options -> Performance, which you can adjust to increase the scan speed, but at the expense of hitting your web application harder. The two most common fields to adjust are the Max Bandwidth and Max Concurrent Requests.You should start by doubling these values and seeing how your web application responds to the increased traffic. If there are no issues, you can then continue to increase the values to what is shown in the screenshot below.
Optionally, you can adjust the URL Retry Attempts and the Min Delay Between Requests, but these have a much higher likelihood to cause problems for your web application or cause you to miss certain pages. Always work with your app developers to ensure that you don’t accidentally take down your application.
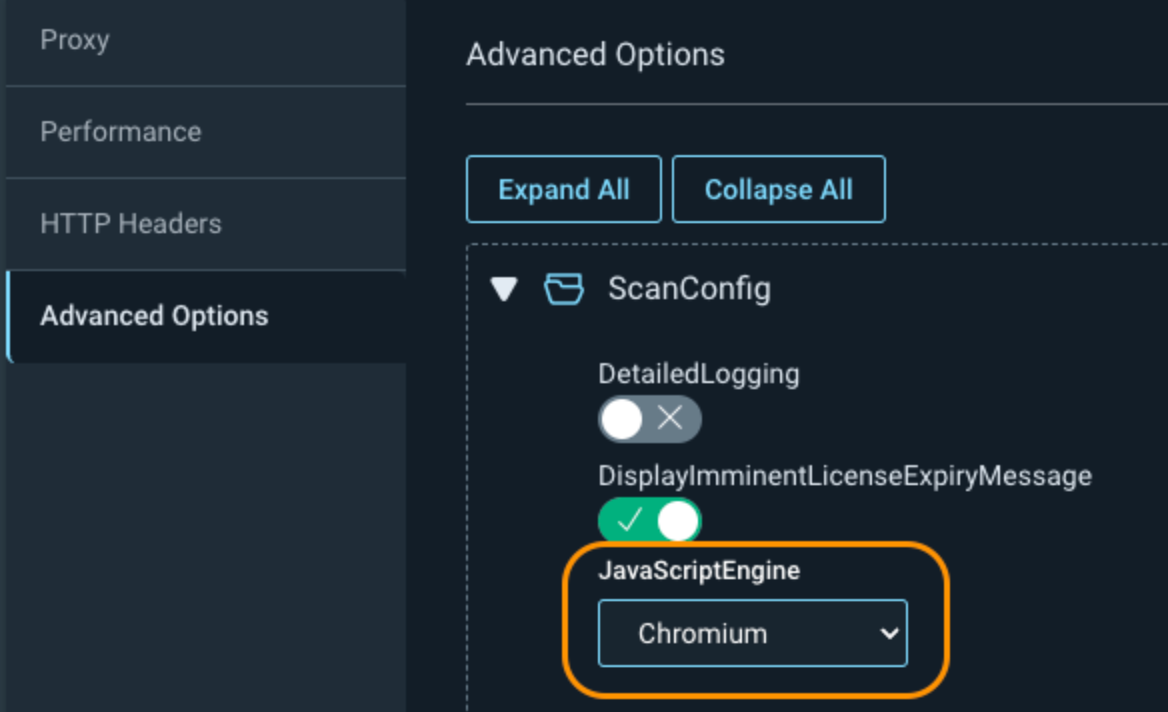
The next setting is under Custom Options -> Advanced Options -> ScanConfig -> JavaScriptEngine. This allows you to change the default engine that is used for your scan. Chrome is currently set by default, as it uses the older crawling engine. For faster and more accurate scanning, especially on modern web applications, this value should be switched to Chromium to benefit from Rapid7’s latest crawling engine.
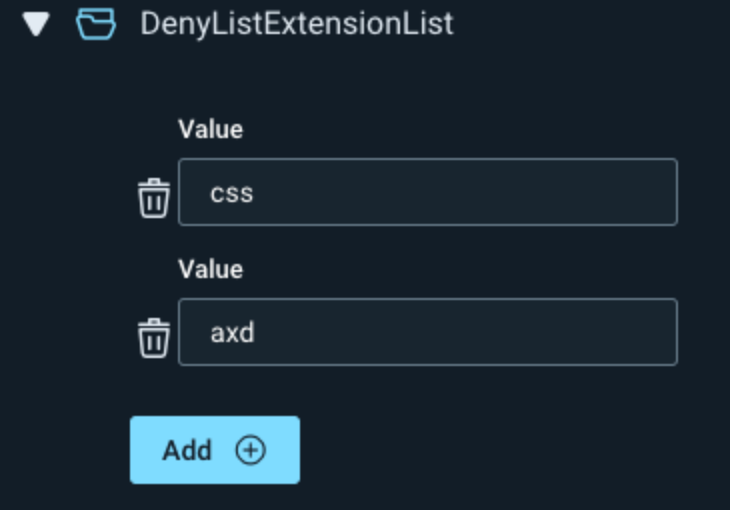
Also, under Advanced Options, if you don't want to scan specific page extensions, you can add them under either CrawlConfig or AttackerConfig -> DenyListExtensionList.
Optionally, if your scans are still running too slow, you can further adjust the Crawl Configuration and Attacker Configuration under the Advanced Options. More info can be found at the link below.
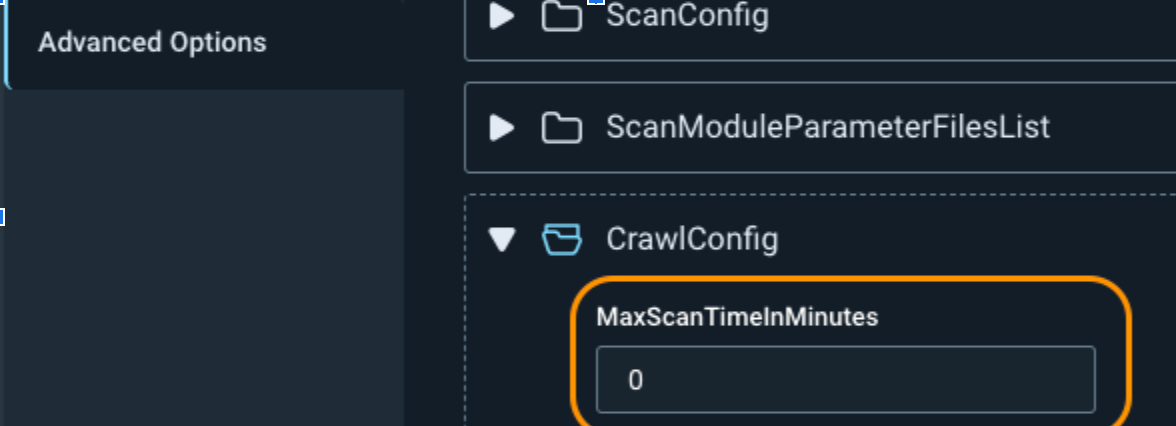
If you need to set a maximum amount of time for the scan to run, you can adjust the MaxScanTimeInMinutes under CrawlConfig. This stops the scan at a certain time, whether the scan is complete or not. This can cause your scan to miss directories and to not get a complete picture of your web application vulnerabilities, so only use it if absolutely necessary.
If you want to run faster validation scans, click into the scan results and click on Validate Scan, in the upper right, to only search for the vulnerabilities found during that scan. This has the added benefit of automatically adjusting the vulnerability status if the vulnerability is not found again. Just remember this isn’t running a full scan against your web application, so you won’t be discovering any new vulnerabilities.
There are many options for speeding up the amount of time it takes to run a scan. As always, if you continue to have issues with scan time or anything else scanning related, don’t hesitate to contact Rapid7 support for more assistance.
Accelerating the Remediation of Vulnerabilities From Code To Cloud
Written by Eric Sheridan, Chief Innovation Officer, Tromzo
In this guest blog post by Eric Sheridan, Chief Innovation Officer at valued Rapid7 partner Tromzo, you’ll learn how Rapid7 customers can utilize ASPM solutions to accelerate triaging, prioritization and remediation of findings from security testing products such as InsightAppSec and InsightCloudSec.
Application Security’s Massive Data Problem
Application Security teams have a massive data problem. With the widespread adoption of cloud native architectures and increasing fragmentation of development technologies, many teams amass a wide variety of specialized security scanning tools. These technologies are highly specialized, designed to carry out comprehensive security testing as a means of identifying as many vulnerabilities as possible.
A natural byproduct of their deployment at scale is that, in aggregate, application security (appsec) teams are presented with thousands – if not millions – of vulnerabilities to process. If you’re going to deploy advanced application security testing solutions, then of course a significant amount of vulnerability data is going to be generated. In fact, I’d argue this is a good problem to have. It’s like the old saying goes: You cannot improve what you cannot measure.
Here’s the kicker though: given a backlog of, lets say 200k vulnerabilities with a severity of “critical” across the entire product stack, where do you start your remediation efforts and why? Put another way: is this critical more important than that critical? Answering this question requires additional context, of which is often manually obtained by appsec teams. And how do you then disseminate that siloed vulnerability and track its remediation workflow to resolution? And can you replicate that for the other 199,999 critical vulnerabilities? This is what I mean when I say appsec teams have a massive data problem. Accelerating remediation, reducing risk, and demonstrating ROI requires us to be able to act on the data we collect at scale.
Overcoming Application Security’s massive data problem requires a completely new approach to how we operationalize vulnerability remediation, and this is exactly what Application Security Posture Management (ASPM) is designed to solve. In a recent Innovation Insight, Gartner defined ASPM as follows:
“Application security posture management analyzes security signals across software development, deployment and operation to improve visibility, better manage vulnerabilities and enforce controls. Security leaders can use ASPM to improve application security efficacy and better manage risk.” - Gartner
Obtaining and analyzing “security signals” requires integrations with various third party technologies as a means of deriving the context necessary to better understand the security implications of vulnerabilities within your enterprise and its environment. To see this in action, let’s revisit the question: “Is this critical more important than that critical?” A robust ASPM solution will provide you context beyond just the vulnerability severity as reported by the security tool. Is this vulnerability associated with an asset that is actually deployed to production? Is the vulnerability internet-facing or internal only? Does either of these vulnerable assets process sensitive data, such as personally identifiable information (PII) or credit card information? By integrating with third party services such as Source Code Management systems and Cloud runtime environments, for example, ASPM is able to enrich vulnerabilities so that appsec teams can make more informed decisions about risk. In fact, with this additional context, an ASPM helps Application Security teams identify those vulnerabilities representing the greatest risk to the organization.
Identifying the most significant vulnerabilities is only the first step, however. The second step is automating the remediation workflow for those vulnerabilities. ASPM enables the scalable dissemination of security vulnerabilities to their respective owners via integration with the ticketing and work management systems already in use by your developers today. Better yet, Application Security teams can monitor the remediation workflow of vulnerabilities to resolution all from within the ASPM. From a collaboration perspective, this is a massive win-win: development teams and appsec teams are able to collaborate on vulnerability remediation using their own respective technologies.
When you put all of this together, you’ll come to understand the greatest value-add provided by ASPM and realized by our customers at Tromzo:
ASPM solutions accelerate the triage and remediation of vulnerabilities representing the greatest risk to the organization at scale.
ASPM Core Capabilities
Effectively delivering on an integrated experience that accelerates the triage and remediation of vulnerabilities representing the greatest risk requires several core capabilities:
The ability to aggregate security vulnerabilities across all scanning tools without impeding your ability to use the best-in-class security testing solutions.
The ability to integrate with and build context from development tools across the CI/CD pipeline.
The ability to derive relationships between the various software assets and security findings from code to cloud.
The ability to express and overlay organizational- as well as team-specific security policies on top of security vulnerabilities.
The ability to derive actions and insights from this metadata that help prioritize and drive to remediation the most significant vulnerabilities.
Doing this effectively requires a tremendous amount of data, connectivity, analysis, and insight. With integrations across 70+ tools, Tromzo is delivering a best-in-class remediation ASPM solution.
How Rapid7 Customers Benefit from an ASPM Solution
By its very nature, ASPM fulfills the need for automation and efficiency of vulnerability remediation via integration across various security testing solutions and development technologies. With efficiency comes real cost savings. Let’s take a look at how Rapid7 customers can realize operational efficiencies using Tromzo.
Breaking Down Security Solution Silos
Rapid7 customers are already amassing best-in-class security testing solutions, such as InsightAppSec and InsightCloudSec. ASPM enables the integration of not only Rapid7 products but all your other security testing products into a single holistic view, whether it be Software Composition Analysis (SCA), Static Application Security Testing (SAST), Secrets Scanning, etc. This effectively breaks down the silos and operational overhead with individually managing these stand-alone tools. You’re freeing yourself from the need to analyze, triage, and prioritize data from dozens of different security products with different severity taxonomies and different vulnerability models. Instead, it’s: one location, one severity taxonomy, and one data model. This is a clear win for operational efficiency.
Accelerating Vulnerability Remediation Through Deep Environmental and Organizational Context
Typical security teams are dealing with hundreds of thousands of security findings and this takes us back to our question of “Is this critical more important than that critical?”. Rapid7 customers can leverage Application Security Posture Management solutions to derive additional context in a way that allows them to more efficiently triage and remediate vulnerabilities produced by best-of-breed technologies such as InsightAppSec and InsightCloudSec. By way of example, let’s explore how ASPM can be used to answer some common questions raised by appsec teams:
1. Who is the “owner” of this vulnerability?
Security teams spend countless hours trying to identify who introduced a vulnerability so they can identify who needs to fix it. ASPM solutions are able to help identify vulnerability owners via the integration with third party systems such as Source Code Management repositories. This automated attribution serves as a foundation to drive remediation by teams and individuals that own the risk.
No more wasted hours!
2. Which vulnerabilities are actually deployed to our production environment?
One of the most common questions that arises when triaging a vulnerability is whether it is deployed to production. This often leads to additional questions such as whether it is internet-facing, how frequently the asset is being consumed, whether the vulnerability has a known exploit, etc. Obtaining answers to these questions is tedious to say the least.
The “code to cloud” visibility offered by ASPM solutions allows appsecteams to quickly answer these questions. By way of example, consider a CVE vulnerability found within a container hosted in a private registry. The code-to-cloud story would look something like this:
A developer wrote a “Dockerfile” or “Containerfile” and stored it in GitHub
GitHub Actions built a Container from this file and deployed it to AWS ECR
AWS ECS pulled this Container from ECR and deployed it to Production
With an integration into GitHub, AWS ECR, and AWS ECS, we can confidently conclude whether or not the Container hosted in AWS ECR is actually deployed to production via AWS ECS. We can even take this further: By integrating within GitHub, we can even map the container back to the corresponding Dockerfile/Containerfile and the team of developers that maintain it.
No more laborious meetings!
3. Does this application process PII or credit card numbers?
Appsecteams have the responsibility of helping their organization achieve compliance with various regulations and industry standards, including GDPR, CCPA, HIPAA, and PCI DSS. These standards place emphasis on the types of data being processed by applications, and hence appsec teams can understand what applications process what types of sensitive data. Unfortunately, obtaining this visibility requires security teams to create, distribute, collect, and maintain questionnaires that recipients often fail to complete.
ASPM solutions have the ability to derive context around the consumption of sensitive data and use this information to enrich applicable security vulnerabilities. A vulnerability deployed to production that stands to disclose credit card numbers, for example, will likely be treated with the highest of priority as a means of avoiding possible fines and other consequences associated with PCI DSS.
No more tedious questionnaires!
4. How do I automate ticket creation for vulnerabilities?
Once you know what needs to be fixed and who needs to fix it, the task of remediating the issue needs to be handed off to the individual or team that can implement a fix. This could involve taking hundreds or thousands of vulnerabilities, de-duplicating them, and grouping them into actionable tasks while automating creation of tickets in a format that is consumable by the receiving team. This is a complex workflow that not only involves automating correctly formatted tickets with the right level of remediation information, but also tracking the entire lifecycle of that ticket until remediation, followed by reporting of KPIs. ASPM solutions like Tromzo are perfectly suited to automate these ticketing and governance workflows, since ASPMs already centralize all vulnerabilities and have the appropriate contextual and ownership metadata.
Leverage ASPM to Accelerate Vulnerability Remediation
ASPM solutions enable Rapid7 customers to accelerate the remediation of vulnerabilities found by their preferred security testing technologies. With today’s complex hybrid work environments, the increased innovation and sophistication of attackers, and the underlying volatile market, automated code to cloud visibility and governance is an absolute must for maximizing operational efficiency and Tromzo is here to help. Check out www.tromzo.com for more information.
There are many different ways to use InsightAppSec to authenticate to web apps, but sometimes you need to go deeper into the advanced settings to fully automate your logins, especially with API scanning. Today, we’ll cover one of those advanced settings: Token Replacement.
InsightAppSec Token Replacement can be used to capture and replay Bearer Authentication tokens, JWT Authentication tokens, or any other type of session token.
The token replacement values are under your scan configs in the following location: Custom Options > Advanced > AuthConfig > TokenReplacementList
When you press Add, the following values can be set.
Name
Description
Possible Values
ExtractionTokenLocation
Where the token you want to extract is located.
Request HeaderRequest BodyRequest URLResponse HeadersResponse Body
ExtractionTokenRegex
Regex used to extract the token. Anything placed in brackets can be returned in the InjectionTokenRegex using @token@.
Any regex, such as:"token": ?"([^"]*)"access_token": ?"([-a-f0-9]+)"[?]sessionId=([^&]*)
InjectionTokenLocation
Where the captured token should be injected.
Request URLRequest HeadersRequest Body
InjectionTokenRegex
The format in which the token should be sent to the web app. @token@ is replaced with the value captured by ExtractionTokenLocation.
Any string. @token@ is replaced with the captured value. Such as:Authorization: Bearer @token@Authorization: Token @token@&sessionId=@token@
Why Token Replacement?
Under Custom Options > HTTP Headers > Extra Header, you can manually pass an authentication token to your web app. While this is the easiest way to set up this form of authentication, unless you generate a token that will not expire, you will have to replace this token every scan. Automating this process using token replacement will save you time and effort in the long run, especially if you have multiple apps you need to generate tokens for.
For this example, we will be using the Rapid7 Hackazon web app. If you want to configure your own Hackazon instance, details around installation and setup can be found here.
Alternatively, there are free public test sites you can use instead, such as this one.
The main difference you’ll encounter when using the Hackazon web app is the API authentication does not have a UI, therefore we must record and pass a traffic file for InsightAppSec to authenticate.
We will use Postman to send the API request to the web app and Burp Suite to record the traffic. You could alternately use the Rapid7 Insight AppSec Toolkit, to record the traffic as well. Here is a video running through setup using the InsightAppSec Toolkit.
The first step is to set up your proxy settings. In Postman, you can go to Settings by clicking the gear icon in the upper right, and then clicking into the proxy settings. We’re going to set the proxy server to “localhost” and change the port to “5000”.
After setting the proxy in Postman, you must set it up in Burp Suite. In Burp, go to the Proxy tab, then click on Proxy Settings. Next, add a proxy listener, specifying port 5000 to match the setting in Postman. Then, set the interface to Loopback Only.
Go back to Postman, add your basic authentication, and then send the traffic. In Burp, click on the HTTP History tab, right click on the captured traffic, then click “Save Item”. Make sure you save the traffic as an xml file.
You can also record the traffic using the Rapid7 Insight AppSec Plugin, or from within the Chrome browser. Instructions for how to do this are located under Traffic Authentication or can be found here.
When recording using the Rapid7 Appsec Plugin, make sure that the recording includes the Bearer Auth or Token in the recorded details.
After recording the login, upload the traffic file to Site Authentication. Make sure you adjust the Logged-In Regex as well to make sure the scan doesn’t fail.
After authenticating to your web app and grabbing the token, the next step is to configure a regex to ensure the token is able to be extracted. There are a wide variety of ways to test the regex, but we will be using https://regex101.com/ for this example.
We will then grab the web app response containing the token info, paste it into the website, and configure a regular expression to ensure only the token is selected. In this use case, the expression "token": ?"([^"]*) was successful in only highlighting the info we want to extract. We can ensure that only the token is selected in capture Group 1 as that will be returned when we specify @token@ under the InjectionTokenRegex.
Next, we want to configure the TokenReplacementList.
Name
Value
Reason
ExtractionTokenLocation
Response Body
The token appeared in the body after authenticating
ExtractionTokenRegex
"token": ?"([^"]*)
This successfully isolated the auth token
InjectionTokenLocation
Request Header
Where the web app is expecting the token
InjectionTokenRegex
Authorization: Token @token@
The header format the web app is expecting
Make sure you upload the swagger API file. You can either upload the file or point InsightAppSec to the specific URL. You can optionally restrict the scan to just the swagger file for more targeted scanning.
To ensure we were successful, click Download Additional Logsfrom the Scan Logs page after the scan is complete and open the Operation log file. You are looking for the log entry “[good]: Added imported token from response body”.Once you see this, you know the taken was imported into the scan properly and we were able to use it to log in to the API.
For further testing, you can look in the vulnerability traffic requests to ensure the Authorization: Token header has been passed successfully.
To detect if the token has expired, you can modify the sessionLossRegex and sessionLossHeaderRegex under Authentication > Additional Settings, or by using a CanaryPage if that has been set up. When configured correctly, the token replacement will grab the token again, ensuring we stay logged in to your API.
Further information on configuring Scan Authentication can be found here. When in doubt, please reach out to your web app developers and/or Rapid7 support for assistance.
For complete visibility into the vulnerabilities in your environment, proper authentication to web apps in InsightAppSec is essential. In this article, we’ll look at issues you might encounter with macro, traffic, and selenium authentication and how to troubleshoot them. Additionally, you’ll get practical and actionable tips on using InsightAppSec to its full potential.
The first step to troubleshooting InsightAppSec authentication is to look over the scan logs. The scan logs can be located under the scan in the upper left hand corner. The logs can give you useful information such as if the authentication fails, the website is unavailable, or if any other problems arose during the scan.
Event log will give you information about the scan itself.
Platform event log will give you information about the scan engine and if it encountered any issues during the scan.
Download additional logs: If you wanted to dive even deeper into what happened during the scan, you can to to look into the full scan logs.
Let’s look at some of the specific issues you might encounter with the different types of authentication noted above.
Macro Authentication
When a macro fails, the logs will give you the specific step where the macro had trouble. For example, in the image below, we can see that the macro failed on step 4, where it could not click on the specific object on the page. This could be caused by the page not loading quick enough, the name or ID of the element path changing, or the web app UI being different.
If you determine that the macro failed because the page isn’t loading fast enough, there are two ways you can slow the macro down.
The first way is to manually add a delay between the steps that are running too quickly. You can copy any of the delays that are currently in the macro, paste them into the spot that you want to slow down, and then change the step numbers. This way you can also set the specific duration for any delays you add into your macro.
The second way is to add additional delays throughout the macro, and change the Min Duration so the delays last longer. This is controlled via the export settings menu on the right. The default minimum duration is set to 3,000 milliseconds (3 seconds). Increasing the duration or adding delays will cause the macro to take longer to authenticate, but when running a scan overnight an extra few minutes to ensure the login works is a good tradeoff.
One other potential problem when recording a macro is when you have a password manager autofill the username and password. Anything that is automatically filled in will not be recorded by the macro. It is recommended to either turn off any password managers when recording a macro, or recording in Incognito/private browsing with all other plugins disabled to ensure nothing can modify or mess with the recording.
Lastly, if you have any events on your web app, such as a prompt to join a mailing list, that does not happen every time, you can mark that macro event as optional. If the event is not marked optional, then the macro will fail as it is unable to see the element on the page. Simply change the optional flag in the macro recording from 0 to 1 and you’re all set.
Traffic Authentication
While traffic authentication is usually successful when the login is working, there could still be some problems with playback. When traffic authentication fails, the scan logs don’t give you specific information like with macro authentication. Instead, the traffic authentication fails with the LoggedInRegex did not detect logged in state error. If you can’t get the traffic authentication working in the Rapid7 Appsec Plugin, you can always record the authentication within your browser.
For Chrome:
Click on the hamburger menu in the upper right.
Go to More Tools → Developer Options
Click on Network in the top tab
Make sure the dot in the upper left is red to signify you are recording.
Log in to your web app and when complete, right click on the recorded traffic and click Save all as HAR with content.
This will download the same .HAR file that the Appsec Plugin records, allowing you to use it for scanning.
Depending on how your web app responds, you might need to change the Use agent setting for how InsightAppsec interacts with your app.
Under your scan configuration, if you go to advanced options→HTTP Headers→User agent, you can then change what user agent is used to reach out to your web app. The latest version of Chrome should be fine for most modern web apps, but if you’re scanning a mobile app or an app that hasn’t been updated in a few years it might benefit from being changed.
The third primary type of authentication is selenium. Selenium is similar to the macro authentication where you record all the actions to log in to your web app. Selenium is similar to traffic authentication where you will usually receive the LoggedInRegex did not detect logged in state error in the scan logs rather than specific information about the failure.
If the Selenium script could not find specific elements on the web page, you could also receive the Could not execute Selenium script error. This means there’s a problem with the script itself, the page didn’t load fast enough, or it couldn’t find the specific element on the web page. If this happens, try re-recording the script or adding a delay.
Using the plugin to record selenium scripts:
Click on the selenium plugin and Record a new test in a new project.
Give the project a name and enter in the base URL where you want recording to start.
In the new window that appears, log in to your web app. Once complete, close out of the window.
Before saving, you can click on the play icon to replay and test your selenium script.
Review the recording and then click on the save button in the upper right. You can then upload the .side file into InsightAppSec.
Just like macro authentication, if your website takes a while to load and the selenium script is running too fast, you can add additional delays to slow it down. There are implicit waits built into the IDE commands but if those don’t work for you, after running the authentication, you can add in wait for element commands to your selenium script.
Right click on the selenium recording and click insert new command
Set the command to wait for element visible
Set the target to the element you want to wait for. In this case, we’re waiting for id=email
By default the value is set to wait for 30,000 milliseconds (30 seconds)
Alternatively, you can use the pause command and set the value to how long you want the script to pause for. However, it is recommended to use the wait for element visible command if the web app responds at different times.
After ensuring the macro, traffic, and selenium files are working correctly, the next step in the authentication process is the logged-in regex. After the login is complete, InsightAppSec will look at the web page to find a logout button or look at the browser header for a session cookie. This can be modified by clicking into the scan configuration, navigating to the Authentication tab, and clicking on Additional Settings on the left.
Logged-in Regex
By default, the logged-in regex looks for sign out, sign off, log out and log off, with and without spaces between the words, on the web page.
One common problem is logged-in regex not seeing the logout button on the page before ending the authentication recording. If the logout button is on another page, or sometimes under a dropdown menu, the logged-in regex won’t detect it on the page, causing the authentication to fail.
Another common issue is if the logout button is an image or otherwise can’t be detected on the page. As the field is looking for a regular expression, you can use other words on the page to determine that the login was successful. You have to ensure that the word only appears on the page after logging in, such as the username. Otherwise the login might not actually be successful.
Logged-in Header Regex
Depending on how your web app is structured, you might need to use the logged-in header regex instead. For example, if there is no logout button, or if you have a single page web app that calls javascript files, the logged-in regex is more likely to fail. What you can do instead is grab the session ID cookie from the web browser, and if that is detected, then the regex will be successful.
In Chrome:
Click on the three dots in the upper right corner
Then go to more tools and then developer options.
Click on the application tab at the top, then cookies on the left, and finally the web app cookie.
From there you want to find the session information cookie that only appears after logging in to the web app. Grab the name of the cookie and place that in the logged-in header regex.
The logged-in regex and logged-in header regex use AND logic, so if you put information in both fields, it will then need both to be successful in order for the login to work. Alternatively, if you remove the regex from both fields, it won’t run any post authentication checks, assuming the login is successful. It is recommended to do that as a last resort, you won't be alerted if the login does start failing or if there are any other problems.
Other common issues and tricks
One issue you might encounter is where you start the authentication recording. For example, starting the recording after a page redirect. If your web app redirects to another page or SSO, and you start the authentication recording after the redirect, InsightAppSec won’t have the session information to properly redirect back to the target web app when it gets replayed during the scan. It is recommended to always start your recording on the root web app directory wherever possible.
You can also choose specific directories for scanning versus the entire web app. You want to remove the URL from the app Target URLs, and add it in specifically under the scan config. You can then set the target directory in the crawl and attack configs as literal, and then add a /* wildcard to hit any subdirectories.
Lastly, there is a way to restrict certain elements on a web page from being scanned. Under advanced options → CrawlConfig and AttackerConfig, there’s an option called ScopeConstraintList. This is where you can explicitly include or exclude specific pages from being scanned. You can take it a step further by adding a httpParameterList to explicitly exclude certain elements on the page from being scanned. For example, if you have a contact us page and you don't want the scanner to hit the submit button, you can add it to the httpParameterList so it won’t be touched.
Below is an example of what the fields look like in the web page source code, and how it can be configured in IAS.
Email field source code: input type="email" name="contact_email"
GraphQL is an open-source data query and manipulation language that can be used to build application program interfaces (APIs). Since its initial inception by Facebook in 2012 and subsequent release in 2015, GraphQL has grown steadily in popularity. Some estimate that by 2025, more than 50% of enterprises will use GraphQL in production, up from less than 10% in 2021.
Unlike Rest APIs, which return information called from an endpoint and require the user to extract applicable information, GraphQL allows the user to query specific data from a GraphQL schema and return precise results.
Although GraphQL is relatively new and allows you to query exactly what you require, it is still prone to the same common vulnerabilities as other APIs. There are weaknesses that attackers can exploit to gain access to sensitive data, making securing GraphQL extremely important. The ability to scan a GraphQL schema will help to remediate those weaknesses and provide additional API security coverage.
Why GraphQL security is important
While there are numerous benefits to adopting GraphQL, the security implications are less well-understood. Can functionality be abused? What problems come with querying flexibility? Which vulnerabilities can be exploited? These are all points of concern for its use base.
GraphQL is also no different from other APIs in terms of potential attack vectors. Indeed, it has its own unique security vulnerabilities on top of those you would encounter through a REST API.
As we discussed in our recent post on API security best practices, APIs are a lucrative target that can allow hackers to gain access to an otherwise secure system and exploit vulnerabilities. Not only do APIs often suffer from the same vulnerabilities as web applications — like broken access controls, injections, security misconfigurations, and vulnerabilities inherited from other dependent code libraries — but they are also more susceptible to resource consumption and rate limiting issues due to the automated nature of their users.
Best practices for securing GraphQL
The first step in securing your GraphQL endpoint is to familiarize yourself with some of the most common vulnerabilities and best practices to protect against potential exposure. The most common are injection vulnerabilities – such as SQL injection, OS command injection, and server-side request forgery – where the data provided in the arguments of a GraphQL request is injected into commands, queries, and other executable entities by the application code. Other common vulnerabilities include a lack of resource management that can enable a Denial of Service (DoS) attack, due to general graph/query complexity and the potential for large batch requests. Finally, broken access control vulnerabilities exist in GraphQL APIs in much the same way as in other applications and services, but they can be exacerbated by the segmented nature of GraphQL query resolvers.
There are several best practice recommendations which can be utilized to counter such attacks.
Only allow valid values to be passed - Values should be controlled via allow lists, custom validators and correct definitions.
Depth limiting - Restricting the depth of a query only to predetermined levels will allow control over the expense of a query and avoid tying up your back end unnecessarily.
Amount limiting - Restricting the amount of a particular object in a query will reduce the expense of the query by not allowing more than x objects to be called.
Query cost analysis - Checking how expensive a query may be before you allow it to run is a useful additional step to block expensive or malicious queries.
Control input rejections - Ensure you don’t overly expose information about the API during input rejections.
Introspection turned off - By default, introspection will be enabled on GraphQL, but simply disabling introspection will restrict what information the consumer can access and not allow them to learn everything about your API.
OWASP have also produced a really neat cheat sheet series, which provides an introduction to GraphQL, as well as a detailed rundown of best practices and common GraphQL attacks, to help teams with upskilling and securing GraphQL.
How to secure GraphQL
The second step in securing your GraphQL endpoint is right here with Rapid7! While almost every modern DAST solution can properly parse and understand requests to and responses from web applications and, in most cases, APIs, that doesn’t mean all those tools will specifically understand GraphQL. That’s why InsightAppSec has specifically added support for parsing GraphQL requests, responses, and schemas, so that it can properly scan GraphQL-based APIs. This new feature provides customers with the ability to scan GraphQL endpoints to identify and then remediate any vulnerabilities encountered.
Initial support will be provided to identify the following vulnerabilities:
SQL injection
Blind SQL injection
OS commanding
Server-side request forgery
Local file inclusion/remote file inclusion
To find out how to execute a GraphQL scan, check out our doc on the feature in InsightAppSec for additional information, support, and guidance.
On November 11th 2022, Rapid7 will for the first time publish and present state-of-the-art machine learning (ML) research at AISec, the leading venue for AI/ML cybersecurity innovations. Led by Dr. Stuart Millar, Senior Data Scientist, Rapid7's multi-disciplinary ML group has designed a novel deep learning model to automatically prioritize application security vulnerabilities and reduce false positive friction. Partnering with The Centre for Secure Information Technologies (CSIT) at Queen's University Belfast, this is the first deep learning system to optimize DAST vulnerability triage in application security. CSIT is the UK's Innovation and Knowledge Centre for cybersecurity, recognised by GCHQ and EPSRC as a Centre of Excellence for cybersecurity research.
Security teams struggle tremendously with prioritizing risk and managing a high level of false positive alerts, while the rise of the cloud post-Covid means web application security is more crucial than ever. Web attacks continue to be the most common type of compromise; however, high levels of false positives generated by vulnerability scanners have become an industry-wide challenge. To combat this, Rapid7's innovative ML architecture optimizes vulnerability triage by utilizing the structure of traffic exchanges between a DAST scanner and a given web application. Leveraging convolutional neural networks and natural language processing, we designed a deep learning system that encapsulates internal representations of request and response HTTP traffic before fusing them together to make a prediction of a verified vulnerability or a false positive. This system learns from historical triage carried out by our industry-leading SMEs in Rapid7's Managed Services division.
Given the skillset, time, and cognitive effort required to review high volumes of DAST results by hand, the addition of this deep learning capability to a scanner creates a hybrid system that enables application security analysts to rank scan results, deprioritise false positives, and concentrate on likely real vulnerabilities. With the system able to make hundreds of predictions per second, productivity is improved and remediation time reduced, resulting in stronger customer security postures. A rigorous evaluation of this machine learning architecture across multiple customers shows that 96% of false positives on average can automatically be detected and filtered out.
Rapid7's deep learning model uses convolutional neural networks and natural language processing to represent the structure of client-server web traffic. Neither the model nor the scanner require source code access — with this hybrid approach first finding potential vulnerabilities using a scan engine, followed by the model predicting those findings as real vulnerabilities or false positives. The resultant solution enables the augmentation of triage decisions by deprioritizing false positives. These time savings are essential to reduce exposure and harden security postures — considering the average time to detect a web breach can be several months, the sooner a vulnerability can be discovered, verified and remediated, the smaller the window of opportunity for an attacker.
Now recognized as state-of-the-art research after expert peer review, Rapid7 will introduce the work at AISec on Nov 11th 2022 at the Omni Los Angeles Hotel at California Plaza. Watch this space for further developments, and download a copy of the pre-print publication here.
“Yes, I know what applications we have publicly exposed.”
How many times have you said that with confidence? I bet not too many. With the rapid pace of development that engineering teams can work at, it is becoming increasingly difficult to know what apps you have exposed to the internet, adding potential security risks to your organization.
This is where InsightAppSec’s new application discovery feature, powered by Rapid7’s Project Sonar, can help to fill in these gaps.
What exactly is application discovery?
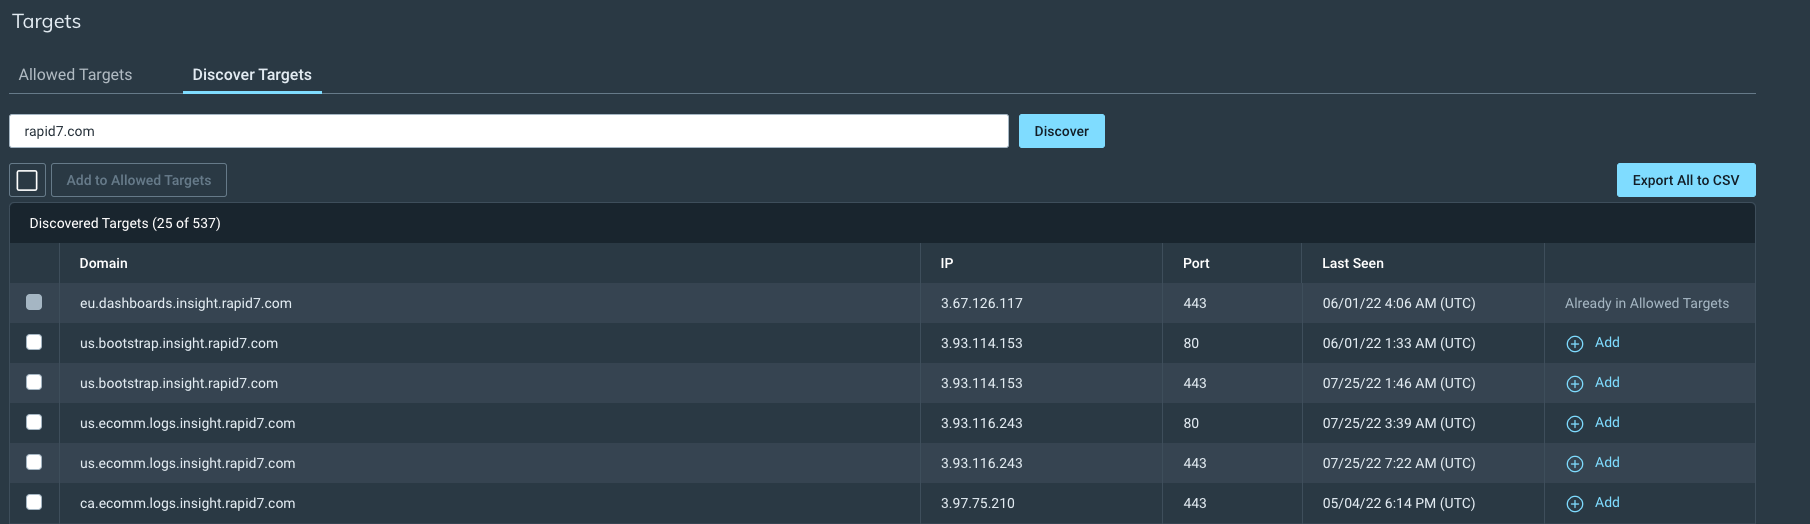
Using the data supplied by Project Sonar — which was started almost a decade ago and conducts internet-wide surveys across more than 70 different services and protocols — you can enter a domain within InsightAppSec and run a discovery search. You will get back a list of results that are linked to that initial domain, along with some useful metadata.
We have had this feature open as a beta for various customers and received real-world examples of how they used it. Here are two key use cases for this functionality.
Application ports
After running a discovery scan, one customer noticed that a “business-critical web application was found on an open port that it shouldn’t have been on.” After getting this data, they were able to work with that application team and get it locked down.
App inventory
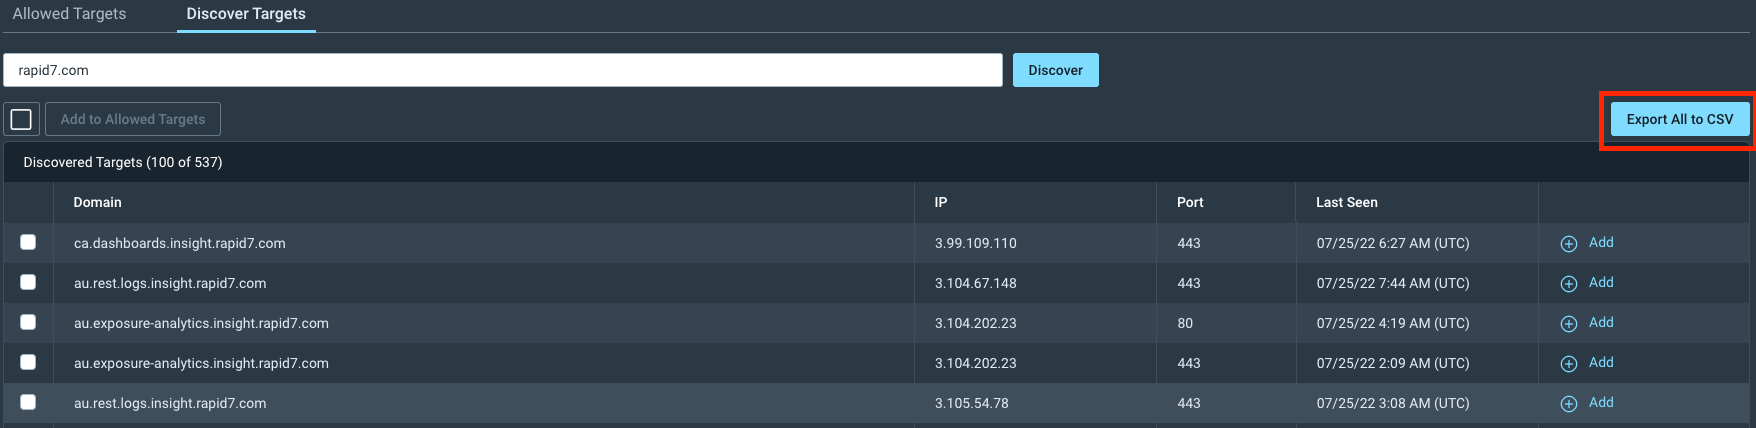
Various customers noted that running a discovery scan helped them to get a better sense of their public-facing app inventory. From this, they were able to carry out various tasks, including“checking the list against their own list for accountability purposes” and “having relevant teams review the list before attacking.”They did this by exporting the discovery results to a CSV file and reviewing them outside of InsightAppSec.
How exactly does it work?
Running a discovery search shouldn't be difficult, so we’ve made the process as easy as possible. Start by entering a domain that you own, and hit “Discover.” This will bring back a list of domains, along with their IP, Port, and Last Seen date (based on the last time a Sonar scan has found it.)
From here, you could add a domain to your allow list and then run a scan against it, using the scan config setup process.
If you see some domains that you are not sure about, you might decide that you need to know more about the domains before you run a scan. You can do this by exporting the data as a CSV and then running your own internal process on these before taking any next steps.
How do I access application discovery?
Running a discovery scan is currently available to all InsightAppSec Admins, but Admins can grant other users or sets of users access to the feature using the InsightPlatform role-based access control feature.
Summer is in full swing, and that means soaring temperatures, backyard grill-outs, and the latest roundup of Q2 application security improvements from Rapid7. Yes, we know you’ve been waiting for this moment with more anticipation than Season 4 of Stranger Things. So let’s start running up that hill, not beat around the bush (see what we did there?), and dive right in.
OWASP Top 10 for application security
Way, way back in September of 2021 (it feels like it was yesterday), the Open Web Application Security Project (OWASP) released its top 10 list of critical web application security risks. Naturally, we were all over it, as OWASP is one of the most trusted voices in cybersecurity, and their Top 10 lists are excellent places to start understanding where and how threat actors could be coming for your applications. We released a ton of material to help our customers better understand and implement the recommendations from OWASP.
This quarter, we were able to take those protections another big step forward by providing an OWASP 2021 Attack Template and Report for InsightAppSec. With this new feature, your security team can work closely with development teams to discover and remediate vulnerabilities in ways that jive with security best practice. It also helps to focus your AppSec program around the updated categories provided by OWASP (which we highly suggest you do).
The new attack template includes all the relevant attacks included in the updated OWASP Top 10 list which means you can focus on the most important vulnerabilities to remediate, rather than be overwhelmed by too many vulnerabilities and not focusing on the right ones. Once the vulns are discovered, InsightAppSec helps your development team to remediate the issues in several different ways, including a new OWASP Top 10 report and the ability to let developers confirm vulnerabilities and fixes with Attack Replay.
Scan engine and attack enhancements
Product support for OWASP 2021 wasn’t the only improvement we made to our industry-leading DAST this quarter. In fact, we’ve been quite busy adding additional attack coverage and making scan engine improvements to increase coverage and accuracy for our customers. Here are just a few.
Spring4Shell attacks and protections with InsightAppSec and tCell
We instituted a pair of improvements to InsightAppSec and tCell meant to identify and block the now-infamous Spring4Shell vulnerability. We now have included a default RCE attack module specifically to test for the Spring4Shell vulnerability with InsightAppSec. That feature is available to all InsightAppSec customers right now, and we highly recommend using it to prevent this major vulnerability from impacting your applications.
Additionally, for those customers leveraging tCell to protect their apps, we've added new detections and the ability to block Spring4Shell attacks against your web applications. In addition, we've added Spring4Shell coverage for our Runtime SCA capability. Check out more here on both of these new enhancements.
New out-of-band attack module
We’ve added a new out-of-band SQL injection module similar to Log4Shell, except it leverages the DNS protocol, which is typically less restricted and used by the adversary. It's included in the "All Attacks" attack template and can be added to any customer attack template.
Improved scanning for session detection
We have made improvements to our scan engine on InsightAppSec to better detect unwanted logouts. When configuring authentication, the step-by-step instructions will guide you through configuring this process for your web applications.
Making it easier for our customers
This wouldn’t be a quarterly feature update if we didn’t mention ways we are making InsightAppSec and tCell even easier and more efficient for our customers. In the last few months, we have moved the "Manage Columns" function into "Vulnerabilities" in InsightAppSec to make it even more customizable. You can now also hide columns, drag and drop them where you would like, and change the order in ways that meet your needs.
We’ve also released an AWS AMI of the tCell nginx agent to make it easier for current customers to deploy tCell. This is perfect for those who are familiar with AWS and want to get up and running with tCell fast. Customers who also want a basic understanding of how tCell works and want to share tCell’s value with their dev teams will find this new AWS AMI to provide insight fast.
Summer may be a time to take it easy and enjoy the sunshine, but we’re going to be just as hard at work making improvements to InsightAppSec and tCell over the next three months as we were in the last three. With a break for a hot dog and some fireworks in there somewhere. Stay tuned for more from us and have a great summer.