Xerox Versalink C7025 Multifunction Printer: Pass-Back Attack Vulnerabilities (FIXED)

During security testing, Rapid7 discovered that Xerox Versalink C7025 Multifunction printers (MFPs) were vulnerable to pass-back attacks. The affected products identified were:

  • Xerox Versalink MFPs
  • Firmware Version: 57.69.91 and earlier

This issue has been assigned the following CVEs:

  • CVE-2024-12510: LDAP pass-back vulnerability
  • CVE-2024-12511: SMB / FTP pass-back vulnerability

Product description

The Xerox Versalink C7025 Multifunction printer (MFP) is an all-in-one enterprise color printer designed to deliver print, copy, scan, fax, and email capabilities for enterprise business environments.

Credit

The pass-back vulnerabilities in the Xerox Versalink MFPs were discovered by Deral Heiland, Principal IoT Researcher at Rapid7. After coordination with the vendor, this disclosure is being published in accordance with Rapid7’s vulnerability disclosure policy.

Exploitation and remediation

This section details the potential for exploitation and remediation guidance for the issues discovered and reported by Rapid7, so that producers of this technology can gauge the impact of these issues appropriately and develop mitigations.

While examining the Xerox Versalink C7025, Rapid7 found that the Versalink MFP device was vulnerable to a pass-back attack. This pass-back style attack leverages a vulnerability that allows a malicious actor to alter the MFP’s configuration and cause the MFP device to send authentication credentials back to the malicious actor. This style of attack can be used to capture authentication data for the following configured services:

  • LDAP
  • SMB
  • FTP

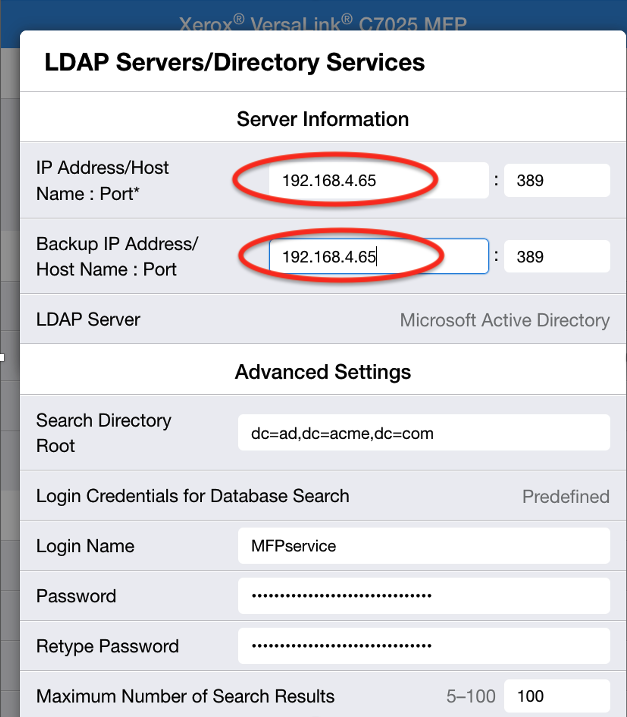
Pass-back attack via LDAP (CVE-2024-12510)

If a malicious actor gains access to the Lightweight Directory Access Protocol (LDAP) configuration page and the LDAP services are configured for authentication, the malicious actor can then reconfigure the LDAP service’s IP address (Figure 1) and trigger an LDAP lookup on the LDAP User Mappings page (Figure 2) to authenticate against an attacker-controlled rogue system rather than the expected server.

Xerox Versalink C7025 Multifunction Printer: Pass-Back Attack Vulnerabilities (FIXED)

Xerox Versalink C7025 Multifunction Printer: Pass-Back Attack Vulnerabilities (FIXED)

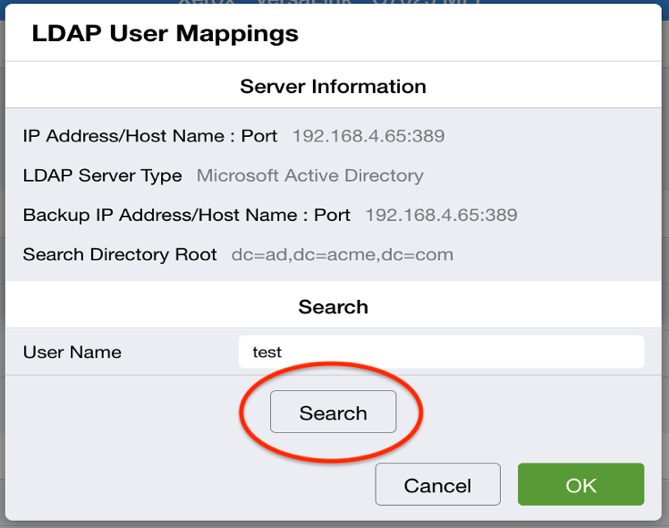
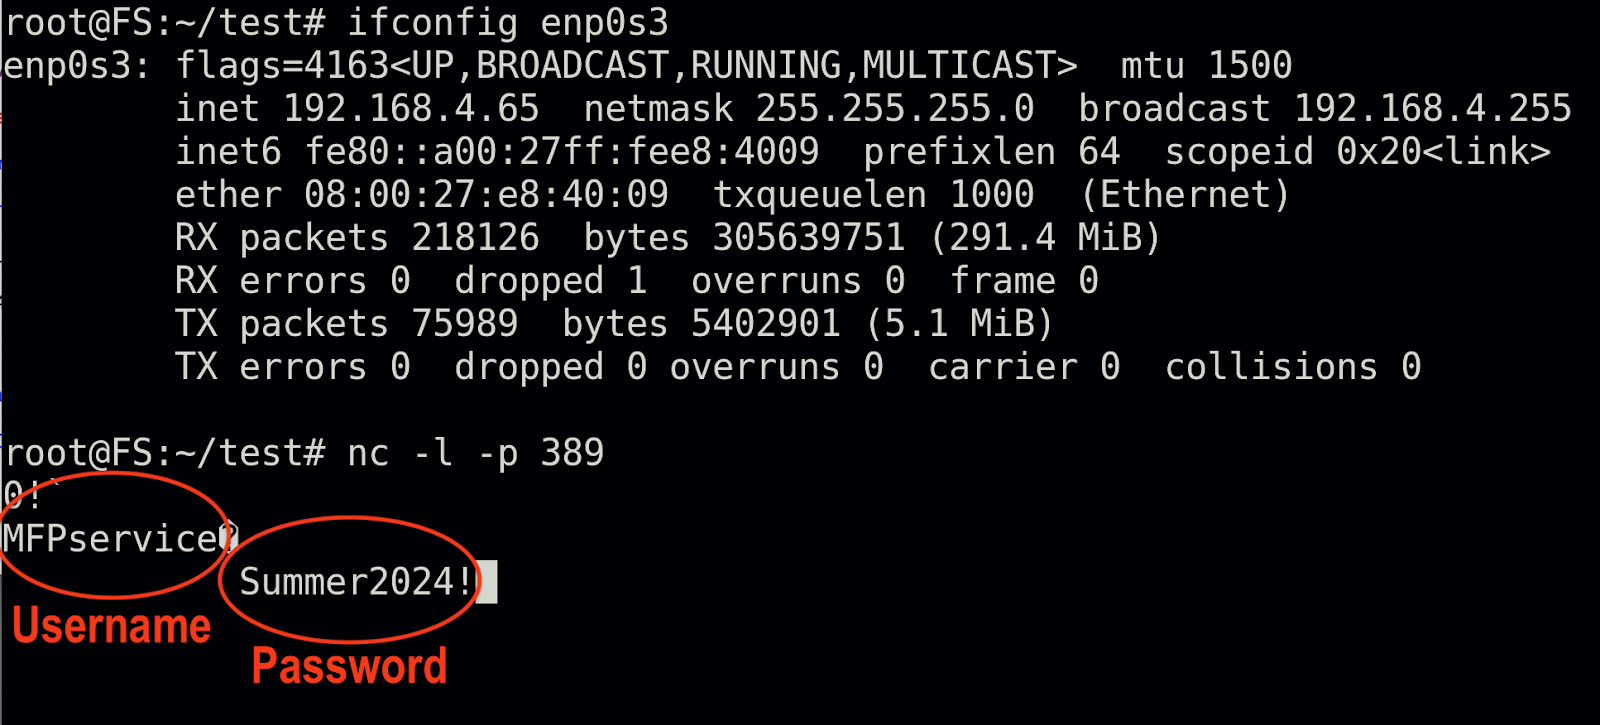
By running a port listener on a host that the malicious actor controls, they are then able to capture the clear text LDAP service credentials as shown below in Figure 3. This attack requires access to the MFP printer admin account, and LDAP services must have been configured for normal operation to a valid LDAP server.
Xerox Versalink C7025 Multifunction Printer: Pass-Back Attack Vulnerabilities (FIXED)

Pass-back attack via user’s address book - SMB / FTP (CVE-2024-12511)

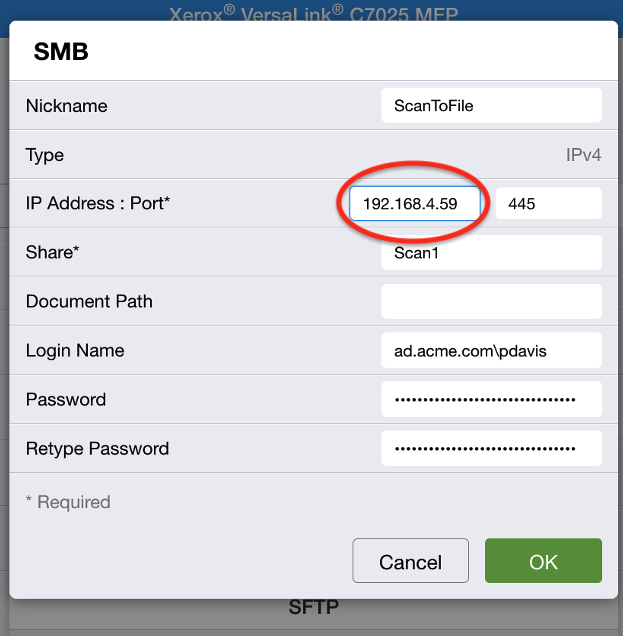
This attack allows a malicious actor to gain access to the user address book configuration to modify the SMB or FTP server's IP address (Figure 4) and point the IP address to a host they control, potentially triggering a scan to file and capture the SMB or FTP authentication credentials.

Xerox Versalink C7025 Multifunction Printer: Pass-Back Attack Vulnerabilities (FIXED)

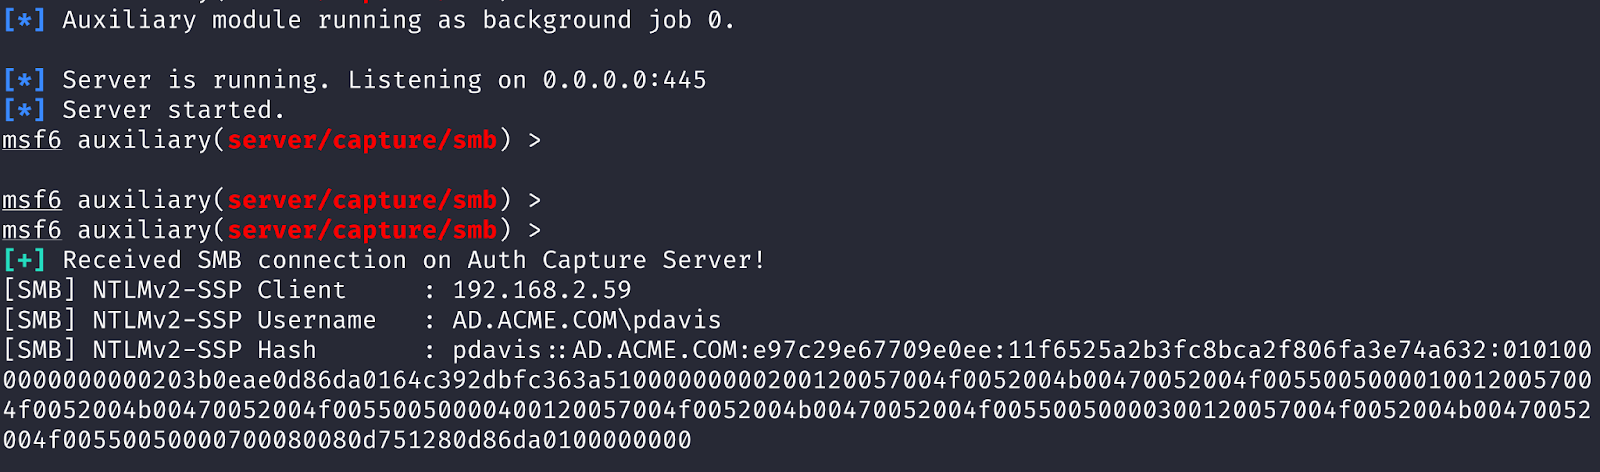
This attack allows a malicious actor to capture NetNTLMV2 handshakes or leverage the vulnerability in an SMB relay attack against Active Directory file servers. An example of capturing NetNTLMV2 handshake using the Metasploit capture/smb auxiliary module is shown below in Figure 5. In the case of FTP, the malicious actor would be able to capture clear text FTP authentication credentials.

Xerox Versalink C7025 Multifunction Printer: Pass-Back Attack Vulnerabilities (FIXED)

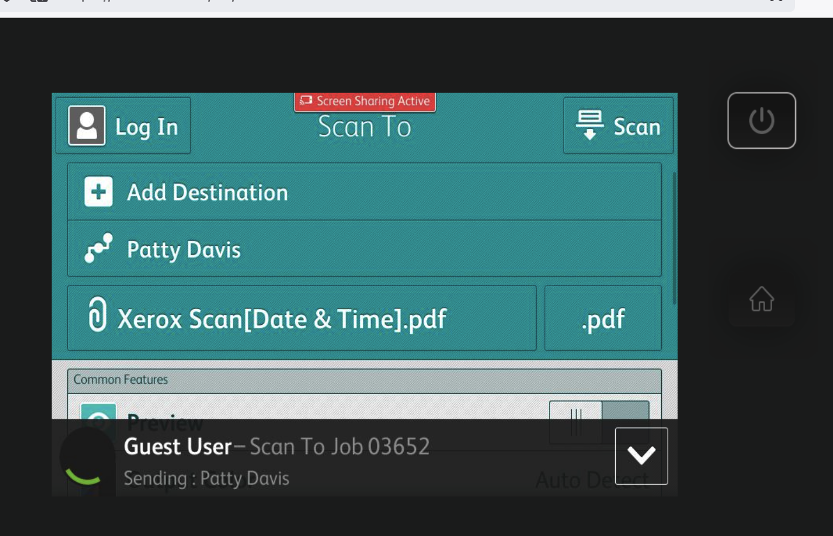
For this attack to be successful, the attacker requires an SMB or FTP scan function to be configured within the user’s address book, as well as physical access to the printer console or access to remote-control console via the web interface (Figure 6). This may require admin access unless user level access to the remote-control console has been enabled.

Xerox Versalink C7025 Multifunction Printer: Pass-Back Attack Vulnerabilities (FIXED)

Impact

If a malicious actor can successfully leverage these issues, it would allow them to capture credentials for Windows Active Directory. This means they could then move laterally within an organization’s environment and compromise other critical Windows servers and file systems.

Remediation guidance

Organizations leveraging Xerox Versalink MFP devices should upgrade to the latest patched version of the firmware to fix this issue. Additional details are available in the vendor advisory.

If patching the MFP devices cannot be done at this time, it is highly recommended to set a complex password for the admin account and also avoid using Windows authentication accounts that have elevated privileges, such as a domain admin account for LDAP or scan-to-file SMB services. Also, organizations should avoid enabling the remote-control console for unauthenticated users.

Disclosure timeline

March 26, 2024: Rapid7 contacts vendor to disclose vulnerabilities.
March 27, 2024 - April 11, 2024: Vendor acknowledges receipt of disclosure request; Rapid7 shares vulnerability details. Vendor confirms receipt of disclosure write up and assigns internal case number.
April 19, 2024 - June 11, 2024: Rapid7 requests input on patch ETA and coordinated disclosure date. Vendor requests additional time to determine patch and disclosure timeline; Rapid7 agrees.
July 23, 2024: Rapid7 requests an update on patch ETA and disclosure date.
July 31, 2024 - August 5, 2024: Vendor and Rapid7 agree on a coordinated disclosure date; Rapid7 agrees to test patches once available.
September 3, 2024: Extension requested.
September 26, 2024 - October 4, 2024: Rapid7 requests update. Vendor requests additional time to prepare update.
November 13 - 27, 2024: Rapid7 requests updates.
November 30, 2024 - December 6, 2024: Disclosure extended to January 2025.
December 11 - 30, 2025: Vendor provides CVE IDs and updates.
January 6 - 7, 2025: Vendor provides updates.
January 16, 2025: Disclosure extended to end of January.
January 24 - 27, 2025: Rapid7 requests confirmation on disclosure timeline. Vendor indicates patches are in testing and they will provide Rapid7 an update on progress later in the week.
January 29 - 31, 2025: Vendor indicates patches are generally available, requests that Rapid7 confirm fixes resolved the issue. Rapid7 tests firmware releases, confirms they resolve the vulnerabilities.
February 3, 2025: Vendor indicates advisories are available; Rapid7 notes that reciprocal disclosure will be delayed.
February 14, 2025: This disclosure.

Out With the Old, In With the New: Securely Disposing of Smart Devices

So, what did you get for Christmas this year?

Hopefully you received some cool smart technology, or maybe you just upgraded your smart camera or voice assistant to a newer model or version. If you upgraded to a new model or version, what is your plan for the old device? Is it still working or is it broken?

Either way, you will need to figure out what to do with it: Donate it, sell it online, or maybe dispose of it as electronic waste. Before you make up your mind, let’s think through a few things.

Have you done a factory reset?

The key reason you want to do a factory reset is to make sure the device is no longer customized according to your environment and that personal information such as WiFi passwords, email addresses, username and account passwords, and your name and home address are properly removed from the device prior to it leaving your hands.

Factory resets are accomplished in different ways, depending upon the device. For example, some devices have a button you press and hold, while others may use a mobile or web application to trigger the reset. I have also seen devices where you just cycle the power multiple times in sequence to reset the devices. Regardless of what the manufacturer’s recommended process is, it is very important that you follow it.

But what if the device appears to be broken? Well, if your old device truly is 100% dead, then there’s not much you can do about that. But the truth is, an IoT device may not be completely functioning yet it may still allow a factory reset to be done. For example, if the device appears to power up but doesn’t communicate correctly, you can try pushing and holding the reset button and see if the device resets (often indicated by the lights).

Now, let's say the device has a web application online or a mobile application and it shows the device is online — such as a smart light bulb or an Amazon Echo — but you cannot get it to work correctly. For example, the LED lights on a smart bulb don't light up or the Echo doesn’t respond to your voice. If the application is still showing the device is online, then chances are the network communication is still working, and the application may allow you to remote reset the device.

Again, if you can find a way to accomplish a factory reset, then you should do it.

What could go wrong?

What could happen if you don’t properly reset a device and then dispose of it by selling it or giving it to someone else, who may in turn sell the device?

Out of curiosity and an attempt to answer this question, I purchased a box full of previously owned Amazon Echos online. Many of them were supposed to be broken, with most of them marked “dead speakers.” With that said, I had an important question to answer. Did the owner use the Amazon Alexa online application to factory reset and remove the Echo device before selling or giving the device to the person who sold it to me? I proceeded to disassemble 10 of these devices and dumped their memory so that I could evaluate the results to see if any of them were still provisioned and contained any user data.

Out With the Old, In With the New: Securely Disposing of Smart Devices

Out of the 10 devices I examined, 4 were found to still be provisioned. As a small example of the potential data accessible on these 4 devices, I conducted further examination and found these devices still containing the WiFi SSID and Pre-shared Key (PSK) for the user’s home networks. Having the PSK in hand can give a malicious actor access to the user’s home network.

To make matters worse, in one of the 4 provisioned devices, the user used his last name for the SSID and his home phone number for PSK. Using personally identifiable information in an SSID, such as a name and/or phone number, greatly increases the ease in tracing a device back to a specific person and physical location. In other words, I highly recommend you not do this.

In the case of the Amazon Echo specifically, critical data such as personal Amazon authentication account information is currently stored in encrypted storage on the devices; therefore, it would take more work for someone to gain access to that, but I would not say it is impossible. Also, it’s important to note that although Echo devices may be encrypting the user account information they store, not all smart products on the market follow those recommendations. So — once again — to reduce the risk of your data being compromised, it is important that you factory reset your devices prior to disposal.

The proliferation of consumer-grade IoT devices in business.

It’s important to point out that the issue I’ve been discussing here doesn’t just apply to general consumers but also to businesses. Often, we assume that consumer-grade IoT technologies are only used by home users when in fact businesses of all sizes can and do leverage consumer-based IoT technology in the workplace environment.

It’s common to see WiFi access points, smart TVs, smart cameras, TV streaming boxes, smart exercise equipment, consumer-grade printers, and yes, even smart voice assistants, being used within a number of organizations. For example, every year I build out exercises for DEF CON IoT Village to help expose people to, and train them on, various aspects of hardware hacking. I purchase devices on the secondary market for this training and every year at least 40-50% of the devices I’ve purchased have not been factory reset. On more than one occasion, I have even purchased blocks of devices from a single reseller to find that those devices were not factory reset and were still configured with data from an operational business.

Start the year off securely.

To summarize, here are the key takeaways from my experiment and the bigger conversation around disposing of old smart devices:

  1. Business IT and security leaders should have clear, cradle-to-grave processes governing the IoT technologies purchased, so that the organization is not exposed to unnecessary risk. Cradle to grave covers initial installation and provisioning, ongoing maintenance, and, in the end, safe and secure disposal of the technology.
  2. Consumers should make sure to do a proper factory reset prior to the disposal or resale of any smart devices. Keep in mind that even if the device appears to be broken, a factory reset is still often possible — see my guidance earlier in this blog.
  3. If you cannot factory reset your device and you’re concerned about the data on the device, you can always change your SSID, PSK, and account password.

Finally, always remember to never dispose of your IoT technology in the trash, as landfills are not the proper place to send them. Instead, these devices should be sent to an electronic waste disposal option in your local area.

If you are looking for a deeper dive check out this research paper on Amazon echo dot devices from Northeastern University. Happy New Year!

Privacy, Security, and Connected Devices: Key Takeaways From CES 2024

The topic of data privacy has become so relevant in our age of smart technology. With everything becoming connected, including our homes, workplaces, cities, and even our cars, those who develop this technology are obligated to identify consumers' expectations for privacy and then find the best ways to meet those expectations. This of course includes determining how to best secure the data with which these technologies interact. As you can imagine, accomplishing these requirements is no easy feat.

Yes, connected technology developers have their work cut out for them, and that’s why CES 2024 included a panel to discuss this very topic: “Safeguarding Your Sanctuary: Expectations for Data Privacy in the Smart Home Era.” I had the privilege of being a part of this four-person panel, and if you weren’t in the room with us, here’s your chance to get some of the key takeaways from our discussion.

Putting the Consumer’s Needs First

What do consumers expect? The answer to this question is not black and white because individual consumers have different views of what privacy means to them. Therefore, defining a baseline that puts control of much of this data back in the hands of the consumer becomes critical.

That said, if consumers are going to have the ability to make their own data decisions then it’s important that easily understood mechanisms for managing data privacy are embedded within their smart technology. The greater technology community should also do its part to educate consumers on the overall importance of privacy and security — and the role they play in ensuring it for themselves.

Another example of putting the consumer’s needs first is when vendors have an online presence where they share details about their security and privacy policies and processes along with a point of contact so security researchers and consumers can report potential security issues within a product. The vendor’s website is also a perfect place for them to step in and play a role in educating consumers on privacy and security topics. I pointed out that if a consumer is researching product brands for purchase and a vendor has nothing to say about their privacy policies or their security program, then I typically recommend steering away from that product brand.  

The Do’s and Don’ts of Data Collection and Sharing

User data collection and sharing is a central theme in consumer privacy and data security, and our CES panel discussed this at length. Consumer opt-in for data sharing is becoming the rule rather than the exception, and our panel agreed with this practice.

One good example of data sharing in which many consumers would choose to opt in is home security vendors sharing customer data with insurance companies, thereby allowing for the consumer to potentially get a discount on their homeowner’s insurance premiums.

We also discussed data collected by the product vendor for the purpose of improving product performance and capabilities. This process should be expected, but we also pointed out that vendors should have a data retention policy and process in place that includes purging data past a certain age. For one, most data typically loses value over time as it relates to product enhancement purposes; if this data isn’t purged it could create a higher level of risk for the vendor should the data be stolen in a breach. Also, collecting and storing data that may not have any apparent business value is a risky move that vendors should avoid.

Outsmarting Connected Devices

Where do smart devices go to die… or to be reborn? The fact is, many consumers don’t always consider the serious privacy and security implications, which explains why over the last five years more than 30% of the previously used Internet of Things (IoT) devices I have purchased from Ebay for research and training purposes get delivered to me still containing consumer data, including product account passwords and WIFI pre-shared key data.

Consumers need to ensure that they do a factory reset on the devices they are disposing of. Not only that, in today’s smart home and smart car scenarios, consumers need to be extra mindful of the connected devices they’re using that will change hands. Selling your home or car means more than just turning over the keys, it means factory resetting anything that’s interacted with your personal data. Vendors can also play a role here by properly documenting the processes for factory resetting their products and also making sure those processes are easy for a consumer to perform.

Genie Aladdin Connect Retrofit Garage Door Opener: Multiple Vulnerabilities

Rapid7, Inc. (Rapid7) discovered vulnerabilities in Aladdin Connect retrofit kit garage door opener and Android mobile application produced by Genie. The affected products are:

  • Aladdin Garage door smart retrofit kit, Model ALDCM
  • Android Mobile application ALADDIN Connect, Version 5.65 Build 2075

Rapid7 initially reported these issues to Overhead Door — the parent company of The Genie Company — on August 22nd 2023. Since then, members of our research team have worked alongside the vendor to discuss the impact, resolution, and a coordinated response for these vulnerabilities.

Product description

The Aladdin Connect garage door opener (Retrofit-kit) is a smart IoT solution which allows standard electric garage doors to be upgraded to support smart technology for remote access and use of mobile applications for opening and closing of the garage door.

Credit

The vulnerabilities in Genie Aladdin Connect retrofit garage door opener and mobile application were discovered by Deral Heiland, Principal IoT Researcher at Rapid7. They are being disclosed in accordance with Rapid7’s vulnerability disclosure policy after coordination with the vendor.

Vendor statement

Trusted for generations by millions of homeowners, The Genie Company is committed to security, and we collaborate with valued researchers, such as Rapid7, to respond to and resolve vulnerabilities on behalf of our customers.

Exploitation and remediation

This section details the potential for exploitation and our remediation guidance for the issues discovered and reported by Rapid7, so that defenders of this technology can gauge the impact of, and mitigations around, these issues appropriately.

Android Application Insecure Storage (CVE-2023-5879) - FIXED

While examining the Android mobile application, Aladdin Connect, for general security issues, Rapid7 found that the user’s password was stored in clear text in the following file:

  • /data/data/com.geniecompany.AladdinConnect/shared_prefs/com.genie.gdocntl.MainActivity.xml

The persistence of this data was tested by logging out and rebooting the device. Typically logging out and rebooting a mobile device leads to the data being purged from the device. In this case neither the file, nor its contents, were purged. Figure 2 is copy of file content after logout and reboot:

Genie Aladdin Connect Retrofit Garage Door Opener: Multiple Vulnerabilities
Figure 2: Clear text Stored User Credentials

Exploitation

An attacker with physical access to the user’s smartphone (i.e., via a lost or stolen phone), would be able to potentially extract this critical data, allowing access to the user’s service account to control the garage door opener.

Remediation

To mitigate this vulnerability, users should set a password pin code on the mobile devices to restrict access.

Additional Note from Vendor

This vulnerability is tied to the biometric capability (touch or face recognition).

Mitigation: Update to the latest app upgrade available in the play store. App version v5.73

Cross-site Scripting (XSS) injected into Aladdin Connect garage door opener (Retrofit-Kit) configuration setup web server console via broadcast SSID name (CVE-2023-5880)

When the Aladdin connect device is placed into Wi-Fi configuration mode, the user web interface used for configuring the device is vulnerable to XSS injection via broadcast SSID names containing HTML and or JavaScript.

Exploitation

This XSS attack via SSID injection method can be done by running a software-based Wi-Fi access point to broadcast HTML or JavaScript as the SSID name such as:

  • </script><svg onload=alert(1)>

An example of this is shown in Figure 3, using airbase-ng to broadcast the HTML and or JavaScript code:

Genie Aladdin Connect Retrofit Garage Door Opener: Multiple Vulnerabilities
Figure 3: SSID Name Injection Method

In the example found in Figure 4, a simple alert box is triggered on the Aladdin base unit Wi-Fi configuration webpage from the above SSID name. Also, the image on the right of Figure 4 shows the actual web page source delivered to the end user. No user interaction is needed to trigger this, they only need to view the web page during configuration mode.

Genie Aladdin Connect Retrofit Garage Door Opener: Multiple Vulnerabilities
Figure 4: XSS Injection using SSID Injection Method

Also, a denial of service (DoS) of the Wi-Fi configuration page can be accomplished by just broadcasting an SSID containing </script> preventing the web page from being used to configure the device's setup. This corrupted web page is shown in Figure 5:

Genie Aladdin Connect Retrofit Garage Door Opener: Multiple Vulnerabilities
Figure 5: Corrupted Wi-Fi Configuration Page

Remediation

To mitigate this vulnerability, users should avoid running setup if any oddly named SSIDs are being broadcast in the general vicinity, such as SSIDs containing HTML markup language and/or JavaScript code in their names.

Also, in general the mobile application can be used to set up and configure the Garage Door opener. This will avoid any direct interaction with the vulnerable  “ Garage Door Control Setup” configuration page.

Additional Notes from the Vendor

This is a very low-impact vulnerability with minimal risk. This can only occur when the owner places the device in the wifi configuration mode for a limited period and the intruder operates within the 2.4 GHz band distance range during that limited configuration period.  The device will not be impacted by the misconfiguration if that were to occur and it is fully capable of recovering from misconfiguration. The device cannot be operated with a misconfigured SSID as the device can only be claimed by the owner using the mobile app. There is no vulnerability in the mobile app which is the approved mode of device provisioning.

Mitigation: Use mobile app to configure the device.

Unauthenticated access allowed to web interface for “Garage Door Control Module Setup” page (CVE-2023-5881) - FIXED

This vulnerability allows a user with network access to connect to the Aladdin Connect device web server's “Garage Door Control Module Setup” web page and alter the Garage doors connected WIFI SSID settings without authenticating.

Exploitation

The device allows unauthenticated access to Garage Door Control Module Setup configuration page on TCP Port 80, This allows anyone with network access to reconfigure the Wi-Fi settings without being challenged to authenticate. A sample of this access to the configuration web page is shown in Figure 6:

Genie Aladdin Connect Retrofit Garage Door Opener: Multiple Vulnerabilities
Figure 6: Unauthenticated Configuration Services Access Port 80

Remediation

To prevent exploitation, users should only attach the Aladdin Garage door smart retrofit kit to a network they own and control. Also, access to this network should not be allowed from any other network source such as the Internet.

Additional Notes from the Vendor

This is a very low-impact vulnerability with minimal risk. This can only occur when the intruder has access to the same local network as the retrofit kit (use the same network router), so the attack vector is limited to local. This web interface is not accessible from the internet. The device cannot be operated with a misconfigured SSID, as the device can only be claimed using the mobile app that an owner would use.

Mitigation: Update the Retrofit device to the latest software version, 14.1.1. Fix was automatically updated on all online devices as of December 2023. Please reach out to customer service to confirm if your device has the update.

Authenticated user access to others users data via service API - FIXED

An authenticated user can gain unauthorized access to other users’ data by querying the following API using a different device ID than their own.

  • https://pxdqkls7aj.execute-api.us-east-1.amazonaws.com/Android/devices/879267

Here are sample fields that are potentially viewable data using this method:

Genie Aladdin Connect Retrofit Garage Door Opener: Multiple Vulnerabilities
Figure 1: Enumeration of User Data

Additional Notes from the Vendor

This was resolved immediately after our internal penetration testing detected the issue. This happened because of a recent software update. The fix was applied to the API on 07/25/2023.

Mitigation: None

Is That Smart Home Technology Secure? Here’s How You Can Find Out.

As someone who likes the convenience of smart home Internet of Things (IoT) technology, I am regularly on the lookout for products that meet my expectations while also considering security and privacy concerns. Smart technology should never be treated differently than how we as consumers look at other products, like purchasing an automobile for example. In the case of automobiles, we search for the vehicle that meets our visual and performance expectations, but that will also keep us and our family safe. With that said, shouldn’t we also seek smart home technologies that are secure and protect our privacy?

I can’t tell you which solution will work for your specific case, but I can give you some pointers around technology security to help you do that research and determine which solution may best meet your needs and help you stay secure while doing it. Many of these recommendations will work no matter what IoT product you’re looking to purchase; however, I do recommend taking the time to perform some of these basic product security research steps.

The first thing I recommend is to visit the vendor site and search to see what they have to say about their products' security. Also, do they have a vulnerability disclosure program (VDP)? If an organization that manufactures and sells IoT technology doesn’t have much to say about their products' security or an easy way for you or someone else to report a security issue, then I highly recommend you move on.

This would indicate that product security probably doesn’t matter to them as much as it should. I also say this to the product vendors out there: If you don’t take product security seriously enough to help educate us consumers on why your products are the best when it comes to security, then why should we buy your products?

Next, I always recommend searching the Common Vulnerability Exposure (CVE) database and the Internet for the product you’re looking to buy and/or the vendor’s name. The information you find is sometimes very telling in terms of how an organization handles security vulnerability disclosure and follow-up patching of their products.

The existence of a vulnerability in an IoT product isn’t necessarily a bad thing; we’re always going to find vulnerabilities within IoT Products. The question we’re looking to answer by doing this search is this: How does this vendor handle reported vulnerabilities? For example, do they patch them quickly, or does it take months (or years!) for them to react – or will they ultimately do nothing? If there is no vulnerability information published on a specific IoT product, it may be that no one has bothered to test the security of the product. It’s also possible that the vendor has silently patched their issues and never issued any CVEs.

It is unlikely, but not impossible, that a product will never contain a vulnerability. Over the years I’ve encountered products where I was unsuccessful in finding any issues; however, not being successful in finding vulnerabilities within a product doesn't mean they couldn’t possibly exist.

Recently, I became curious to learn how vendors that produce and/or retrofit garage door openers stack up in terms of security, so I followed the research process discussed above. I took a look at multiple vendors to see, are any of them following my recommendations? The sad part is, practically none of them even mentioned the word “security” on their websites. One clear exception was Tuya, a global IoT hardware and IoT software-as-a-service (SaaS) organization.

When I examined the Tuya website, I quickly located their security page and it was full of useful information. On this page, Tuya points out their security policies, standards, and compliance. Along with having a VDP, they also run a bug bounty program. Bug bounty programs allow researchers to work with a vendor to report security issues – and get paid to do it. Tuya’s bug bounty information is located at the Tuya Security Response Center. Vendors take note: This is how an IoT product vendor should present themselves and their security program.

In closing, consumers, if you’re looking to spend your hard-earned money, please take the time to do some basic research to see if the vendor has a proactive security program. Also, vendors, remember that consumers are becoming more aware and concerned about product security. If you want your product to rise to the status of “best solution around,” I highly recommend you start taking product security seriously as well as share details and access to your security program for your business and products. This data will help consumers make more informed decisions on which product best meets their needs and expectations.

Poorly Purged Medical Devices Present Security Concerns After Sale on Secondary Market

In a post-pandemic landscape, the interconnectedness of cybersecurity is front and center. Few could say that they were not at least aware of, if not directly affected by, the downstream effects of major breaches that cause impacts felt across economies. One should look at disruptions in the global supply chain as case in point.

So the concept of security that goes from the cradle to the grave, is more than just an industry buzz phrase, it is a critical component of securing networks, applications, and devices.

Sadly, in too many cases, cradle to grave security was either not considered at conception, or outright ignored. And as a new report released today by Rapid7 principal researcher, Deral Heiland points out, even when organizations are able to take steps to mitigate concerns at the grave portion of the life cycle, they don’t.

In Security Implications from Improper De-acquisition of Medical Infusion Pumps Heiland performs a physical and technical teardown of more than a dozen medical infusion pumps — devices used to deliver and control fluids directly into a patient’s body. Each of these devices was available for purchase on the secondary market and each one had issues that could compromise their previous organization’s networks.

The reason these devices pose such a risk is a lack of (or lax) process for de-acquisitioning them before they are sold on sites like eBay. In at least eight of the 13 devices used in the study, WiFi PSK access credentials were discovered, offering attackers potential access to health organization networks.

In the report, Heiland calls for systemic changes to policies and procedures for both the acquisition and de-acquisition of these devices. The policies must define ownership and governance of these devices from the moment they enter the building to the moment they are sold on the secondary market. The processes should detail how data should be purged from these devices (and by extension, many others). In the cases of medical devices that are leased, contractual agreements on the purging process and expectations should be made before acquisition.

The ultimate finding is that properly disposing of sensitive information on these devices should be a priority. Purging them of data should not (and in many cases is not) terribly difficult. The issue lies with process and responsibility for the protection of information stored in those devices. And that is a major component of the cradle to grave security concept.

If you would like to read the report it is available here.

Understanding the Ecosystem of Smart Cities for the Purpose of Security Testing

Is there a defined ecosystem, similar to what we encountered with the Internet of Things (IoT), that can be charted out as it relates to smart city technology and its security implications?

While evaluating IoT I struggled with defining what IoT is. I found that there were varying definitions out there, but none that helped me fully understand what constitutes IoT and how to approach evaluating its security posture. To solve that dilemma in my mind and to better be able to discuss it with vendors and consumers I finally landed on the concept that IoT is often better defined as a series of traits that can be used to explain it, its structure, and better understand the components and their interaction with each other. This concept and approach also allowed me to properly map out all of the interlinking mechanisms as it relates to security testing of the IoT technology's full ecosystem.

Looking at it from this perspective we see that Smart Cities leverage IoT technology and concepts at its core but in many cases with a much more defined relationship to data. With this in mind, I have started looking at the various components that make up Smart Cities, abstracting out their specific purposes, with the goal of having a model to help better understand the various security concerns as we plan for our Smart City future.

Through general observation we can see that Smart City solutions consist of the following five general areas:

Embedded technology

  • Sensors
  • Actuators
  • Aggregators & Edge or Fog appliances

Management and control

  • Client-side application
  • Cloud application
  • APIs
  • Server application

Data storage

  • Cloud storage
  • On-premises storage
  • Edge or Fog storage

Data access

  • Cloud application
  • Client-side application
  • Server-side application

Communication

  • Ethernet
  • WiFi (802.11abgn)
  • Radio frequency (RF) ( BLE, Zigbee, Z-wave, LoRa, etc.…)
  • Cellular communication ( GSM, LTE, 3,4,5G)

Mapping these various components to a specific smart city solutions ecosystem, we can better establish the relationship between all the components in that solution. This in turn allows us to improve our threat modeling processes by including those interrelationships. Also, similar to general IoT security testing, understanding the interconnected relationships allows us to take a more holistic approach to security testing.

The typical approach of testing each component only as a stand-alone entity is always a short-sighted approach and misses the mark when identifying attack vectors and associated risk that often come to light only when security testing takes into consideration the interaction of these components. This approach leads us to always ask the question: what happens to the security posture of one set of components if there is a security failure in another set of components? Also, the holistic approach helps us better map the security risk levels across the entire ecosystem. Just because a low-risk condition is found in a single item does not mean that the risk is not compounded into a higher risk category due to some interaction within other components.

So, in conclusion, the solution to establishing a solid security testing response for Smart City technologies is to map out the entire ecosystem of the solution that is being designed and deployed. Define a solid understanding of the various components and their interaction with each other; then, conduct threat modeling to determine the possible risks and threats that are expected to come against the smart city solutions.

Hands-On IoT Hacking: Rapid7 at DEF CON 30 IoT Village, Pt. 4

Welcome back to our blog series on Rapid7's IoT Village exercise from DEF CON 30. In our previous posts, we covered how to achieve access to flash memory, how to extract file system data from the device, and how to modify the data we've extracted. In this post, we'll cover how to gain root access over the device's secure shell protocol (SSH).

Gaining root access over SSH

Before we move on to establishing SSH connect as root, you may need to set the local IP address on your local host to allow you to access the cable modem at its default IP address of 192.168.100.1. In our example, we set the local IP address to 192.168.100.100 to allow this connection.

To set the local IP address on your host, the first thing is to identify the local ethernet interface. You can do this from the Linux CLE terminal by running the ifconfig command:

  • ifconfig
Hands-On IoT Hacking: Rapid7 at DEF CON 30 IoT Village, Pt. 4
Figure 10: IFCONFIG showing Local Ethernet Interfaces

In our example, the ethernet interface is enp0s25, as shown above. Using that interface name (enp0s25), we can set the local IP address to 192.168.100.100 using the following command

  • ifconfig enp0s25 192.168.100.100

To validate that you've set the correct IP address, you can rerun the ifconfig command and examine the results to confirm:

Hands-On IoT Hacking: Rapid7 at DEF CON 30 IoT Village, Pt. 4
Figure 11: Ethernet Interface Set To 192.168.100.100

It's also possible to connect your host system directly to the cable modem's ethernet port and have your host interface setup for DHCP – the cable modem should assign an IP address to your host device.

Once you have a valid IP address assigned and/or configured on your host system, power up the cable modem and see if your changes were made correctly and if you now have root access. Again, ensure the SD Card reader is disconnected before plugging 12v power supply into the cable modem.

Hands-On IoT Hacking: Rapid7 at DEF CON 30 IoT Village, Pt. 4

Once you've confirmed that the SD Card reader is disconnected, power up the cable modem and wait for the boot-up sequence to complete. Boot-up is complete when only the top LED is lit and the second LED is flashing:

Hands-On IoT Hacking: Rapid7 at DEF CON 30 IoT Village, Pt. 4

From the CLI terminal on your host, you can run the nmap command to show the open ports on the cable modem. This will also show if your changes to the cable modem firmware were made correctly.

  • nmap -sS 192.168.100.1 -p 22,80,443,1337
Hands-On IoT Hacking: Rapid7 at DEF CON 30 IoT Village, Pt. 4
Figure 12: NMAP Scan Results

At a minimum, you should see TCP port 1337 as open as shown above in Figure 12. If not, then most likely an error was made either when copying the dropbear_rsa_key file or making changes to the inittab file.

If the TCP port 1337 is open, the next step is to attempt to login to the cable modem with the following SSH command as root. When prompted for password, use “arris" in all lower case.

Note: Since the kernel on this device is believed to have created an environment restriction to prevent console access, we were only successful in getting around that restriction with the -T switch. This -T switch in SSH disables all pseudo-terminal allocation, and without using it, no functioning console can be established. Also, when connected, you will not receive a typical command line interface prompt, but the device should still accept and execute commands properly.

  • ssh -T root@192.168.100.1 -p 1337

If you receive a “no matching key exchange method found" error (Figure 13), you will need to either define that Diffie-hellman-group-sha1 in the SSH command or create a config file to do this automatically.

Hands-On IoT Hacking: Rapid7 at DEF CON 30 IoT Village, Pt. 4
Figure 13: Key Exchange Error

Defining a config file is the easier method. We did this prior to the DEF CON IoT Village, so participants in the exercise would not need to. Since others may be using this writeup to recreate the exercise, I decided to add this to prevent any unnecessary confusion.

To create a config file to support SSH login to this cable modem, without error, you will need to create the following folder “.ssh" and file “config" within the home directory of the user you are logging as. In our example, we were logged in as root. To get to the home folder, the simplest method is to enter the “cd" command without any arguments. This will take you to the home directory of the logged in user.

  • cd

Once in your home directory, try to change directory “cd" to the “.ssh" folder to see if one exists:

  • cd .ssh

If it does, you won't need to create one and can skip over the creation steps below. If not, then you will need to create that folder in your home directory with the following command:

  • mkdir .ssh

Once you have changed directory “cd" to the .ssh folder, you can use vi to create and edit a config file.

  • vi config

Once in vi, make the following entries in the config file shown below in Figure 14. These entries will enable support for access to cable modem at 192.168.100.1, for the user root, a Cipher of aes256-cbd, and the Diffie-hellman key exchange.

Hands-On IoT Hacking: Rapid7 at DEF CON 30 IoT Village, Pt. 4
Figure 14: Config File

Once the config is created and saved, you should be able to login over SSH to the cable modem and not receive any more errors.

When you connect and log in, the SSH console will not show you a typical command prompt. So, once you hit the return key after the above SSH command, run the command “ls -al" to show a directory and file listing on the cable modem as shown below in Figure 15. This should indicate whether you successfully logged in or not.

Hands-On IoT Hacking: Rapid7 at DEF CON 30 IoT Village, Pt. 4
Figure 15: Cable Modem Root Console

At this point, you should now have root-level access to the cable modem over SSH.

You may ask, “What do I gain from getting this level of root access to an IoT device?" This level of access allows us to do more advanced and detailed security testing on a device. This is not as easily done when sitting on the outside of the IoT device or attempting to emulate on some virtual machine, because often, the original hardware contains components and features that are difficult to emulate. With root-level access, we can interact more directly with running services and applications and better monitor the results of any testing we may be conducting.

Hands-On IoT Hacking: Rapid7 at DEF CON 30 IoT Village, Pt. 3

Welcome back to our blog series on Rapid7's IoT Village exercise from DEF CON 30. In our previous posts, we covered how to achieve access to flash memory and how to extract file system data from the device. In this post, we'll cover how to modify the data we've extracted.

Modify extracted file systems data

Now that you have unsquashfs'd the Squash file system, the next step is to take a look at the extracted file system and its general structure. In our example, the unsquashed file system is located at /root/Desktop/Work/squashfs-root. To see the structure, while in the folder /Desktop/Work, you can run the following command to change director and then list the file and folders:

  • cd squashfs-root
  • ls -al

As you can see, we have unpacked a copy of the squash file system containing the embedded Linux root file system that was installed on the cable modem for the ARM processor.

The next goal will be to make the following three changes so we can eventually gain access to the cable modem via SSH:

  1. Create or add a dropbear_rsa_key to squashfs.
  2. Remove symbolic link to passwd and recreate it.
  3. Modify the inittab file to launch dropbear on startup.

To make these changes, you will first need to change the directory to the squashfs-root folder. In our IoT Village exercise example, that folder was “~/Desktop/Work/squashfs-root/etc", and the attendees used the following command:

  • cd ~/Desktop/Work/squashfs-root/etc

It is critical that you are in the correct directory and not in the etc directory of your local host before running any of the following commands to avoid potential damage to your laptop or desktop's configuration. You can validate this by entering the command “pwd", which allows you to examine the returned path results as shown below:

  • pwd
Hands-On IoT Hacking: Rapid7 at DEF CON 30 IoT Village, Pt. 3

The next thing we need to do is locate a copy of the dropbear_rsa_key file and copy it over to “~/Desktop/Work/squashfs-root/etc". This RSA key is needed to support dropbear services, which allow SSH communication to the cable modem. It turns out that a usable copy of dropbear_rsa_key file is located within the etc folder on Partition 12, which in our example was found to be mounted at /media/root/disk/etc. You can use the application Disks to confirm the location of the mount point for Partition 12, similar to the method we used for Partition 5 shown in Figure 4.

By running the following command during the IoT Village exercise, attendees were successfully able to copy the dropbear_rsa_key from Partition 12 into “~/Desktop/Work/squashfs-root/etc/":

  • cp /media/root/disk/etc/dropbear_rsa_key .
Hands-On IoT Hacking: Rapid7 at DEF CON 30 IoT Village, Pt. 3

Next, we had participants remove the symbolic linked passwd file and create a new passwd file that points to the correct shell. Originally, the symbolic link pointed to a passwd file that pointed the root user to a shell that prevented root from accessing the system. By changing the passwd file, we can assign a usable shell environment to the root user.

Like above, the first step is to make sure you are in the correct folder listed below:

“~/Desktop/Work/squashfs-root/etc"

Once you have validated that you are in the correct folder, you can run the following command to delete the passwd file from the squash file systems:

  • rm passwd
Hands-On IoT Hacking: Rapid7 at DEF CON 30 IoT Village, Pt. 3

Once this is deleted, you can next create a new passwd file and add the following data to this file as shown below using vi:

Note: Here is a list of common vi interaction commands that are useful when working within vi:

  • i = insert mode. This allows you to enter data in the file
  • esc key will exit insert mode
  • esc key followed by entering :wq and then the enter key will write and exit vi
  • esc key followed dd will delete the line you are on
  • esc key followed x will single character
  • esc key followed shift a will place you in append insert mode at the end of the line
  • esc key followed a will place you in append insert mode at the point of your cursor
  • vi passwd

Once in vi, add the following line:

root:x:0:0:root:/:/bin/sh

Hands-On IoT Hacking: Rapid7 at DEF CON 30 IoT Village, Pt. 3

Next, we need to alter the inittab file. Again, make sure you are currently in the folder “/root/Desktop/Work/squashfs-root/etc". Once this is validated, you can use vi to open and edit the inittab file.

  • vi inittab

The file should originally look like this:

Hands-On IoT Hacking: Rapid7 at DEF CON 30 IoT Village, Pt. 3

You will need to add the following line to the file:

::respawn:/usr/sbin/dropbear -p 1337 -r /etc/dropbear_rsa_key

Add the line as shown below, and save the file:

Hands-On IoT Hacking: Rapid7 at DEF CON 30 IoT Village, Pt. 3

Once you've completed all these changes, double-check them to make sure they are correct before moving on to the next sections. This will help avoid the need to redo everything if you made an incorrect alteration.

If everything looks correct, it's time to move repack the squash file system and write the data back to Partition 5 on the cable modem.

Repacking squash file system and rewriting back to Modem

In this step, you will be repacking the squash file system and using the Linux dd command to write the image back to the cable modems NAND Flash memory.

The first thing you will need to do is change the directory back to the working folder – in our example, that is “/Desktop/Work". This can be done from the current location of “~/Desktop/Work/squashfs-root/etc" by running the following command:

  • cd ../../
Hands-On IoT Hacking: Rapid7 at DEF CON 30 IoT Village, Pt. 3

Next, you'll use the command “mksquashfs" to repack the squash folder into a binary file called new-P5.bin. To do this, run the following command from the “/Desktop/Work" folder that you should currently be in.

  • mksquashfs squashfs-root/ new-P5.bin
Hands-On IoT Hacking: Rapid7 at DEF CON 30 IoT Village, Pt. 3

Once the above command has completed, you should have a file called new-P5.bin. This binary file contains the squashfs-root folder properly packed and ready to be copied back onto the cable modem partition 5.

Note: If for some reason you think you have made a mistake and need to rerun the “mksquashfs" command, make sure you delete the new-P5.bin file first. “mksquashfs" will not overwrite the file, but it will append the data to it. If this happens it will cause the new-P5.bin images to have duplicates of all the files which will cause your attempt to gain root access to fail. So, if you rerun mksquashfs make sure to delete the old new-P5.bin file first.

One you have run the mksquashfs and have a new-P5.bin file containing the repacked squashfs, you'll use the Linux dd command to write the binary file back to the cable modem partition 5.

To complete this step, first make sure you have identified the correct “Device:" location using the method shown in Figure 7 from part 2 of this blog series.

Hands-On IoT Hacking: Rapid7 at DEF CON 30 IoT Village, Pt. 3

In this example, the “Device:" was determined to be sdd5. So we can write the binary images by running the following dd command:

  • dd if=new-P5.bin of=/dev/sdd5
Hands-On IoT Hacking: Rapid7 at DEF CON 30 IoT Village, Pt. 3

Once the dd command completes, the modified squash file system image should now be written on the modem's NAND flash memory chip. Before proceeding, disconnect the SD Card reader from the cable modem as shown below.

Note: Attaching the SD Card Reader and 12V power supply to the cable modem at the same time will damage the cable modem and render it nonfunctional.

Hands-On IoT Hacking: Rapid7 at DEF CON 30 IoT Village, Pt. 3

In our next and final post in this series, we'll cover how to gain root access over the device's secure shell protocol (SSH). Check back with us next week!

Hands-On IoT Hacking: Rapid7 at DEF CON 30 IoT Village, Pt. 2

Welcome back to our blog series on Rapid7's IoT Village exercise from DEF CON 30. Last week, we covered the basics of the exercise and achieving access to flash memory. In this post, we'll cover how to extract partition data.

Extracting partition data

The next step in our hands-on IoT hacking exercise is to identify the active partition and extract the filesystems for modification. The method I have used for this is to examine the file date stamps – the one with the most current date is likely the current active file system.

Note: Curious why there are multiple or duplicate filesystem partitions on an embedded device? Typically, with embedded device firmware, there are two of each partition, two kernel images, and two root file system images. This is so the device's firmware can be updated safely and prevent the device from being bricked if an error or power outage occurs during the firmware update. The firmware update process updates the files on the offline partitions, and once that is completed properly, the boot process loads the new updated partitions as active and takes the old partitions offline. This way, if a failure occurs, the old unchanged partition can be reloaded, preventing the device from being bricked.

On this cable modem, we have 7 partitions. The key ones we want to work with are Partition 5, 6, 12, 13. This cable modem has two MCU:, an ARM and an ATOM processor. Partition 5 and 6 are root filesystems for the ARM processor, which is what we will be hacking. Partition 12 and 13 are for the root filesystems for the ATOM process, which controls the RF communication on the cable.

To ensure we alter the active partition, the first thing we need to do is check the date stamps on the mounted file systems to see whether partition 5 or partition 6 is the active partition. There are several ways to do this, but the method we use is to click on partition 5 or 6 in the Disks application to highlight it, and then click on the “Mounted at:" link as shown below in Figure 4 to open the mounted file partition shown in Figure 5:

Hands-On IoT Hacking: Rapid7 at DEF CON 30 IoT Village, Pt. 2

Figure 4: Partition File System Mount Locations

Hands-On IoT Hacking: Rapid7 at DEF CON 30 IoT Village, Pt. 2

Figure 5: Mounted File System Partition 5

Once File Manager opens the folders, you can right click on the “etc" folder, select “Properties," and check the date listed in “Modified:" as shown below in Figure 6:

Hands-On IoT Hacking: Rapid7 at DEF CON 30 IoT Village, Pt. 2

Figure 6: Folder Date Stamp

You will want to do this on both partitions 5 and 6 for the cable modem to identify the partition with the most current date stamp, as this is typically the active partition. For the example cable modems we used at DEF CON IoT Village, partition 5 was found to have the most current date stamp.

Extracting the active partition

The next step is to extract the partition with the newest date stamp (Partition 5). To do this, we first need to identify which Small Computer System Interface (SCSI) disk partition 5 is attached to. This can be identified by selecting Partition 5 with the Disks application and then read the “Device:" as shown below in Figure 7:

Hands-On IoT Hacking: Rapid7 at DEF CON 30 IoT Village, Pt. 2

Figure 7: Device

Also remember to record the “Device:" information. You'll need this during several of the future steps. In our example, we see that this is /dev/sdd5, as shown in Figure 7.

To extract the partition image, we launched the Terminal application on your Linux host to gain access to the command line interface (CLI). Once the CLI is opened, create a storage area to hold the partition binary and file system data. In our example, we created a folder for this called /Desktop/Work.

From CLI within the /Desktop/Work folder, we ran the Linux dd command to make a binary copy of Partition 5. We used the following command to make sure we used the device location that Partition 5 was connected to: /dev/sdd5. A sample output of this dd command is shown below in Figure 8:

  • dd command arguments:
    if=file Read input
    of=file Write output
  • dd if=/dev/sdd5 of=part5.bin
Hands-On IoT Hacking: Rapid7 at DEF CON 30 IoT Village, Pt. 2

Figure 8: dd Command

Note: Before proceeding, we highly recommend that you make a binary copy of the Cable Modem full NAND flash. This may come in handy if anything goes wrong and you need to return the device to its original operation mode. This can be done by running the following dd command against the full “Device:". In this example that would be /dev/sdd

  • dd if=/dev/sdd of=Backup_Image.bin

Unsquashfs the partition binary

Next, we'll extract the file system from the Partition 5 image that we dd'd from the cable modem in the previous steps. This file system was determined to be a Squash file system, a type commonly used on embedded devices.

Note: A Squash file system is a compressed read-only file system commonly found on embedded devices. Since the file system is read-only, it is not possible to make alteration of that files system while it is in place. To make modifications, the file system will need to be extracted from the device's storage and uncompressed, which is what we'll do in the following exercise steps.

So, your first question may be, “How do we know that this is a squash file system?" If you look at the partition data in the application “disks", you will see that “Content:" shows (squashfs 4.0)

Hands-On IoT Hacking: Rapid7 at DEF CON 30 IoT Village, Pt. 2

Another simple option to identify the content of the file is to run the file command against the binary file extracted from modem with the dd command and view the output. An example of this output is shown below in Figure 9:

  • file part5.bin
Hands-On IoT Hacking: Rapid7 at DEF CON 30 IoT Village, Pt. 2

Figure 9: Ouput from File Command

To gain access to the partition binary squash file system, we will be extracting/unpacking the squash file system using the unsquashfs command. A squash file system is read-only and cannot be altered in place – the only way to alter a squashfs is to unpack it first. This is a simple process and is done by running the unsquashfs command against the binary file part5.bin:

  • unsquashfs part5.bin
Hands-On IoT Hacking: Rapid7 at DEF CON 30 IoT Village, Pt. 2

Once the command completes you should now have a folder called “squashfs-root". This folder contains the extracted embedded Linux root file systems for the cable modem.

In our next post, we'll cover how to modify the data we just extracted. Check back with us next week!